


How to Deploy and Manage Device Access Control
Learn how to block USB storage and control peripheral access on managed endpoints: create policies, add trusted devices, grant temporary access, and deploy.
How to Deploy and Manage Device Access Control
Overview:
Why uncontrolled peripherals are a data-loss gap, not just a hygiene one
A USB drive is the quietest way data leaves an organization. Nobody has to break in, nothing trips a firewall, and the copy takes seconds. On the other side of the same port, an unknown keyboard or other input device can be plugged in to inject keystrokes. Either way, the question an auditor asks is the same: was the port governed before the device was plugged in, and can you prove it?
The problem organizations run into is rarely a lack of policy on paper. It is enforcement: which endpoints actually block removable storage, which exceptions were granted, who approved them, whether the exception ever expired, and whether anyone can produce that record months later.
The Device Access Control module closes that gap by treating peripheral access as a managed policy. You define the rule once (device type plus access level), register the specific devices you trust, grant time-boxed exceptions when someone genuinely needs a blocked device, and push the result to endpoints through a tracked deployment.
This guide walks the full workflow end to end: an access control policy with per-device-type rules, a trusted device list, a temporary access window, a deployment that applies the policy to real endpoints, and the task output that proves it landed.
- Reduce exposure: every managed endpoint enforces a known access level per device class instead of relying on whatever the user plugs in.
- Prove compliance: policies, deployments, and task logs give you evidence on demand instead of a fire drill before an audit.
- Allow the exceptions you need: trusted devices and temporary access windows let legitimate work continue without weakening the baseline rule.
- Expire access automatically: a temporary grant ends on its own; nobody has to remember to revoke it.
- Remove manual work: one policy scales to every targeted endpoint; there is no per-machine device manager or registry change to make by hand.
Prerequisites
Confirm all five before creating a policy. A missing prerequisite usually surfaces mid-deployment, when a policy is already half applied and harder to walk back cleanly.
- Administrator access: your account holds a role permitted to manage the Device Access Control module. Read-only operators can view policies and status but cannot create or publish them.
- Agent installed and reporting: the endpoint agent is installed, registered, and reporting healthy on every target device. Devices not yet enrolled are invisible to any deployment.
- Device inventory known: you know which device classes matter to you (removable storage, keyboards, printers, Bluetooth adapters, and so on) and which specific devices must stay usable.
- Device identifiers on hand: for every trusted device, have its Vendor ID, Product ID, and Serial Number ready. Trusted devices are matched on these values.
- Endpoint scope defined: target devices are organized so a deployment can be scoped deliberately (specific endpoints, departments, or locations) rather than applied ad hoc.
Architecture: how a policy becomes an enforced port
The rule, the exceptions, and the enforcement travel through distinct stages: a policy defines the rule, trusted devices and temporary access define who is exempt, a deployment binds the policy to specific endpoints, and the agent on the endpoint applies it and reports back.
| Stage | Component | Role |
|---|---|---|
| Definition | Access Control Policy | One or more device type rules, each with an access level |
| Exemption (permanent) | Trusted Device | A specific device, identified by Vendor ID, Product ID, and Serial Number, that stays allowed |
| Exemption (time-boxed) | Temporary Access | A device type allowed on one endpoint for a fixed duration or a time window |
| Binding | Deployment | Scope (endpoints, departments, locations), deployment type (Apply Policy), deployment policy, notification |
| Execution | Endpoint agent | Receives the task, applies the policy, reports the result |
| Proof | Policy Status and task output | Per-endpoint state and a log of what the agent actually did |
Pro tip: Decide your exceptions before you write the block rule. A Block rule with no trusted devices or temporary access path tends to generate support tickets on day one.
Step 1: Open the Device Access Control module
Navigate to the module and get oriented before creating anything, so you know where policies, exceptions, deployments, and status each live.
Instructions
- From the main console, open the Device Access Control module.
- Note the five sections in the left sidebar: Access Control Policies, Trusted Devices, Temporary Access, Policy Status, Deployments.
- Open Access Control Policies to see any existing policies. The list shows Name, Device Type Rules, Rules Count, and Actions (edit or delete).
Path: Console / Device Access Control
Result: You're in the Device Access Control module. Policies, exceptions, and deployments each have their own section, and nothing is enforced until a policy is deployed in Step 6.
Step 2: Create an access control policy
Define what happens to each device class in a single reusable policy.
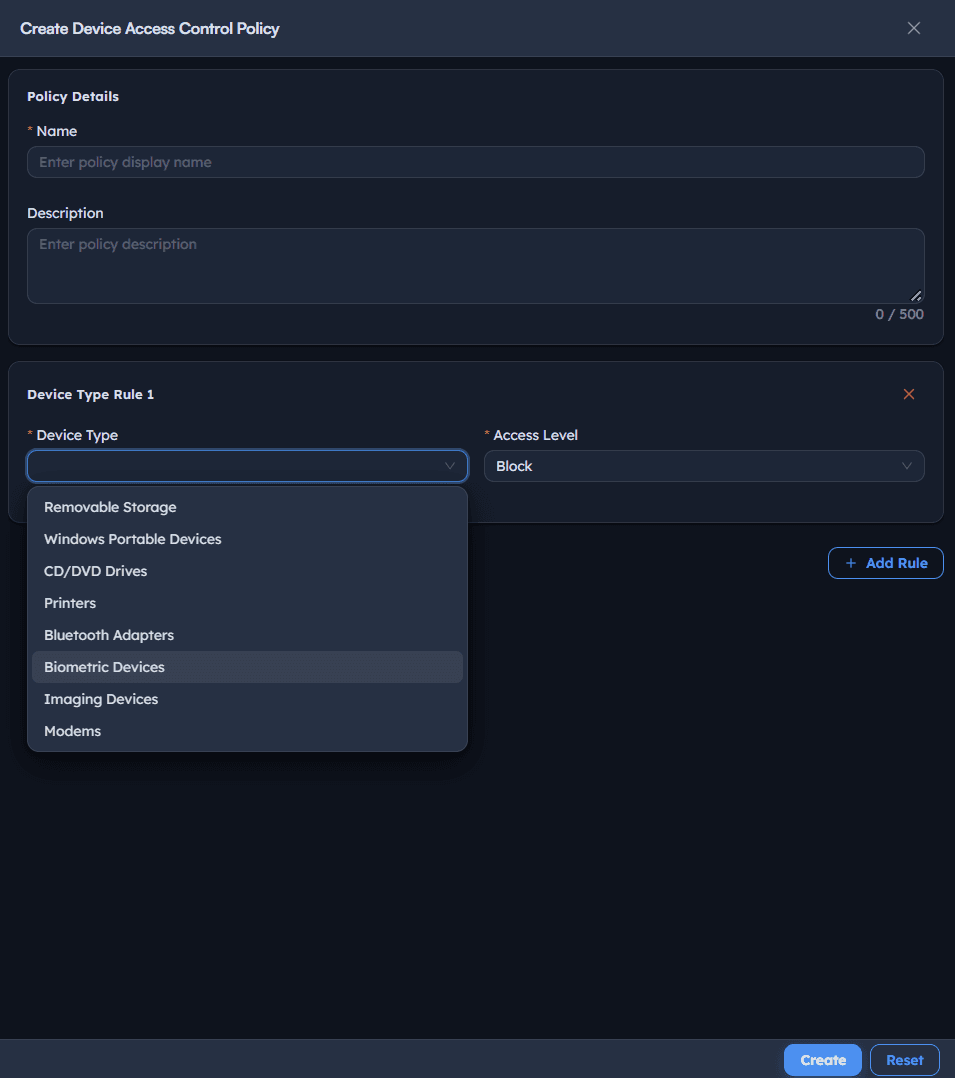
Instructions
- Go to Access Control Policies → Create.
- Enter a Name that describes what the policy enforces (e.g. Block Keyboard). Add an optional Description (up to 500 characters).
- Select Add Rule to create Device Type Rule 1.
- Set Device Type from the dropdown (e.g.
Keyboards). Available types include Removable Storage, Windows Portable Devices, CD/DVD Drives, Printers, Bluetooth Adapters, Biometric Devices, Imaging Devices, Modems, Keyboards, Mice, and Smart Card Readers. - Set Access Level to one of the available options:
No Change,Allow Trusted Devices, orBlock. - Select Add Rule again to add more device types to the same policy, then select Create.
Path: Console / Device Access Control / Access Control Policies / Create
Console: policy settings
| Field | Value |
|---|---|
| Name | Block Keyboard |
| Device Type (Rule 1) | Keyboards |
| Access Level (Rule 1) | Block |
Result: The policy appears in the Access Control Policies list with its rule count. It is not attached to any endpoint yet: that happens in Step 6.
Important: Choosing Allow Trusted Devices reveals a Trusted Devices field on the rule. Select the devices that stay allowed under this rule; every other device of that type is blocked.
Warning: Blocking Keyboards on a machine with no other input path can lock a user out. Test on a single endpoint first, and prefer Allow Trusted Devices over a blanket Block for input devices.
Step 3: Register trusted devices
Build the list of specific devices that must keep working even when their device class is restricted.
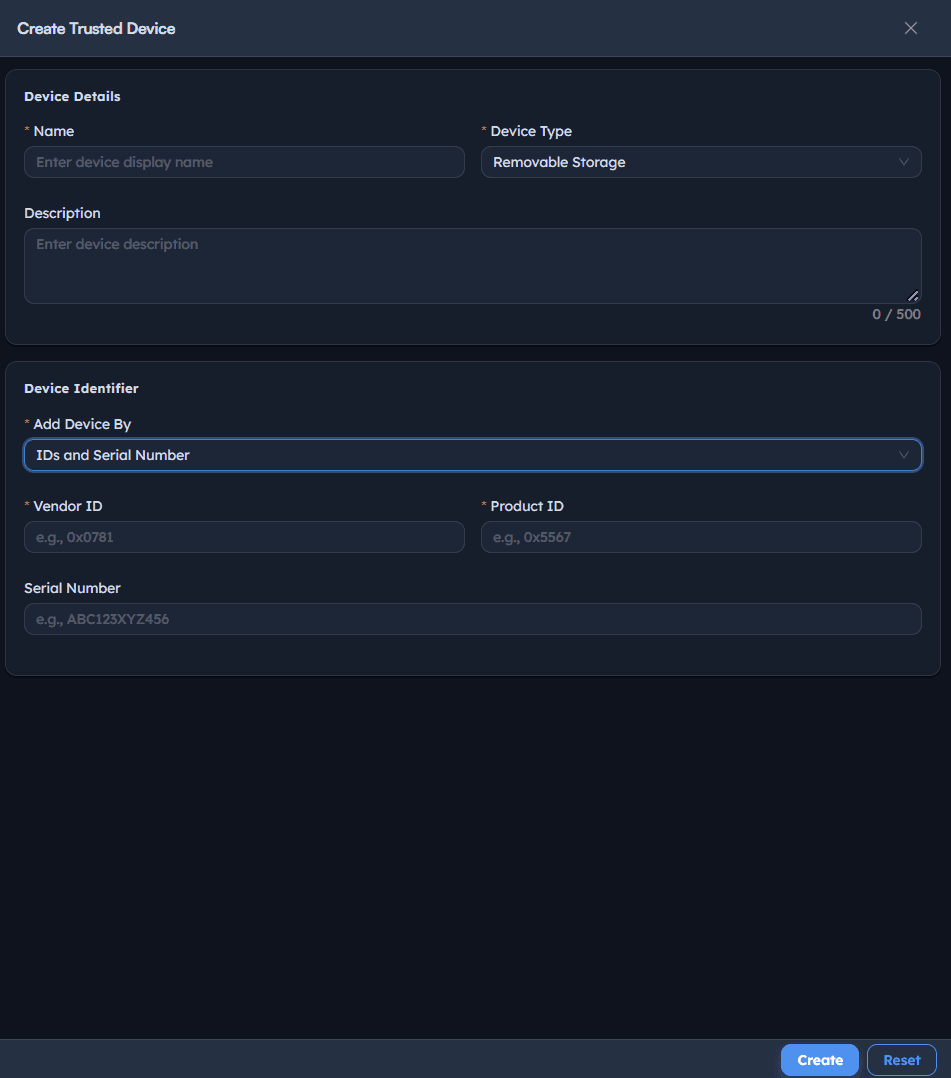
Instructions
- Go to Trusted Devices → Add Trusted Device.
- Enter a Name (e.g. Keyboard device) and choose the Device Type (e.g.
KeyboardsorRemovable Storage). Add an optional Description. - Under Device Identifier, set Add Device By to
IDs and Serial Number. - Enter the Vendor ID, Product ID, and Serial Number of the device.
- Select Create.
Path: Console / Device Access Control / Trusted Devices / Add Trusted Device
Console: trusted device settings
| Field | Value |
|---|---|
| Name | Keyboard device |
| Device Type | Keyboards |
| Add Device By | IDs and Serial Number |
| Vendor ID | <VENDOR-ID> |
| Product ID | <PRODUCT-ID> |
| Serial Number | <SERIAL-NUMBER> |
Result: The device appears in the Trusted Devices list with its Name, Device Type, Add Device By, and Device Instance Path, ready to be referenced by any policy rule set to Allow Trusted Devices.
Best practice: Match on Vendor ID, Product ID, and Serial Number together. A Vendor ID alone would trust every device from that manufacturer.
Step 4: Grant temporary access
Give one endpoint short-lived access to a blocked device class without changing the baseline policy.
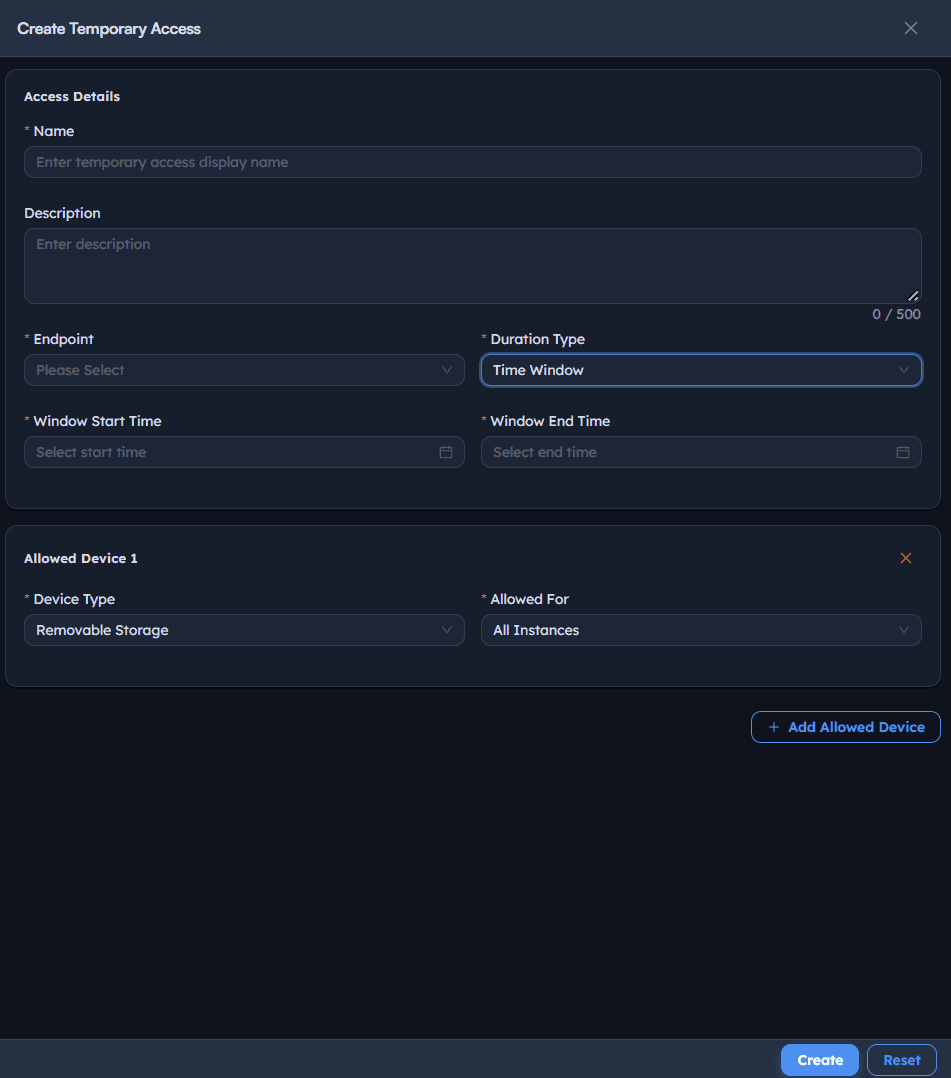
Instructions
- Go to Temporary Access → Create.
- Enter a Name (e.g. Temp Access) and an optional Description.
- Select the Endpoint that needs the exception.
- Choose a Duration Type:
Fixed Duration: set Duration Value and Duration Unit (e.g.2Hours).Time Window: set Window Start Time and Window End Time from the date and time picker.
- Select Add Allowed Device, choose the Device Type (e.g.
Keyboards), and set Allowed For toAll Instances. - Select Create. To change it later, open the entry with the edit icon and select Update.
Path: Console / Device Access Control / Temporary Access / Create
Console: temporary access settings
| Field | Value |
|---|---|
| Name | Temp Access |
| Endpoint | <ENDPOINT-HOSTNAME> |
| Duration Type | Time Window |
| Window Start Time | <START-DATE-TIME> |
| Window End Time | <END-DATE-TIME> |
| Allowed Device Type | Keyboards |
| Allowed For | All Instances |
Result: The entry appears in the Temporary Access list with its Endpoint, Duration Type, Duration, Devices count, and Status. A future window shows Pending; once the window closes the status changes to Expired.
Pro tip: Prefer a Time Window when the need is tied to a specific event (a vendor visit, a maintenance slot) and Fixed Duration when it starts whenever the work starts.
Warning: An entry with a Devices count of 0 grants nothing. Confirm the allowed device was added before you rely on the exception.
Step 5: Review existing deployments
Understand how the module tracks enforcement before you publish anything new.
Instructions
- Go to Deployments.
- Read the list columns: Deployment (ID and name), Type (
ApplyorRemove), Stage (e.g.Initiated,Completed), Progress (e.g.1/1endpoints), and Policy (e.g. OOB Instant deployment policy). - Use the eye icon on a row to open its task details.
Path: Console / Device Access Control / Deployments
Result: You can see the history of every policy applied or removed, including any deployment whose progress bar shows a failure.
Best practice: Keep deployment names specific (Block Keyboard, Unblock Keyboard). The list is your change history, and vague names make it useless in an audit.
Step 6: Deploy the policy to endpoints
Bind the policy to actual devices with a deployment of type Apply Policy.
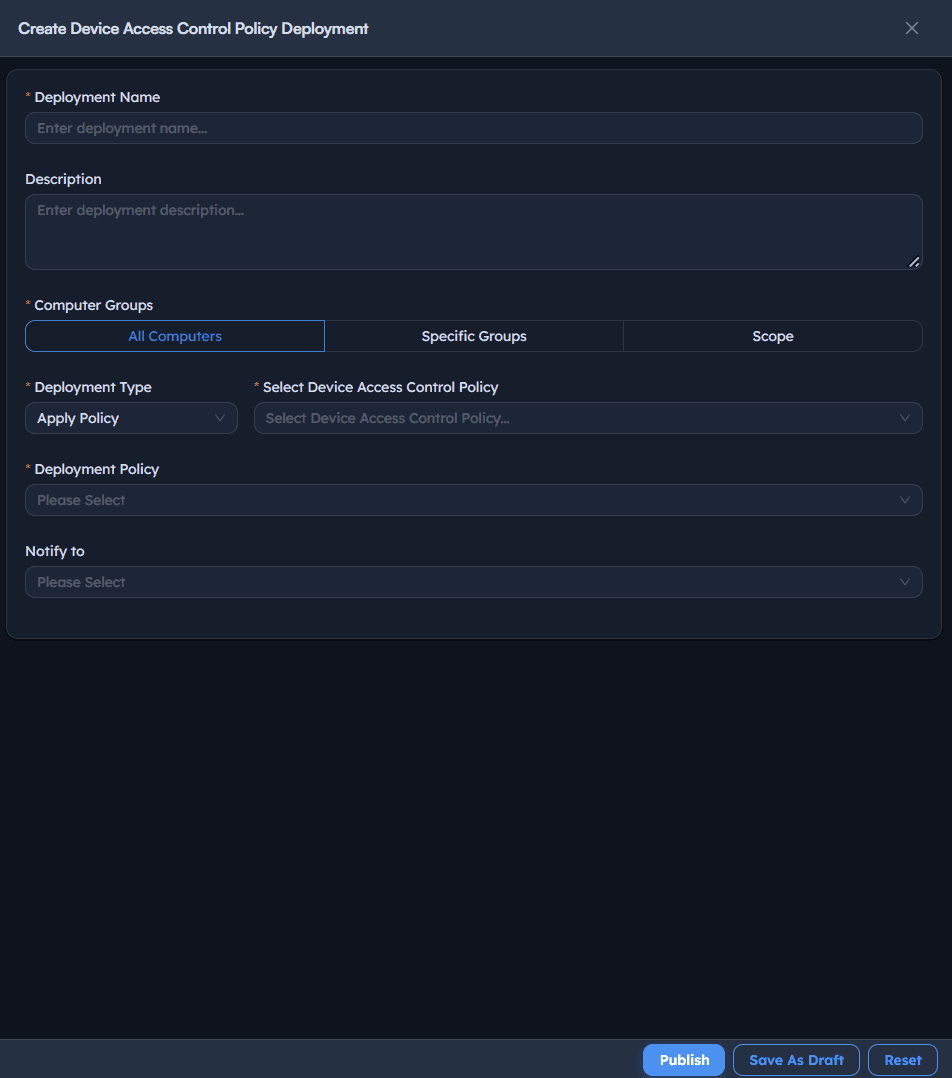
Instructions
- Go to Deployments → Create.
- Enter a Deployment Name (e.g. Block Keyboard) and an optional Description.
- Set Scope to
Specific Endpoints(orAll Endpoints,Specific Departments,Specific Locations, orWindowsfor broader rollout) and select the target device(s) under Endpoints. - Set Deployment Type to
Apply Policy. - Under Select Device Access Control Policy, choose the policy created in Step 2.
- Set Deployment Policy to
OOB Instant deployment policy. - Optionally set Notify to so an admin or team is alerted.
- Select Publish, or Save As Draft to finish later.
Path: Console / Device Access Control / Deployments / Create
Console: deployment definition
| Field | Value |
|---|---|
| Deployment Name | Block Keyboard |
| Scope | Specific Endpoints |
| Endpoints | <ENDPOINT-HOSTNAME> |
| Deployment Type | Apply Policy |
| Device Access Control Policy | Block Keyboard |
| Deployment Policy | OOB Instant deployment policy |
Result: A new deployment (e.g. <TASK-ID> – Block Keyboard) appears at the top of the Deployments list with type Apply and stage Initiated, moving to Completed once the endpoint reports back.
Warning: Publishing a deployment scoped to All Endpoints applies the policy fleet-wide immediately. Confirm scope carefully before publishing, and start with a specific endpoint to confirm behaviour.
Step 7: Verify the deployment and read the task output
Confirm the policy actually landed on the endpoint using the task view and log rather than the stage label alone.
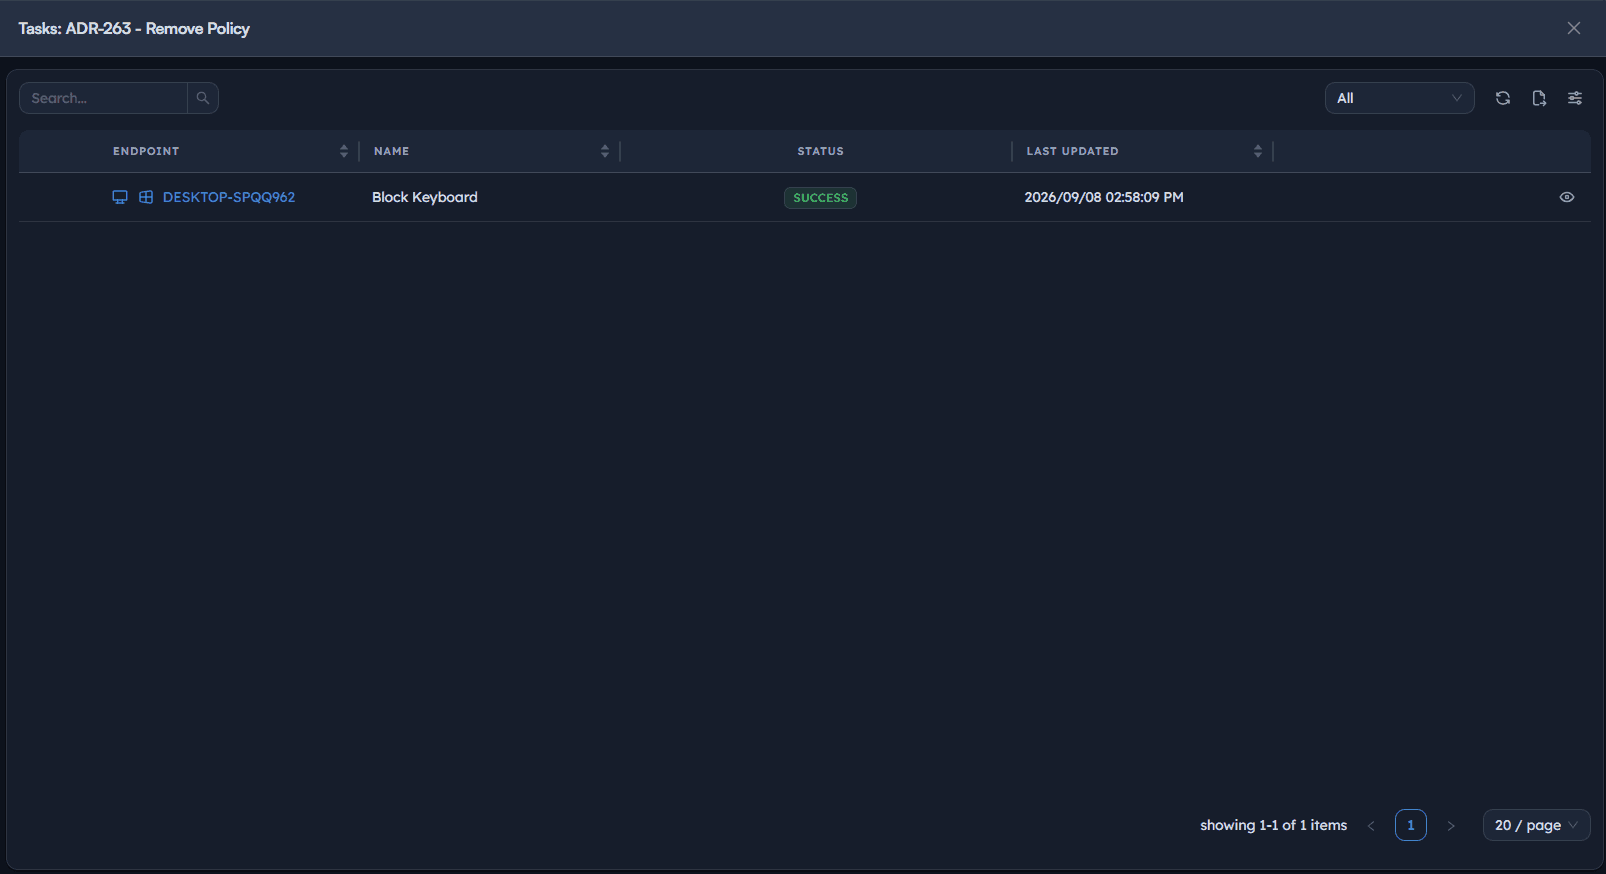
Instructions
- In Deployments, select the eye icon on the deployment you just published.
- In the Tasks dialog, find the target endpoint's row and read its Status (for example
Ready to Deploy, then success) and Last Updated time. - Open the task output to read the agent log. A healthy run shows the agent starting the access control policy task, applying the named policy, and reporting that the policy was applied successfully.
- Return to the Deployments list and confirm the stage reads
Completedwith progress1/1.
Path: Console / Device Access Control / Deployments / Tasks
Result: You have per-endpoint evidence that the policy was applied, with a timestamped log entry.
Pro tip: If a task stays at Ready to Deploy, the endpoint is usually offline or asleep. The task completes when the agent next checks in.
Step 8: Check policy status
Use the Policy Status section for an ongoing view of what is applied where, once deployments have completed.
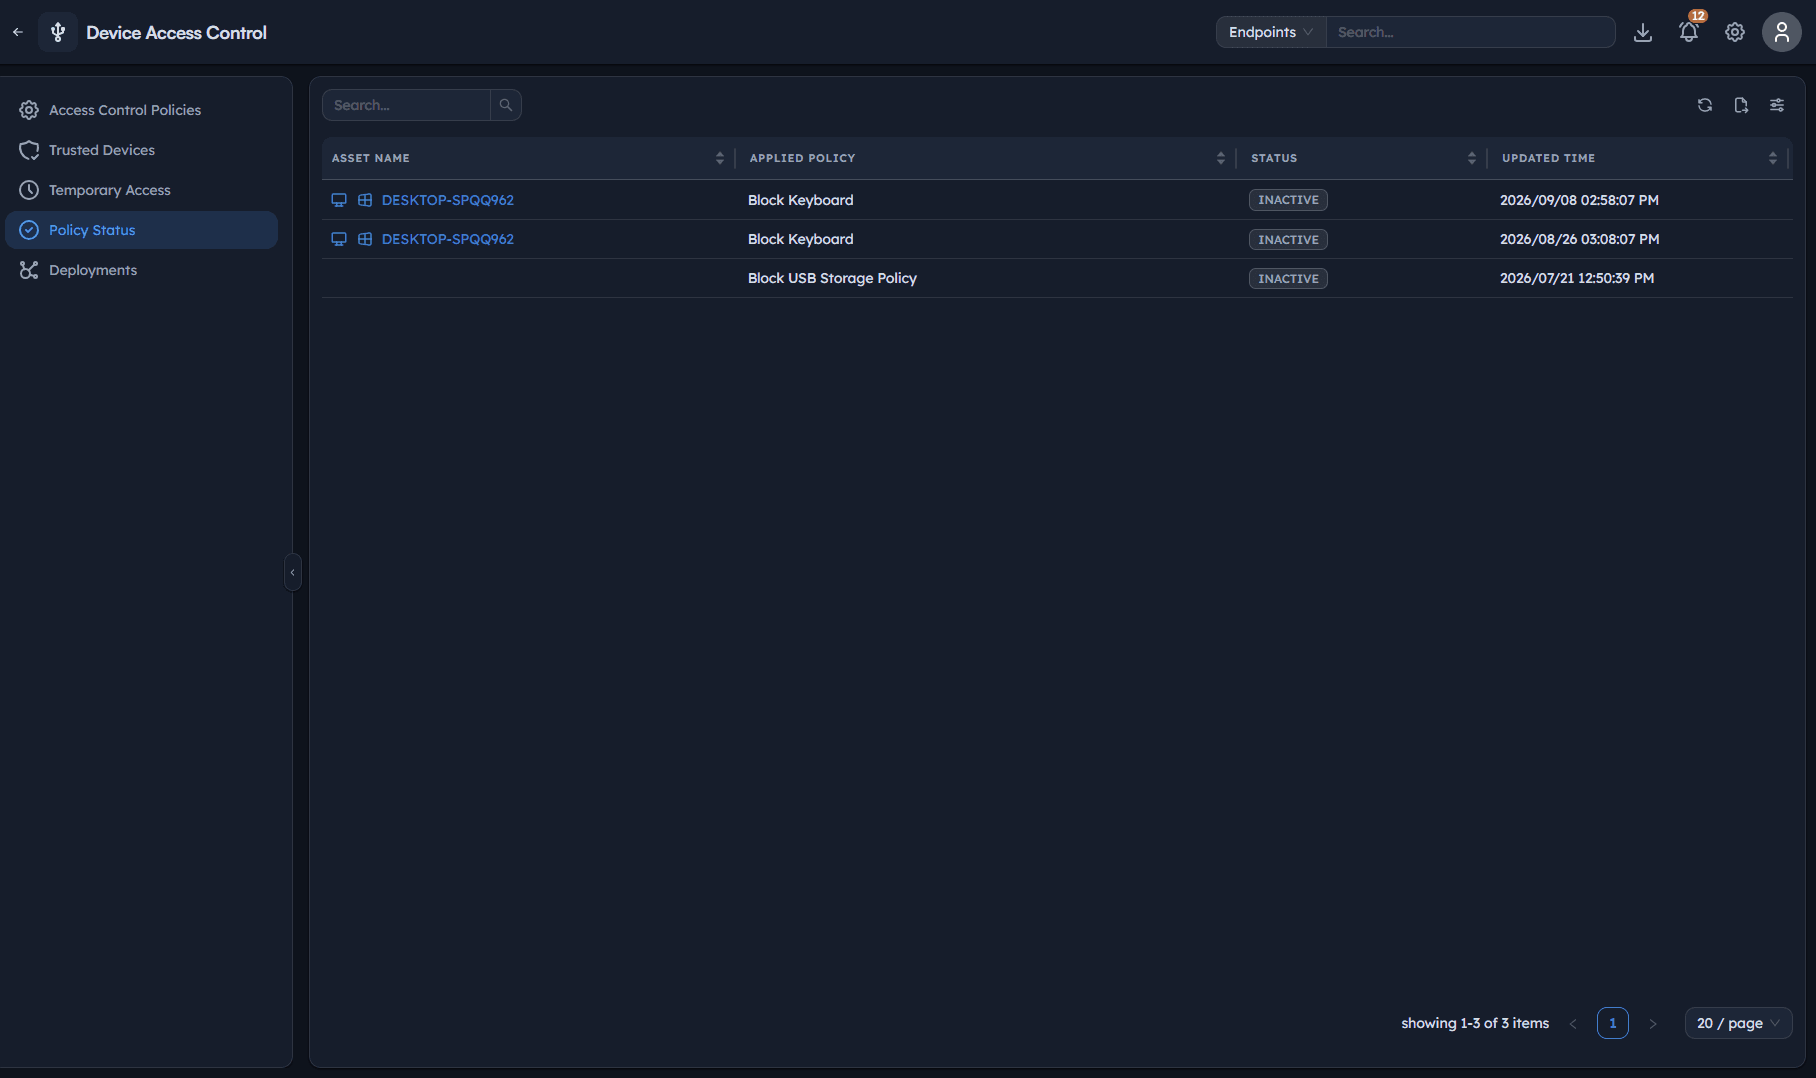
Instructions
- Go to Policy Status.
- Review the per-endpoint entries for the policy you deployed.
- Investigate any endpoint that does not show the policy as applied after its deployment reports
Completed.
Path: Console / Device Access Control / Policy Status
Result: A view you can reference when someone asks which endpoints currently enforce a given policy.
Best practice: Re-check status a day after deployment, not immediately. Devices that were offline during the initial push need time to check in and complete.
Step 9: Remove a policy when needed
Reverse a restriction through a tracked deployment rather than an ad hoc change on the endpoint, so the action stays auditable.
Instructions
- Go to Deployments → Create.
- Name it for the action (e.g. Unblock Keyboard).
- Set Scope and Endpoints to the machines the policy should come off.
- Set Deployment Type to the removal option and select the policy to remove.
- Set Deployment Policy and select Publish.
- Confirm the deployment appears in the list with type
Removeand stageCompleted.
Path: Console / Device Access Control / Deployments / Create
Result: The restriction is lifted through a tracked action, with the same task and log visibility as the original apply.
Warning: If the endpoint is still in scope of another deployment that applies the same policy, the restriction can return. Check the Deployments list for overlapping applies before relying on a removal.
Best practices for Device Access Control
| Practice | Why it matters | Recommended setting |
|---|---|---|
| Block by device type, allow by trusted device | Keeps the baseline strict while letting known-good hardware work | Allow Trusted Devices on rules where users have legitimate devices |
| Identify trusted devices by ID and serial number | Prevents a whole vendor's product line from being trusted by accident | Vendor ID + Product ID + Serial Number |
| Use temporary access for one-off needs | Exceptions end on their own instead of lingering | Time Window for events, Fixed Duration for tasks |
| Name deployments by intent | The Deployments list doubles as your change history | Block Keyboard, Unblock Keyboard |
| Pilot before fleet-wide | A single bad rule can block input devices everywhere | Specific Endpoints before All Endpoints |
| Confirm with the task log | Stage labels alone do not show what the agent did | Read the task output for each pilot endpoint |
| Review temporary access regularly | Expired and pending entries pile up over time | Delete expired entries you no longer need |
Troubleshooting: common issues and resolutions
| Issue | Cause | Resolution |
|---|---|---|
Deployment stuck at Initiated | Endpoint is offline, asleep, or the agent has not checked in | Confirm the device is online; the task completes on next check-in |
Task shows Ready to Deploy and does not progress | Agent has not picked up the task | Check agent health on the endpoint; re-publish if needed |
| Trusted device is still blocked | Rule access level is Block, not Allow Trusted Devices, or the identifiers do not match | Set the rule to Allow Trusted Devices, select the device, and re-check its Vendor ID, Product ID, and Serial Number |
| Temporary access has no effect | Entry has 0 devices, or the window has not started or has already expired | Add an allowed device; confirm the window and the status (Pending or Expired) |
| Policy comes back after removal | Another deployment still applies it to that endpoint | Review the Deployments list and remove or adjust the overlapping apply |
| Users locked out of input devices | A blanket Block on Keyboards or Mice | Grant temporary access to recover, then change the rule to Allow Trusted Devices |
| Deployment progress bar shows red | The task failed on one or more endpoints | Open the task output, read the log for the error, and re-publish to the affected endpoint |
Frequently asked questions
Device Access Control is a module that lets administrators block or allow peripheral devices, such as USB storage, keyboards, printers, and Bluetooth adapters, on managed Windows endpoints through central policies instead of per-machine settings.
Create an access control policy with a rule whose Device Type is Removable Storage and whose Access Level is Block. Then create a deployment of type Apply Policy, select that policy and your target endpoints, and publish it.
A trusted device is a permanent exemption for one specific piece of hardware, identified by Vendor ID, Product ID, and Serial Number. Temporary access is a time-boxed exemption for a device type on one endpoint, and it expires on its own.
You can set Scope to All Endpoints, but start with a specific endpoint to confirm behaviour first. A rule that blocks input devices can lock users out if it is wrong.
The entry's status changes to Expired and the exception no longer applies, so the endpoint returns to the baseline policy without any manual step.
Create a deployment that removes the policy from that endpoint, then confirm it shows as Completed in the Deployments list. Check that no other deployment still applies the same policy there.