


How to Configure Security Policies
Security Policies in the Trinetri platform by selecting a Computer or User configuration level, enabling or disabling specific Group Policy settings, and deploying the policy to selected endpoints. The guide covers policy creation, deployment scope, monitoring deployment status, and verifying the exact registry changes applied on endpoints.
How to Configure Security Policies
Overview
Why a security policy needs a configuration level before anything else
A security policy is only as useful as the catalog of settings it draws from, and that catalog changes completely depending on who the policy targets. A policy aimed at a computer covers a small, fixed set of machine-wide restrictions. A policy aimed at a user opens up a much larger catalog organized into categories like Desktop, Internet Explorer, Network, System, and more. Picking the wrong configuration level first means building against the wrong list of settings entirely.
Security Policies is built around that split: choose a Configuration Level (Computer or User), pick the individual policies to Enable or Disable from whichever catalog that level exposes, save the policy, then deploy it to the endpoints that should receive it. Every deployment reports its own stage and progress, and a per-endpoint output log shows exactly which registry values were set, deleted, or reverted.
This guide walks the full workflow end to end: opening the Security Policies module, building a Computer-level policy, building a User-level policy from the larger catalog, deploying a policy to specific endpoints, and confirming the deployment applied the expected registry changes on a live endpoint.
- Configuration Level changes the entire catalog: Computer level exposes a small, fixed policy list; User level exposes a multi-category catalog (Desktop, Internet Explorer, Network, System, Active Desktop, Explorer, Start Menu and Taskbar, Task Scheduler, Windows Installer, Control Panel, and more).
- Every individual policy is a three-way switch: each setting is Enable, Disable, or Not Configured - leaving it Not Configured means the policy doesn't touch that setting at all.
- The Apply checkbox label follows the configuration level: it reads Apply On Startup for Computer-level policies and Apply On User Login for User-level policies.
- Deployment scope is the same across modules: target All Endpoints, Specific Endpoints, Specific Departments, Specific Locations, or Windows devices from a single deployment.
- The output log names the exact registry change: each applied policy logs whether a registry value was set to a specific value or deleted to revert to the OS default.
- See deployment status per task: Stage (Initiated/Completed) and per-endpoint task Status (Success/Failed) are both tracked, alongside the full output log.
Prerequisites
Confirm these before creating a security policy. Picking the wrong Configuration Level, or leaving every setting at Not Configured, are the most common reasons a "created" policy has no real effect once deployed.
- Administrator access: your account holds a role permitted to manage the Device Control -> Security Policies module.
- Agent installed and reporting: the endpoint agent is installed, registered, and reporting healthy on every target device you plan to deploy to.
- Configuration Level decided: know whether the restrictions you need belong at the Computer level (a small, fixed set) or the User level (the larger, category-based catalog), since the two expose entirely different policy lists.
- Individual settings identified: have a clear list of which specific policies should be Enabled or Disabled, rather than working through every category live during creation.
- Deployment scope confirmed: know whether this policy should go to specific endpoints, a department, a location, or the whole fleet.
Architecture: how a security policy definition becomes a registry change
A security policy entry defines which individual settings are enabled or disabled for a given configuration level. A deployment decides which endpoints receive it and under what policy. The output log is the record of what the endpoint agent actually changed.
| Stage | Component | Role |
|---|---|---|
| Definition | Security Policy entry | Name, Configuration Level, and the Enable/Disable/Not Configured state of each catalog setting |
| Catalog | Group Policies | The category tabs and individual settings exposed for the chosen Configuration Level |
| Targeting | Deployment Scope | All Endpoints, Specific Endpoints, Specific Departments, Specific Locations, or Windows |
| Enforcement | Deployment Policy | Governs how and when the deployment is pushed to targeted endpoints |
| Execution | Endpoint agent | Sets or deletes the specific registry value backing each enabled or disabled policy |
| Proof | Task Status and Output | Per-endpoint Success/Failed status with a log naming each registry value touched |
Pro tip: Settings left at Not Configured are skipped entirely by the endpoint agent - they're not the same as Disable. Only switch a setting to Enable or Disable if you specifically want that policy applied.
Step 1: Open Security Policies
Get oriented before creating anything, so you know where policies and deployments each live.
Instructions
- From the main console, go to Endpoints -> Device Control.
- Select the Security Policies module.
- Note the two sections in the left sidebar: Security Policies (definitions) and Security Policy Deployments (rollouts and status).
Path: Console / Endpoints / Device Control / Security Policies
Result: You're in the Security Policies module with visibility into any existing policies before authoring a new one.
Step 2: Create a Computer-level policy
Build a policy from the small, fixed catalog that applies at the machine level, independent of who signs in.
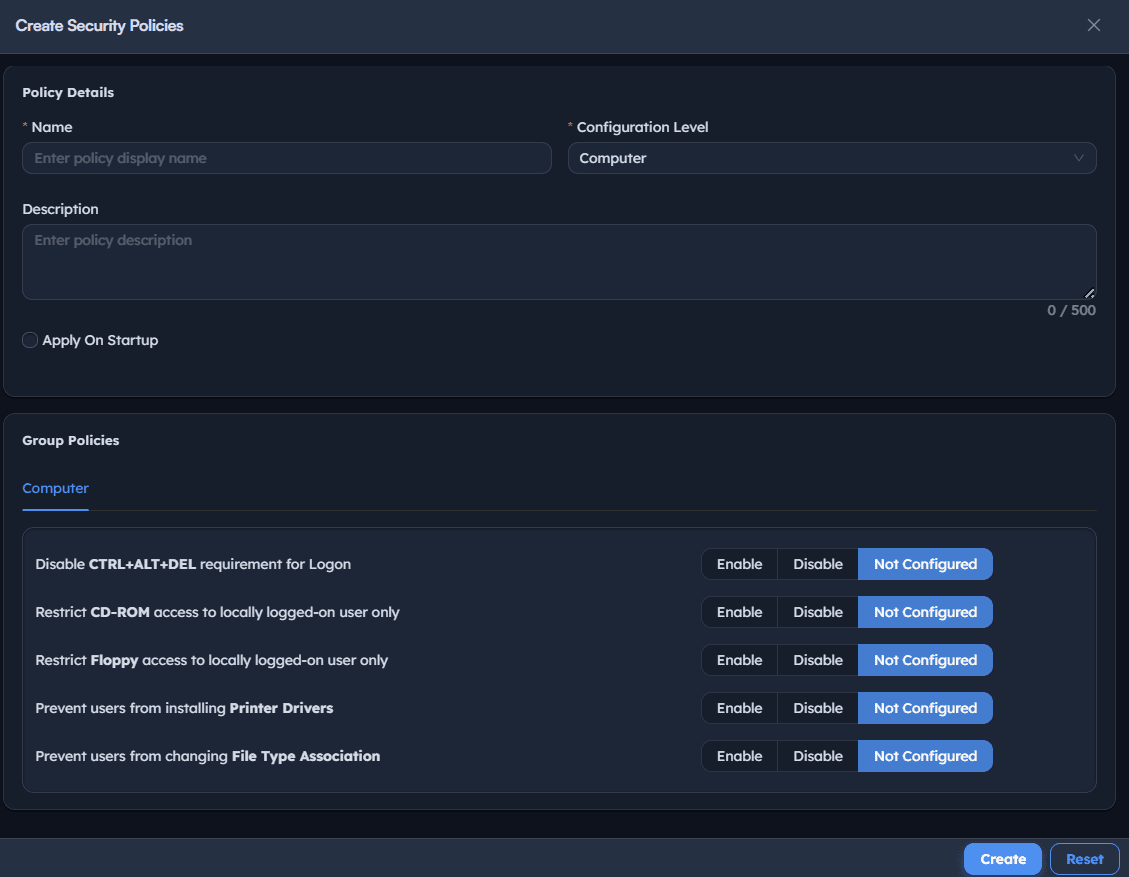
Instructions
- Go to Security Policies -> Create.
- Enter a Name describing the policy's intent, e.g. Windows Security.
- Set Configuration Level to
Computer. - Optionally enter a Description and toggle Apply On Startup if the policy should apply as soon as the machine boots.
- Under Group Policies -> Computer, set each relevant setting to
EnableorDisable, leaving the rest atNot Configured.
Path: Console / Device Control / Security Policies / Create
Console: Computer-level catalog
| Policy | Enable / Disable / Not Configured |
|---|---|
| Disable CTRL+ALT+DEL requirement for Logon | Enable |
| Restrict CD-ROM access to locally logged-on user only | Enable |
| Restrict Floppy access to locally logged-on user only | Not Configured |
| Prevent users from installing Printer Drivers | Not Configured |
| Prevent users from changing File Type Association | Not Configured |
Result: The policy's Computer-level settings are staged. Nothing is applied to an endpoint yet - that happens once the policy is deployed in Step 4.
Important: The Computer-level catalog is intentionally small. If the setting you need isn't listed here, it likely belongs to the User-level catalog instead - check Step 3 before assuming a restriction isn't available.
Step 3: Create a User-level policy from the group policy catalog
Switch to the User configuration level to reach the full, category-based catalog of settings.
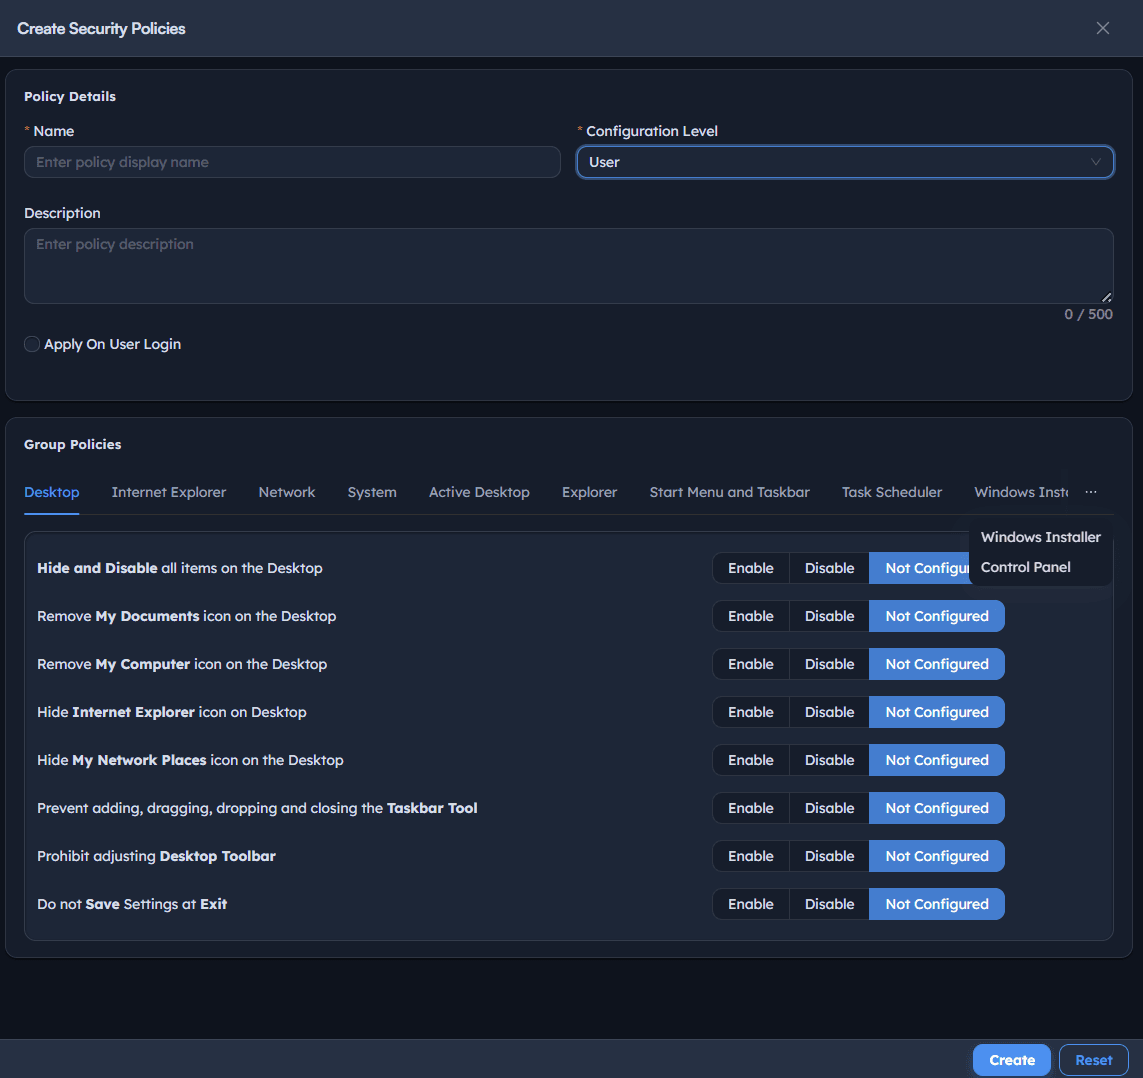
Instructions
- In Configuration Level, choose
User. The Apply On Startup checkbox becomes Apply On User Login, and the Group Policies section switches to a row of category tabs. - Browse the tabs - Desktop, Internet Explorer, Network, System, Active Desktop, Explorer, Start Menu and Taskbar, Task Scheduler, Windows Installer, Control Panel, and more - to find the settings you need.
- Within any tab, set the relevant policies to
EnableorDisable.
Path: Console / Device Control / Security Policies / Create
Console: sample User-level tabs and policies
| Tab | Example policies |
|---|---|
| Desktop | Hide and Disable all items on the Desktop; Remove My Computer icon on the Desktop |
| Internet Explorer | Restrict using Save As menu option; Disable changing Proxy Settings |
| Network | Hide 'Entire Network' from Network Neighborhood; Ability to Enable/Disable LAN Connections |
| System | Restrict using Registry Editing Tools; Remove Task Manager |
| Active Desktop | Do not allow HTML wallpaper; Restrict changing Wallpaper |
| Explorer | Remove Shutdown from Start Menu and Task Manager; Turn on classic shell |
| Windows Installer | Always install with Elevated Privileges; Prohibit Rollback |
| Control Panel | Hide Add/Remove Programs Applet; Hide Accessibility Options Applet |
Result: A User-level policy is staged against the specific category settings you enabled or disabled, ready to be saved as its own policy or combined with a Computer-level policy under a different name.
Important: Switching Configuration Level replaces the entire Group Policies section - settings you configured under Computer aren't carried over to User, and vice versa. Decide the level first, then configure that level's catalog in one pass.
Step 4: Save the policy and deploy it to endpoints
Save the definition, then push it out to the endpoints that should receive it.
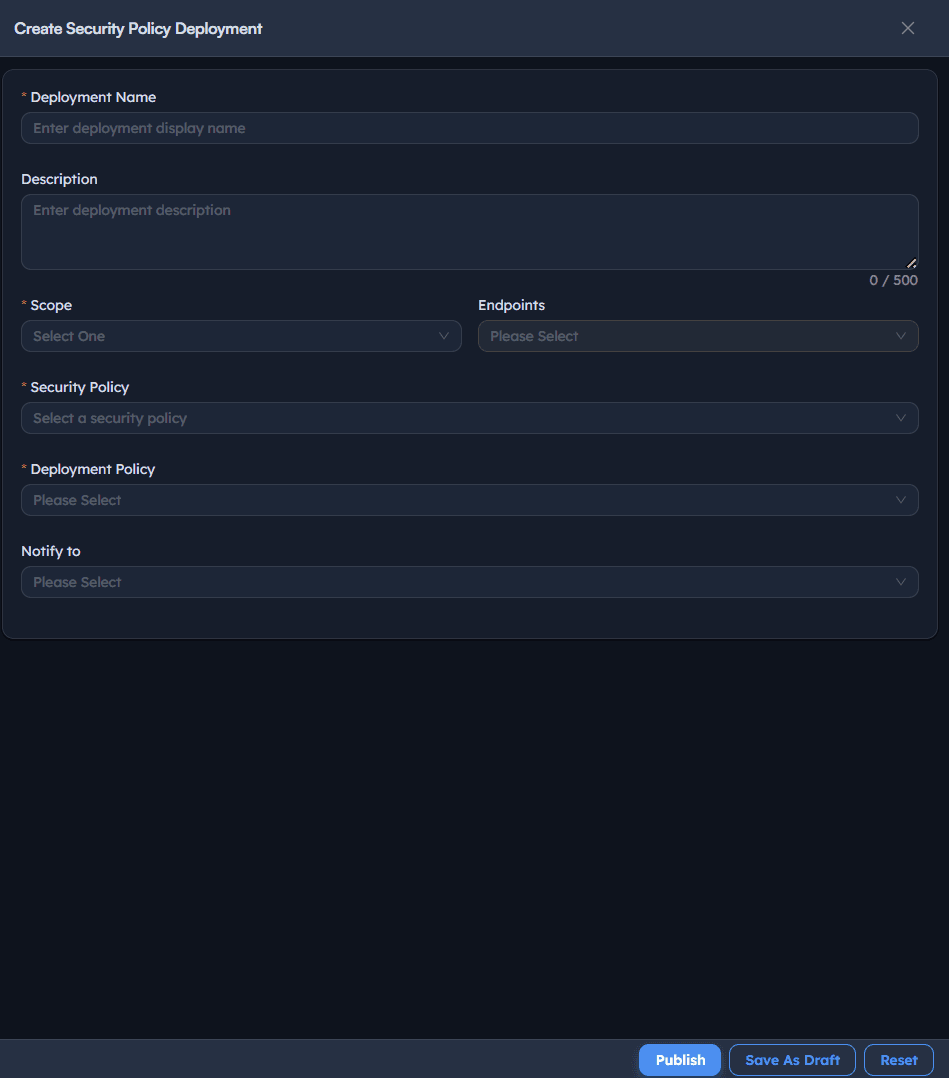
Instructions
- Select Create to save the policy. It appears in the Security Policies list with its Configuration Level.
- Go to Security Policy Deployments -> Create.
- Enter a Deployment Name, e.g. Windows Security, and an optional Description.
- Set Scope to
All Endpoints,Specific Endpoints,Specific Departments,Specific Locations, orWindows. - If you chose
Specific Endpoints, search and select each target endpoint under Endpoints. - Under Security Policy, choose the policy you created, e.g.
Windows Security. - Set Deployment Policy, e.g.
OOB Instant deployment policy. - Optionally set Notify To, then select Publish and confirm in the dialog asking "Are you sure you want to Publish Deployment: <deployment name>?"
Path: Console / Device Control / Security Policies / Security Policy Deployments / Create
Console: deployment definition
| Field | Value |
|---|---|
| Deployment Name | Windows Security |
| Scope | Specific Endpoints |
| Endpoints | <ENDPOINT-HOSTNAME> |
| Security Policy | Windows Security |
| Deployment Policy | OOB Instant deployment policy |
Result: A new deployment is created and immediately begins rolling out. It starts in the INITIATED stage with 0/1 progress before it's picked up by the targeted endpoint agent.
Warning: Choosing All Endpoints or a broad department/location scope pushes every enabled or disabled setting in the policy to every matching device at once. Confirm the scope before publishing rather than after.
Step 5: Monitor the deployment and confirm the registry changes
Verify the whole chain - policy, deployment, and endpoint agent - actually results in applied settings, rather than assuming the deployment succeeded.
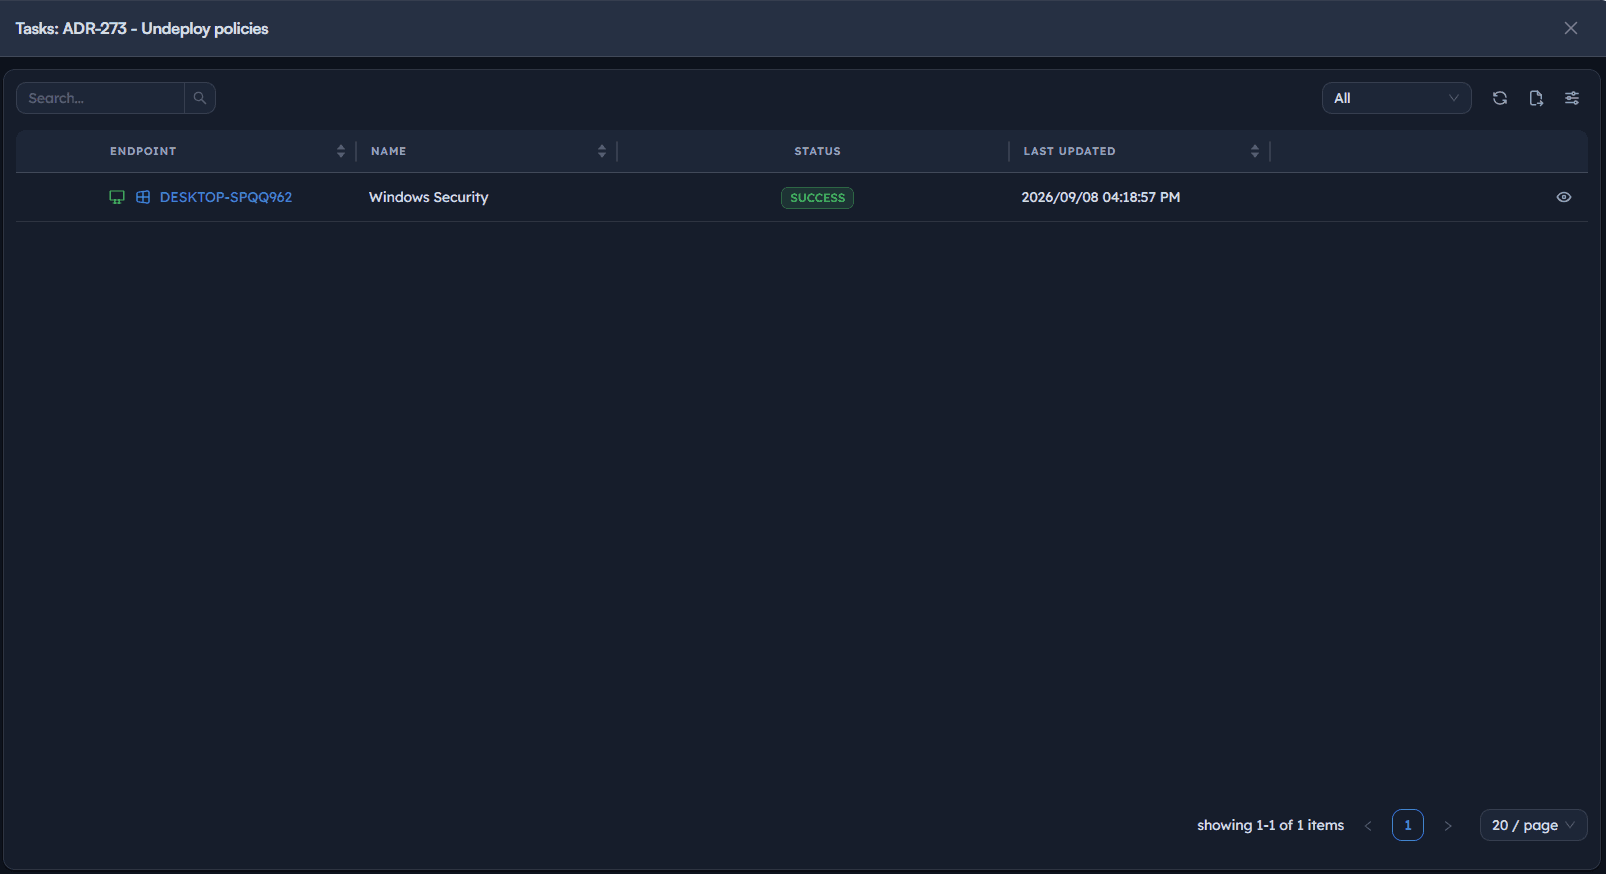
Instructions
- Return to Security Policy Deployments and locate the deployment by name.
- Read the Stage column:
INITIATEDmeans the deployment has started but not finished;COMPLETEDconfirms the endpoint agent finished applying it. - Select the deployment's view icon to open its Tasks list, showing each targeted endpoint's Status (
SUCCESSorFAILED) and Last Updated time. - Open a task's view icon to see the per-endpoint Output log.
Path: Console / Device Control / Security Policies / Security Policy Deployments
Console: deployment status
| Deployment | Type | Stage | Progress | Policy |
|---|---|---|---|---|
| <DEPLOYMENT-ID> - Windows Security | INSTALL | COMPLETED | 1/1 | OOB Instant deployment policy |
Result: Confirmed, evidence-backed rollout - the task output names the exact registry value each enabled or disabled setting touched, and any setting left at Not Configured is simply skipped rather than logged as applied.
Important: A setting that reverts to the OS default logs as Deleted rather than Set to a value. Both outcomes count toward the applied total; only a genuine failure to reach or write the endpoint counts as failed.
Best practices for security policies
| Practice | Why it matters | Recommended setting |
|---|---|---|
| Decide Configuration Level before configuring settings | Switching levels replaces the entire Group Policies section | Confirm Computer vs. User first, based on where the restriction belongs |
| Leave unrelated settings at Not Configured | Explicitly setting every visible policy risks unintended side effects | Only touch the specific settings the policy is meant to change |
| Keep Computer-level and User-level policies separate | The two catalogs serve different purposes and audiences | Create distinct, clearly named policies per configuration level |
| Scope deployments narrowly at first | A broad scope makes an unwanted registry change hard to walk back quickly | Start with Specific Endpoints, widen once verified |
| Check deployment Stage and task Status after every publish | Publishing and completing are different facts | Confirm COMPLETED and per-endpoint SUCCESS, not just that the deployment was created |
| Review the output log for new policies | Confirms the exact registry values a policy will touch | Open the Output log the first time you deploy a new policy |
Troubleshooting: common issues and resolutions
| Issue | Cause | Resolution |
|---|---|---|
| Security policy created but no endpoint behavior changed | The policy was never deployed | Go to Security Policy Deployments and publish a deployment targeting the policy |
| Expected setting isn't listed while building the policy | The setting belongs to the other Configuration Level's catalog | Switch Configuration Level between Computer and User and re-check the relevant tab |
Deployment stuck at INITIATED | Endpoint agent hasn't checked in, or lost connectivity mid-run | Confirm endpoint agent health and connectivity, then re-check the deployment |
Task Status shows FAILED for an endpoint | The agent couldn't reach the endpoint or write the registry value | Confirm endpoint agent health, then republish the deployment |
| A configured setting doesn't appear in the output log | The setting was left at Not Configured rather than Enable or Disable | Re-open the policy and confirm the setting's three-way switch |
| Wrong endpoints received the policy | Scope was set to a broader option than intended (e.g. a department instead of specific endpoints) | Re-check the deployment's Scope and Endpoints fields before publishing again |
Frequently asked questions
Computer level exposes a small, fixed set of machine-wide policies. User level exposes a much larger catalog organized into categories like Desktop, Internet Explorer, Network, System, and more. Switching between them replaces the entire Group Policies section.
No. Not Configured means the policy skips that setting entirely. Only settings switched to Enable or Disable are applied, and only those appear in the endpoint's output log.
No. Creating a policy only saves its definition. The settings only reach a device once you create and publish a deployment targeting that policy.
Yes. Set the deployment's Scope to Specific Endpoints, Specific Departments, or Specific Locations and choose the exact targets, instead of using All Endpoints.
Open the deployment's Tasks list, then open a task's Output log. It names each applied policy and whether the underlying registry value was set to a specific value or deleted to revert to the OS default.
It controls when the policy takes effect on the endpoint: at machine startup for Computer-level policies, or at user login for User-level policies. The label changes automatically based on the selected Configuration Level.