


Device Access Control
A walkthrough of Device Access Control on the Trinetri Autonomous Platform: building an access control policy with device type rules, registering trusted hardware, granting time-limited exceptions, and deploying the policy to endpoints with per-endpoint confirmation.
How to Configure Device Access Control
Overview:
Why blocking a device type needs a policy, not a manual lockdown
A single unmanaged USB drive, an unapproved wireless adapter, or a rogue input device is enough to move data off an endpoint or introduce something unwanted onto it. Disabling ports by hand solves it on one machine and breaks legitimate work on the next, because the same policy that blocks an attacker's drive also blocks the finance team's approved encrypted USB.
Device Access Control covers that path: an Access Control Policy defines what happens for each device type, a Trusted Devices registry identifies the specific hardware that stays permitted, Temporary Access grants a time-boxed exception without editing the policy, and a Deployment pushes the policy to a chosen scope of endpoints. Defining a policy changes nothing by itself; nothing happens until it's deployed, and every deployment breaks down into a per-endpoint task with its own status and execution log.
This guide walks the full workflow end to end: opening Device Access Control, creating a policy with a device type rule, registering a trusted device, granting temporary access, publishing a deployment, and confirming from the task output that the policy actually applied.
- Four access levels per device type: each rule sets
Allow,Block,Allow Trusted Devices, orNo Change, so a policy can lock down one device class while leaving others untouched. - Multiple rules in one policy: Add Rule stacks several device type rules into a single policy, rather than one policy per device class.
- Trusted devices identified by hardware IDs: a device is registered by Vendor ID, Product ID, and optionally Serial Number, so an approved drive is recognised by its hardware identity rather than its drive letter or label.
- Temporary Access is time bound by design: an exception is granted as either a fixed duration or an explicit start and end time window, and expires on its own.
- Apply and Remove deployment types: the same module both applies a policy and removes one, each tracked as its own deployment.
Prerequisites
Confirm these before deploying an access control policy. A blocked input device or an unregistered approved drive is the most common reason a rollout gets reversed within minutes.
- Administrator access: your account holds a role permitted to manage the Device Control -> Device Access Control module.
- Agent installed and reporting: the endpoint agent is installed, registered, and reporting healthy on every target device.
- Hardware identifiers collected: for any device that must stay permitted, gather its Vendor ID, Product ID, and Serial Number before creating the trusted device entry.
- Endpoint scope identified: know which specific endpoints the policy should reach before publishing the deployment.
- Recovery path confirmed: if you plan to block input devices such as keyboards or mouses, confirm you have remote access to the endpoint that does not depend on the device class being blocked.
Architecture: how an access control policy reaches an endpoint
An Access Control Policy defines the rules. A Trusted Device entry identifies specific hardware that a rule can exempt. Temporary Access grants a time-limited exception. A Deployment binds the policy to a scope of endpoints, and the agent enforces it and reports back.
| Stage | Component | Role |
|---|---|---|
| Definition | Access Control Policy | Name, description, and one or more device type rules, each pairing a Device Type with an Access Level |
| Exception (persistent) | Trusted Devices | Named device entry identified by Vendor ID, Product ID, and optional Serial Number, referenced by Allow Trusted Devices rules |
| Exception (temporary) | Temporary Access | Endpoint, duration type, duration or time window, and the allowed device types for that window |
| Binding | Deployment | Scope, endpoints, deployment type (Apply or Remove), policy selection, deployment policy, notification list |
| Execution | Endpoint agent | Enforces the access rules, reports per-endpoint task status |
| Proof | Policy Status, Task Status, and Output | Per-endpoint Success status with a timestamped execution log confirming the policy applied |
Pro tip: Register trusted devices before creating the policy that references them. The Trusted Devices selector inside a rule only lists entries that already exist, so building them in the reverse order means reopening the policy to finish the rule.
Step 1: Open Device Access Control
Get oriented before creating anything, so you know where policies, trusted devices, exceptions, and deployments each live.
Instructions
- From the main console, go to Device Control in the left sidebar.
- Under Access and Applications, select Device Access Control.
- Note the sections in the left panel: Access Control Policies, Trusted Devices, Temporary Access, Policy Status, and Deployments.
Path: Console / Device Control / Device Access Control
Result: You're in the Device Access Control module with visibility into existing policies, trusted devices, and deployments before making changes.
Step 2: Create an Access Control Policy
Define what each device type is allowed to do, so the same decision can be applied consistently to any number of endpoints.
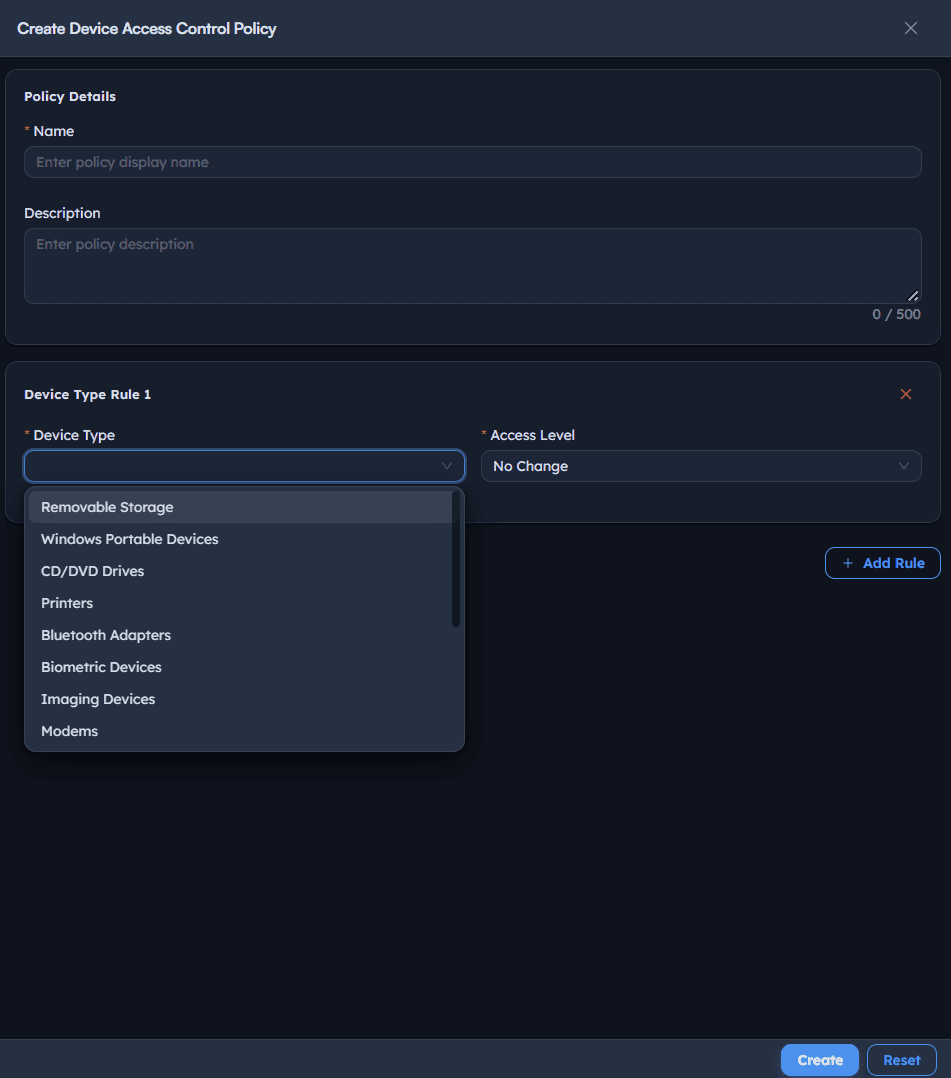
Instructions
- Go to Access Control Policies -> Create.
- Enter a Name describing the intent, e.g. Block Keyboard.
- Optionally enter a Description (up to 500 characters).
- Select Add Rule to create Device Type Rule 1.
- Choose a Device Type, e.g.
Keyboards. Available types include Printers, Bluetooth Adapters, Biometric Devices, Imaging Devices, Modems, Keyboards, Mouses, Smart Card Readers, Tape Drives, Wireless Network Adapters, Floppy Disks, Infrared Devices, and Removable Storage. - Set the Access Level to
Allow,Block,Allow Trusted Devices, orNo Change. - If you chose
Allow Trusted Devices, select the entries to permit in the Trusted Devices field that appears. - Select Add Rule again to cover additional device types in the same policy.
- Select Create.
Path: Console / Device Control / Device Access Control / Access Control Policies / Create
Console: policy definition (example)
| Field | Value |
|---|---|
| Name | Block Keyboard |
| Device Type Rule 1: Device Type | Keyboards |
| Device Type Rule 1: Access Level | Block |
Result: The policy appears in the Access Control Policies list with its device type and access level. Like other policy-based modules, it has no effect until targeted by a deployment.
Important: No Change is the default Access Level on a new rule. A rule left at No Change is saved but enforces nothing, so confirm every rule carries the access level you actually intend before creating the policy.
Step 3: Register a Trusted Device
Identify the specific hardware that should stay permitted, so an Allow Trusted Devices rule can exempt it by hardware identity rather than by name.
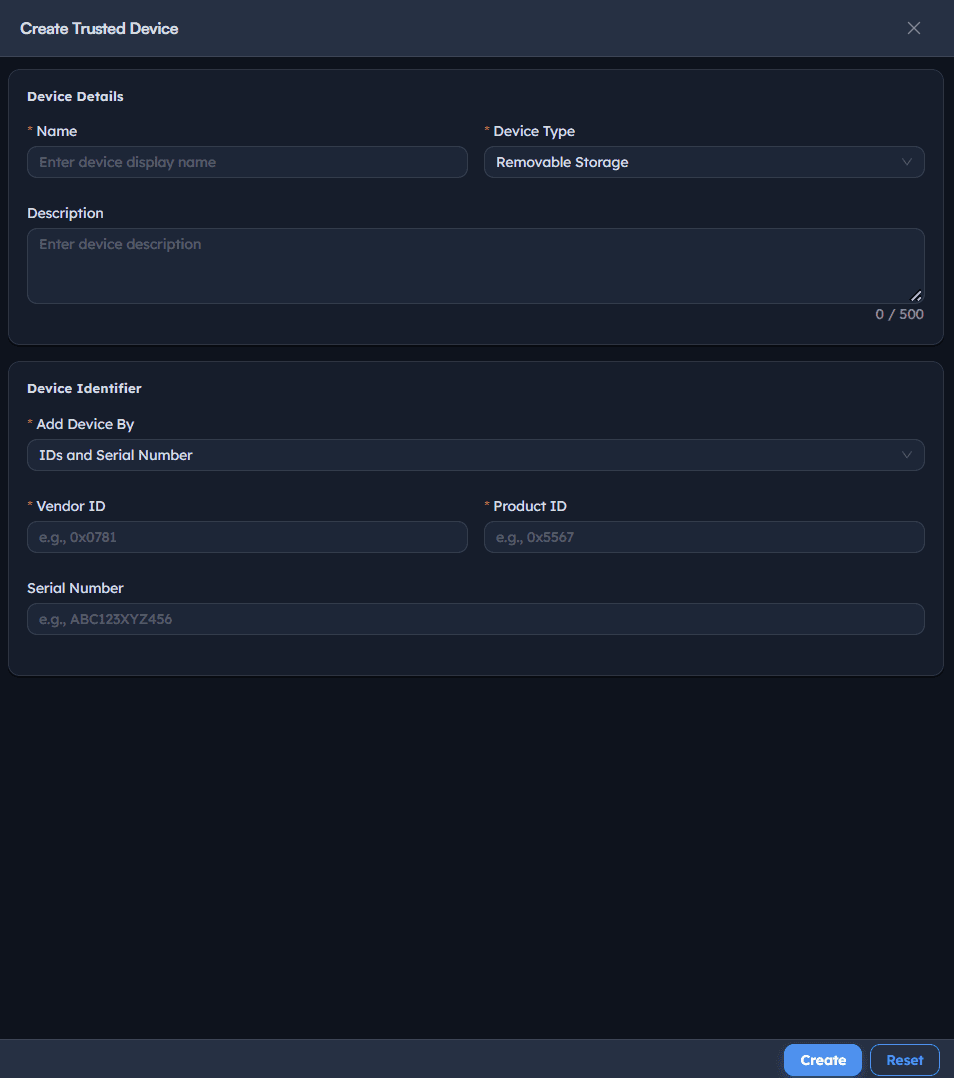
Instructions
- Go to Trusted Devices -> Create.
- Enter a Name for the device, e.g. Keyboard device.
- Choose the Device Type, e.g.
Keyboards. - Optionally enter a Description.
- Under Device Identifier, set Add Device By to
IDs and Serial Number. - Enter the Vendor ID and Product ID.
- Optionally enter the Serial Number to pin the entry to one physical device rather than every device sharing that vendor and product pair.
- Select Create.
Path: Console / Device Control / Device Access Control / Trusted Devices / Create
Console: trusted device definition (example)
| Field | Value |
|---|---|
| Name | Keyboard device |
| Device Type | Keyboards |
| Add Device By | IDs and Serial Number |
| Vendor ID | <VENDOR-ID> |
| Product ID | <PRODUCT-ID> |
| Serial Number | <SERIAL-NUMBER> |
Result: The device appears in the Trusted Devices list with its device type, and becomes selectable inside any rule using the Allow Trusted Devices access level.
Pro tip: Leaving Serial Number blank trusts every device matching that Vendor and Product ID, which is useful for a standard issued peripheral model. Fill it in when only one specific unit should be exempt.
Step 4: Grant Temporary Access (optional)
Create a time-boxed exception for a single endpoint, without editing or redeploying the policy itself.
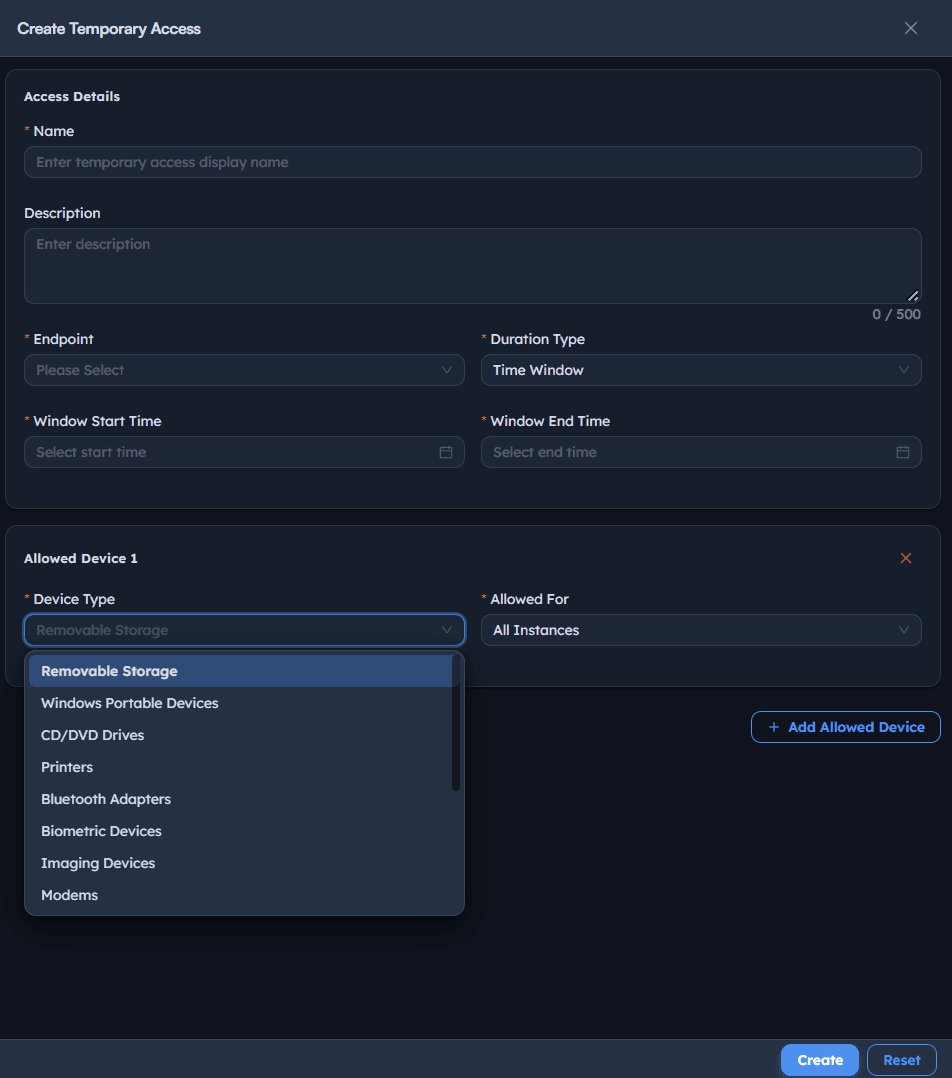
Instructions
- Go to Temporary Access -> Create.
- Enter a Name, e.g. Temp Access, and an optional Description.
- Select the Endpoint that receives the exception.
- Set the Duration Type:
Fixed Duration: enter a Duration Value and Duration Unit (for example, 2 Hours).Time Window: pick a Window Start Time and Window End Time from the date and time picker.
- Select Add Allowed Device to create Allowed Device 1.
- Choose the Device Type and set Allowed For, e.g.
All Instances. - Select Create, or Update when editing an existing entry.
Path: Console / Device Control / Device Access Control / Temporary Access / Create
Console: temporary access list
| Endpoint | Name | Duration Type | Duration | Devices | Status |
|---|---|---|---|---|---|
| <ENDPOINT-HOSTNAME> | Temp Access | Window | 2026-09-08 14:34 to 2026-09-08 14:38 | 1 Devices | PENDING |
Result: The exception appears in the Temporary Access list with its window and a status of Pending, moving to Expired once the window closes. Row actions allow revoking, editing, or deleting an exception before it expires.
Warning: Temporary Access expires on its own, but it does not revoke itself early if the reason for the exception disappears. Use the revoke action on the row when access is no longer needed, rather than waiting out the window.
Step 5: Publish a Deployment to endpoints
Bind the policy to a scope of endpoints so the rules are actually enforced, rather than just defined.
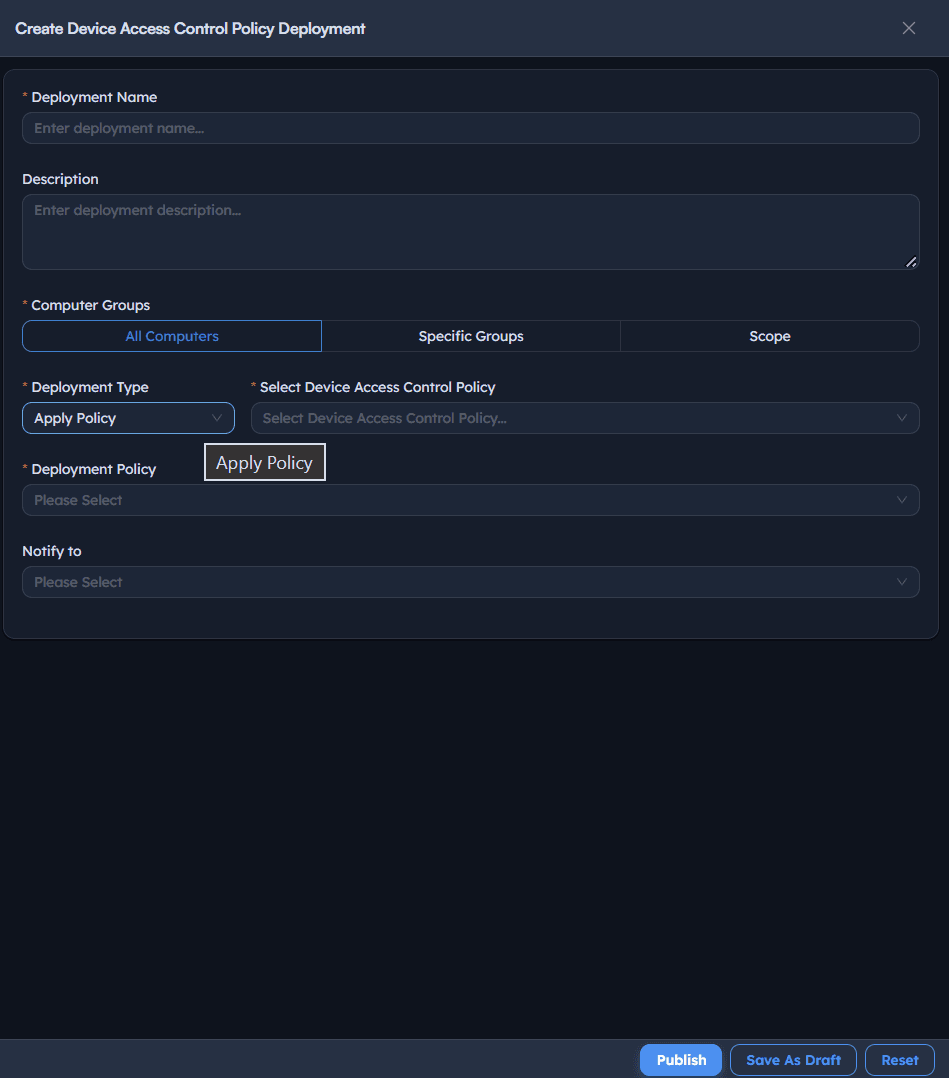
Instructions
- Go to Deployments -> Create.
- Enter a Deployment Name, e.g. Block Keyboard, and an optional Description.
- Set Scope to
Specific Endpoints(or another available scope) and select the target Endpoints. - Set Deployment Type to
Apply Policy(or the equivalent remove action when withdrawing a policy). - Under Select Device Access Control Policy, choose the policy created in Step 2.
- Set Deployment Policy, e.g.
OOB Instant deployment policy(typeInstant). - Optionally set Notify to for completion alerts.
- Select Publish (or Save As Draft to finish later).
Path: Console / Device Control / Device Access Control / Deployments / Create
Console: deployment definition
| Field | Value |
|---|---|
| Deployment Name | Block Keyboard |
| Scope | Specific Endpoints: <ENDPOINT-HOSTNAME> |
| Deployment Type | Apply Policy |
| Select Device Access Control Policy | Block Keyboard |
| Deployment Policy | OOB Instant deployment policy (Instant) |
Result: A deployment task is created (e.g. ADR-260: Block Keyboard) with stage Initiated and progress 0/1, moving through to Completed with progress 1/1. The Deployments list shows each entry with a Type of APPLY or REMOVE alongside its stage and policy.
Important: Removing a policy is its own deployment with a REMOVE type, not a deletion of the policy record. To lift a block from an endpoint, publish a remove deployment rather than deleting the policy, so the change is tracked and auditable like any other rollout.
Step 6: Confirm the deployment with per-endpoint task status and output
Verify the policy actually applied on the endpoint, rather than assuming from the deployment stage alone.
Instructions
- Go to Deployments to see every deployment with its Type, Stage, Progress, and Policy.
- Select the view icon on a deployment row to open its Tasks panel, showing Endpoint, Name, Status, and Last Updated.
- Confirm the Status moves from
Ready To DeploytoSuccessfor the target endpoint. - Select the task row to open its Output view and review the timestamped execution log.
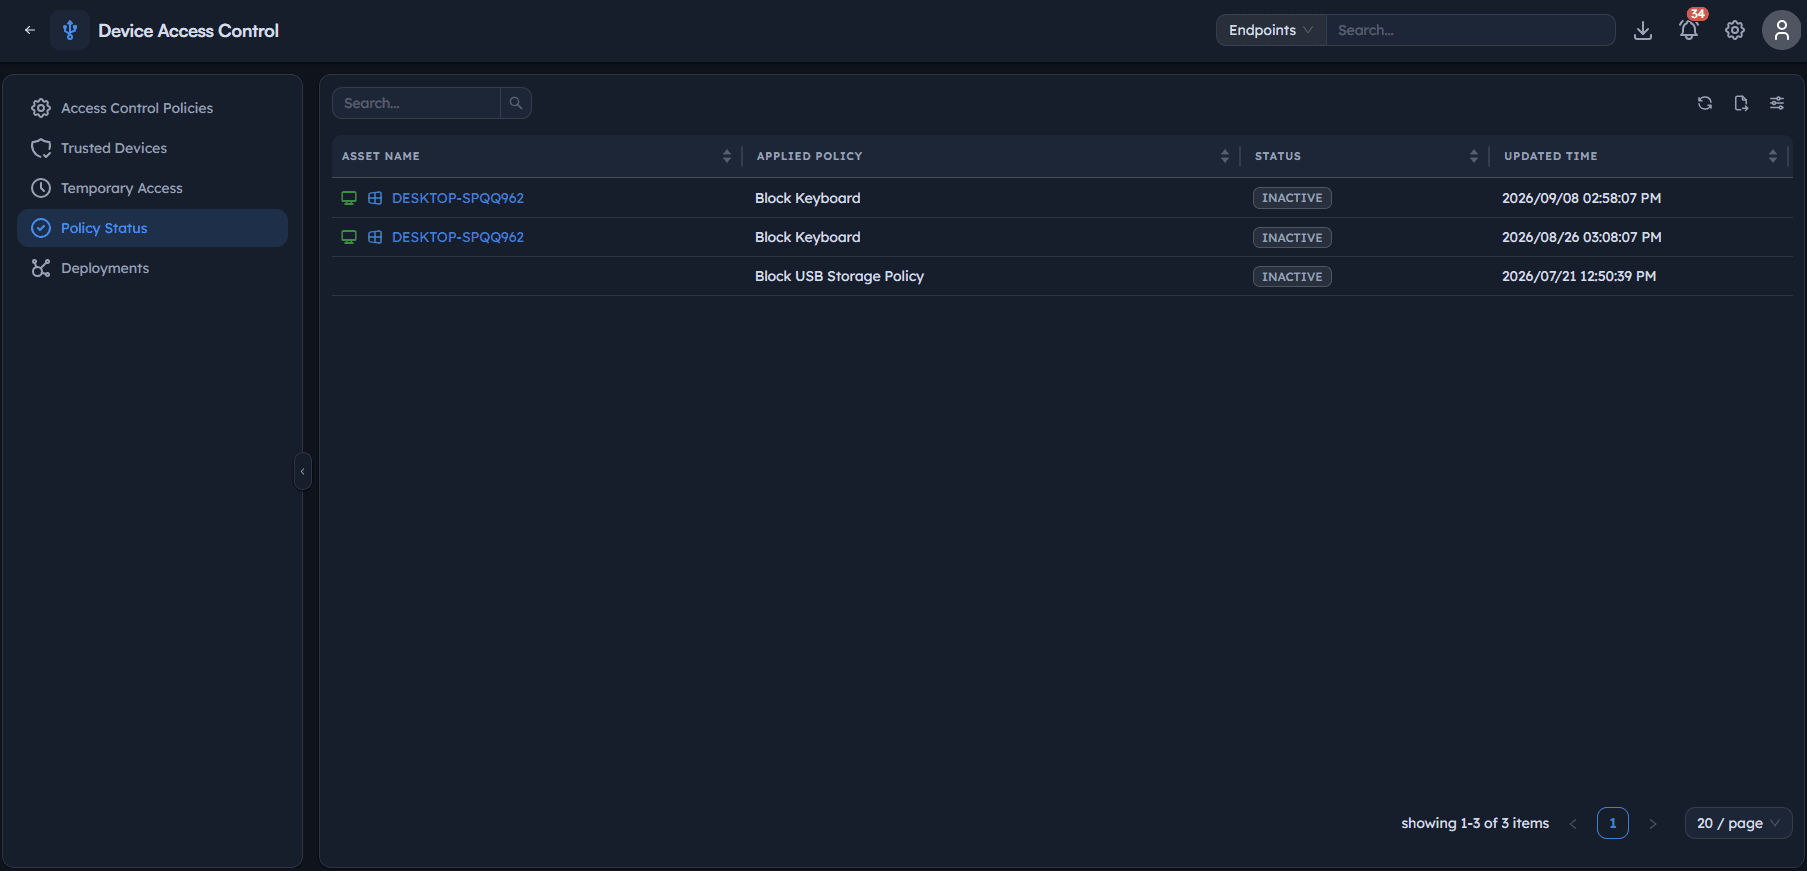
- Check Policy Status for a per-endpoint view of which policies are currently in effect.
Path: Console / Device Control / Device Access Control / Deployments / Tasks / Output
Console: task status
| Endpoint | Name | Status | Last Updated |
|---|---|---|---|
| <ENDPOINT-HOSTNAME> | Block Keyboard | SUCCESS | 2026/09/08 02:36:06 PM |
Result: Evidence-backed confirmation that the named policy reached the endpoint and applied, with a timestamp for each stage of the task, not just a single Success flag for the whole deployment.
Best practices for device access control
| Practice | Why it matters | Recommended setting |
|---|---|---|
| Register trusted devices before writing the policy | An Allow Trusted Devices rule can only reference entries that already exist | Build the Trusted Devices list first, then author the policy |
| Be deliberate about blocking input devices | Blocking keyboards or mouses can lock an operator out of the endpoint console | Confirm remote access that does not rely on the blocked device class before publishing |
| Use Specific Endpoints while validating a new policy | A broad scope makes a misconfigured rule much harder to unwind | Test on one or two endpoints first, then expand |
| Prefer Temporary Access over editing a live policy | A one-off need does not justify changing a policy every endpoint depends on | Grant a time-bound exception and let it expire |
| Set Serial Number for single-unit exemptions | Vendor and Product ID alone trust every device of that model | Add the Serial Number when only one physical device should be permitted |
| Review Policy Status after each rollout | It shows what is actually in effect per endpoint, rather than what was published | Check it whenever a policy is applied or removed |
| Set a Notify To list for unattended deployments | Without it, a failed rollout can go unnoticed until someone checks manually | Add relevant recipients for any deployment run outside business hours |
Troubleshooting: common issues and resolutions
| Issue | Cause | Resolution |
|---|---|---|
| An approved device is still blocked | The device is not registered in Trusted Devices, or its Vendor or Product ID does not match the registered entry | Re-check the hardware identifiers on the endpoint and correct the Trusted Devices entry |
| Policy was created but nothing changed on endpoints | The policy was saved without being deployed | Publish a deployment with the deployment type set to apply the policy |
| A rule saved but enforces nothing | The rule's Access Level was left at the No Change default | Open the policy, set the intended access level on each rule, and redeploy |
| Temporary Access shows Expired sooner than expected | The Time Window end time was set only minutes after the start time | Recreate the exception with a longer window, or use Fixed Duration instead |
| Task Status shows Failed | Agent lost connectivity mid-deployment, or the endpoint could not enforce the requested rule | Confirm agent health, then check the Output log for the specific error before re-publishing |
| Deployment stays at Initiated indefinitely | The target endpoint's agent isn't reporting, or the Deployment Policy type doesn't match the intended trigger | Confirm agent connectivity and the selected Deployment Policy's type (e.g. Instant) |
| Trusted device doesn't appear in the policy rule selector | The device was added after the policy panel was opened | Close and reopen Create Device Access Control Policy, or refresh the Trusted Devices list first |
Frequently asked questions
No. A policy only defines the device type rules. It's enforced only once targeted by a deployment published to a chosen scope of endpoints.
Allow permits the device type, Block denies it, Allow Trusted Devices permits only the specific devices registered in Trusted Devices, and No Change leaves the endpoint's existing behaviour for that device type untouched.
By hardware identity rather than by name: a Vendor ID and Product ID, plus an optional Serial Number. Including the Serial Number restricts the entry to one physical device instead of every device of that model.
Yes. Add Rule stacks multiple device type rules into a single policy, so one policy can block one device class, allow another, and leave a third unchanged.
Trusted Devices is a persistent exemption tied to specific hardware and referenced by policy rules. Temporary Access is a time-limited exception for one endpoint that expires on its own, without changing the policy.
Publish a deployment with the remove deployment type rather than deleting the policy. The Deployments list tracks apply and remove actions separately, so the withdrawal is recorded like any other rollout.
Open the deployment's Tasks panel and check the Status column for that endpoint, then open the task's Output view for the timestamped execution log. Policy Status also shows which policies are currently in effect per endpoint.