


How to Deploy and Manage BitLocker Encryption
BitLocker Encryption safeguards enterprise data by encrypting endpoint drives to protect against unauthorized access. It enables centralized policy management, automated encryption deployment, recovery key management, and continuous monitoring, ensuring data security and compliance across all managed devices.
How to Deploy and Manage BitLocker Encryption
Overview:
Why unmanaged encryption is a compliance gap, not just a security one
An unencrypted laptop is not a theoretical risk. It is a lost-device incident waiting for a date, and once it happens the only question that matters to an auditor is whether the drive was protected before it left the building. BitLocker itself is free and built into Windows. The actual problem organizations run into is consistency: which drives are protected, which encryption method was used, where the recovery key lives, and whether anyone can prove any of it six months later.
The operational reason this drifts is familiar. Encryption gets turned on manually during imaging, the recovery key is escrowed inconsistently (or not at all), a laptop gets rebuilt without IT's involvement, and by the time an auditor asks for evidence nobody can produce a clean device-by-device answer.
The Disk Encryption module closes that gap by treating BitLocker as a managed policy rather than a one-time imaging step. You define the encryption rule once (method, TPM behaviour, drive scope, key rotation) and the platform applies it to every targeted endpoint, escrows every recovery key automatically, and reports live on which devices are actually protected.
This guide walks the full workflow end to end: a BitLocker policy with encryption method and TPM settings, a deployment that pushes it to real endpoints, a live status dashboard to track rollout, a recovery key vault for support and audit use, and a decrypt path for when a drive needs to come back out of policy.
- Reduce exposure: every managed endpoint reaches a known encryption state instead of relying on whatever happened at imaging time.
- Prove compliance: per-device encryption status and recovery-key records give you evidence on demand instead of a fire drill before an audit.
- Protect lost or stolen devices: a device that never reports back is still cryptographically protected, because encryption was applied before it left the fleet.
- Remove manual work: one policy scales to the whole estate; there is no per-device BitLocker wizard to run by hand.
- Recover safely: recovery keys are escrowed centrally the moment encryption starts, so a forgotten PIN or hardware change never turns into data loss.
Prerequisites
Confirm all five before creating a policy. A missing prerequisite here usually surfaces mid-deployment, when a device is already partially encrypted and much harder to walk back cleanly.
- Administrator access: your account holds a role permitted to manage the Disk Encryption module. Read-only operators can view status and recovery keys but cannot create or publish policies.
- Agent installed and reporting: the endpoint agent is installed, registered, and reporting healthy on every target device. Devices not yet enrolled are invisible to any policy.
- TPM present (recommended): most target hardware has a Trusted Platform Module. Devices without one still need a defined fallback (password-based protection), or they should be excluded from TPM-only policies.
- Windows edition supports BitLocker: Pro, Enterprise, or Education editions. Home editions cannot be managed by BitLocker policy at all.
- Endpoint groups defined: target devices are organized into groups (department, location, OS, or tag) so policies can be scoped deliberately rather than applied ad hoc to individuals.
Architecture: how a policy becomes an encrypted drive
The policy and the encryption action travel through distinct stages: a policy defines the rule, a deployment binds that rule to specific endpoints and a trigger type, and the agent on the endpoint carries out the actual BitLocker operation and reports back.
| Stage | Component | Role |
|---|---|---|
| Definition | BitLocker Policy | Encryption method, OS/fixed/removable drive rules, TPM mode, key rotation |
| Binding | BitLocker Deployment | Scope (endpoints/departments/locations), deployment type (Encrypt/Decrypt), timing |
| Execution | Endpoint agent | Confirms TPM status, runs manage-bde-equivalent action, reports progress |
| Escrow | Recovery Key vault | Stores the recovery key per volume the moment encryption begins |
| Proof | BitLocker Status dashboard | Live per-endpoint protection status, encryption percentage, TPM availability |
Pro tip: Group endpoints by hardware profile before writing a policy. A TPM-only policy silently stalls on any device without a TPM unless you've already excluded or separately handled that group.
Step 1: Open the Disk Encryption module
Navigate to the module and get oriented before creating anything, so you know where policies, deployments, status, and recovery keys each live.
Instructions
- From the main console, go to Endpoints → Device Control.
- Under Data Protection, select Disk Encryption.
- Note the four sections in the left sidebar: BitLocker Status, BitLocker Recovery Keys, BitLocker Policies, BitLocker Deployments.
Path: Console / Endpoints / Device Control / Disk Encryption
Result: You're in the Disk Encryption module with no policy yet created: status and recovery keys will remain empty until Steps 2–3 are complete.
Step 2: Create a BitLocker policy
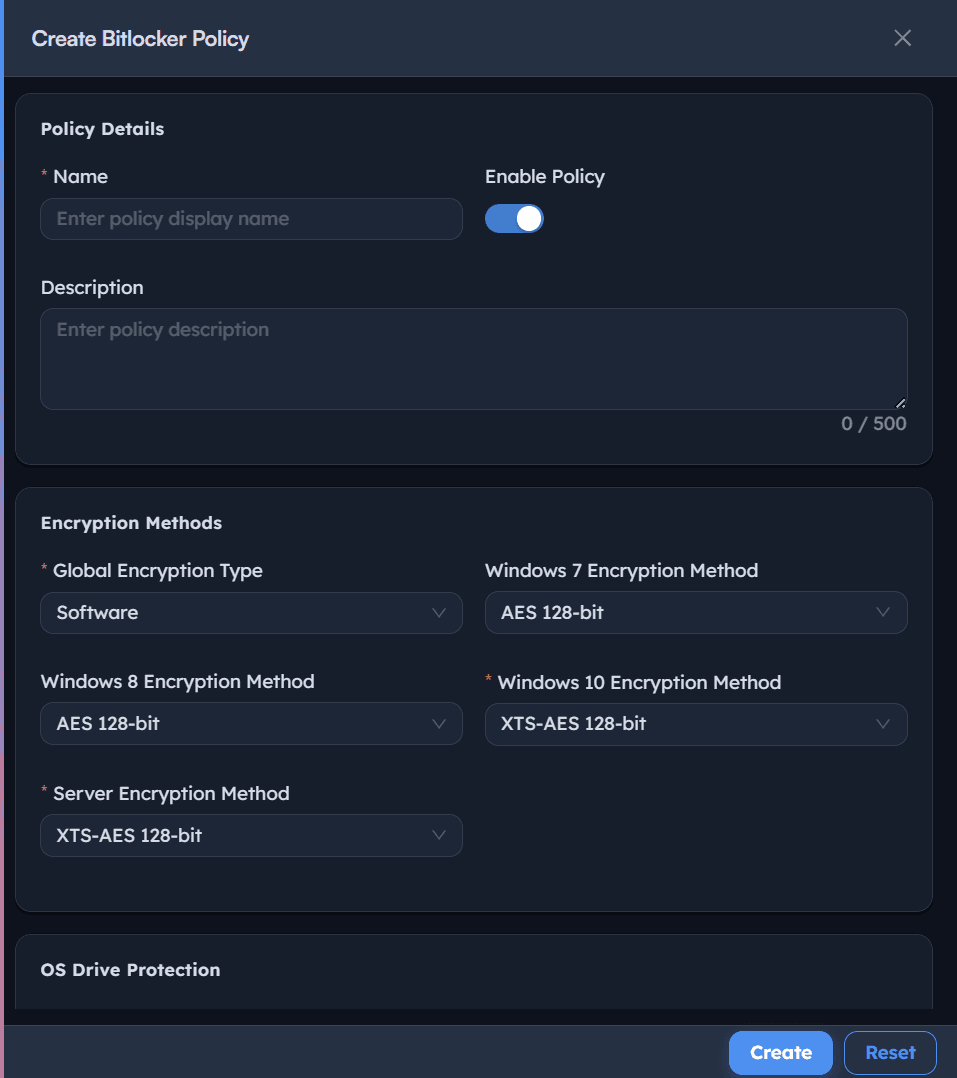
Define the encryption method for each Windows version and the server tier in a single reusable policy.
Instructions
- Go to BitLocker Policies → Create BitLocker Policy.
- Name the policy for what it enforces (e.g. BitLocker Drive) and toggle Enable Policy on.
- Set Global Encryption Type to
Hardware and Softwareunless your fleet is entirely self-encrypting drives. - Set the per-OS encryption methods: Windows 7/8 at
AES 256-bit, Windows 10 and the server tier atXTS-AES 256-bit(XTS is the modern, tamper-evident mode and should be the default wherever the OS supports it).
Path: Console / Disk Encryption / BitLocker Policies / Create BitLocker Policy
Console: encryption method settings
| Field | Value |
|---|---|
| Global Encryption Type | Hardware and Software |
| Windows 7 Encryption Method | AES 256-bit |
| Windows 8 Encryption Method | AES 256-bit |
| Windows 10 Encryption Method | XTS-AES 256-bit |
| Server Encryption Method | XTS-AES 256-bit |
Result: A draft policy exists with encryption method defined. It has no drive rules or targets yet: those follow in Steps 3–5.
Important: XTS-AES is not compatible with drives that need to be read by older Windows versions or removable media used outside your fleet. Use plain AES for removable drives that must stay portable.
Step 3: Configure OS drive protection
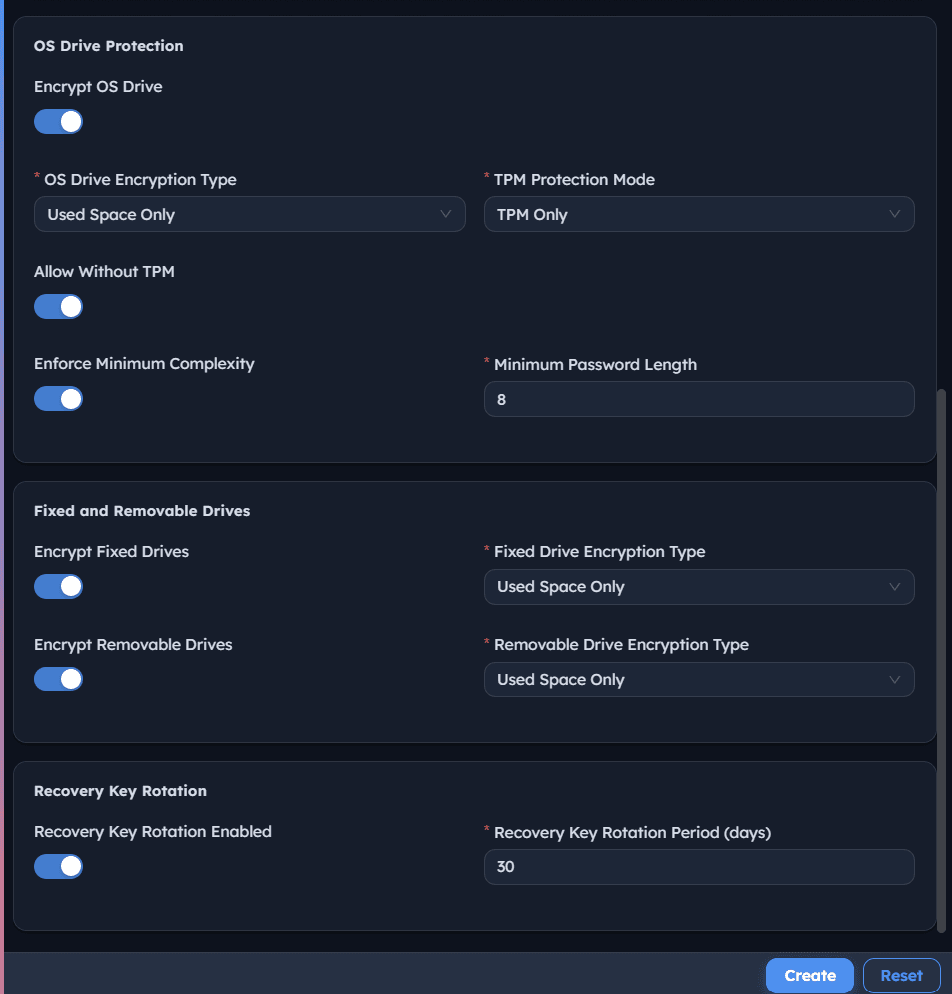
Set how the operating system drive is encrypted and what happens on devices without a working TPM.
Instructions
- On the same policy, toggle Encrypt OS Drive on.
- Set OS Drive Encryption Type to
Used Space Only: this encrypts only data currently on disk rather than the full volume, which is faster and sufficient for drives that were never used unencrypted. - Set TPM Protection Mode to
TPM Onlyfor standard laptops and desktops. - Toggle Allow Without TPM on only if you have devices lacking a TPM that still need to be covered: this falls back to password-based protection.
- Enable Enforce Minimum Complexity and set Minimum Password Length to
10or higher when password fallback is permitted.
Path: Console / Disk Encryption / BitLocker Policies / OS Drive Protection
Console: OS drive settings
| Field | Value |
|---|---|
| Encrypt OS Drive | On |
| OS Drive Encryption Type | Used Space Only |
| TPM Protection Mode | TPM Only |
| Allow Without TPM | On |
| Enforce Minimum Complexity | On |
| Minimum Password Length | 10 |
Result: The OS drive rule is set. Devices with a TPM encrypt silently; devices without one fall back to a complex password rather than being left unprotected.
Warning: Used Space Only on a drive that has already held unencrypted data for a long time leaves previously-deleted sectors unencrypted. For devices being repurposed or handed to a new user, use a full-volume encryption pass instead.
Step 4: Configure fixed and removable drives
Extend the same policy to secondary internal drives and removable media, so protection isn't limited to the boot volume.
Instructions
- Toggle Encrypt Fixed Drives on and set Fixed Drive Encryption Type to
Used Space Only(orFull Volumefor drives being decommissioned or reassigned). - Toggle Encrypt Removable Drives on and set Removable Drive Encryption Type to
Used Space Only. - Leave removable drive encryption on plain AES if those drives need to be read on non-managed machines.
Path: Console / Disk Encryption / BitLocker Policies / Fixed and Removable Drives
Console: drive scope settings
| Field | Value |
|---|---|
| Encrypt Fixed Drives | On |
| Fixed Drive Encryption Type | Used Space Only |
| Encrypt Removable Drives | On |
| Removable Drive Encryption Type | Used Space Only |
Result: The policy now covers every drive class on the endpoint, not just the OS volume.
Best practice: Encrypt removable drives by policy rather than relying on users to enable it manually: an unencrypted USB drive plugged into an otherwise fully-encrypted fleet is a common audit finding.
Step 5: Configure recovery key rotation
Set the policy to rotate the recovery key on a schedule, so a key doesn't stay valid indefinitely if it's ever exposed.
Instructions
- Toggle Recovery Key Rotation Enabled on.
- Set Recovery Key Rotation Period (days) to
30for a standard estate, shorter for higher-sensitivity device groups. - Save the policy as a draft or select Create: it has no targets yet, so nothing deploys until Step 6.
Path: Console / Disk Encryption / BitLocker Policies / Recovery Key Rotation
Console: key rotation settings
| Field | Value |
|---|---|
| Recovery Key Rotation Enabled | On |
| Recovery Key Rotation Period (days) | 30 |
Result: The completed policy appears in the BitLocker Policies list, fully configured but unattached to any endpoint.
Pro tip: A shorter rotation period is cheap to configure and mostly invisible to users, since the key rotates silently in the background: there's little reason not to enable it by default.
Step 6: Deploy the policy to encrypt endpoints
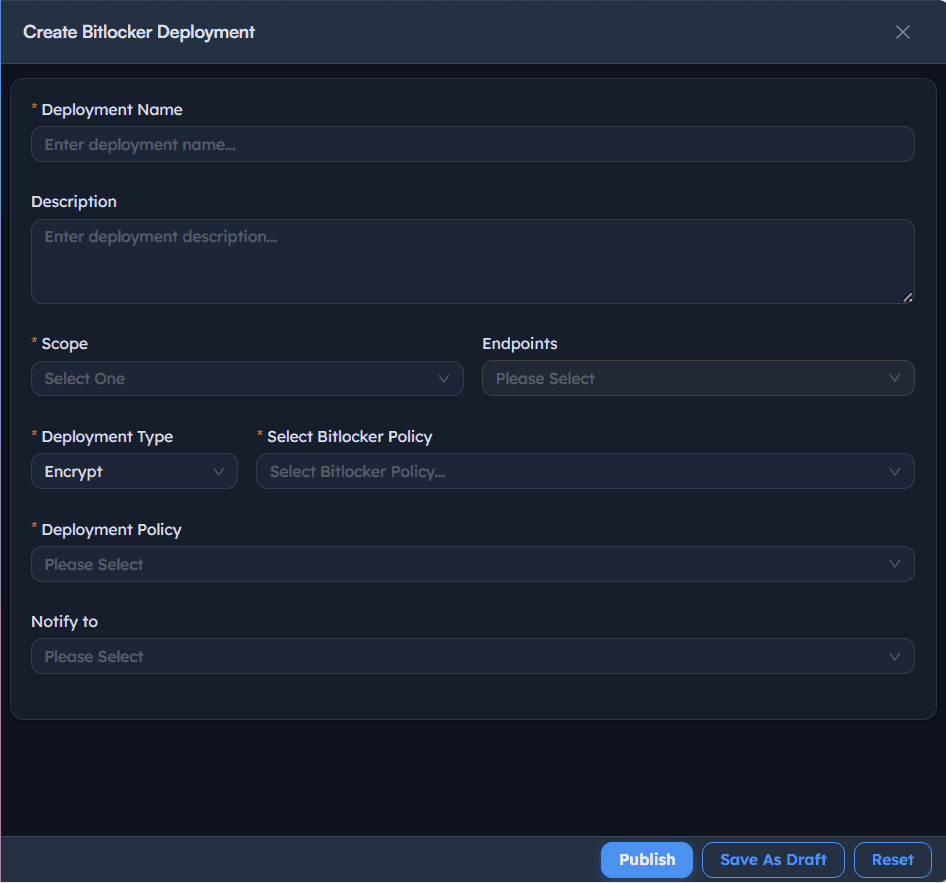
Bind the policy to actual devices with a deployment of type Encrypt.
Instructions
- Go to BitLocker Deployments → Create BitLocker Deployment.
- Name the deployment for its purpose: e.g. Drive Secure.
- Set Scope to
Specific Endpoints(or Departments/Locations/All Endpoints for broader rollout) and select the target device(s). - Set Deployment Type to
Encrypt. - Select the BitLocker Policy created in Steps 2-5.
- Optionally set Notify to so an admin or team is alerted when the deployment completes.
- Select Publish.
Path: Console / Disk Encryption / BitLocker Deployments / Create BitLocker Deployment
Console: deployment definition
| Field | Value |
|---|---|
| Deployment Name | Drive Secure |
| Scope | Specific Endpoints |
| Deployment Type | Encrypt |
| Deployment Policy | OOB Instant deployment policy |
Result: A task is created (e.g. <TASK-ID> – BitLocker Drive) with status In Progress, visible under Tasks with the target endpoint and timestamp.
Warning: Publishing a deployment scoped to All Endpoints starts encryption fleet-wide immediately. Confirm scope carefully before publishing: there is no staged rollout equivalent to a pilot ring for encryption deployments.
Step 7: Monitor the encryption rollout
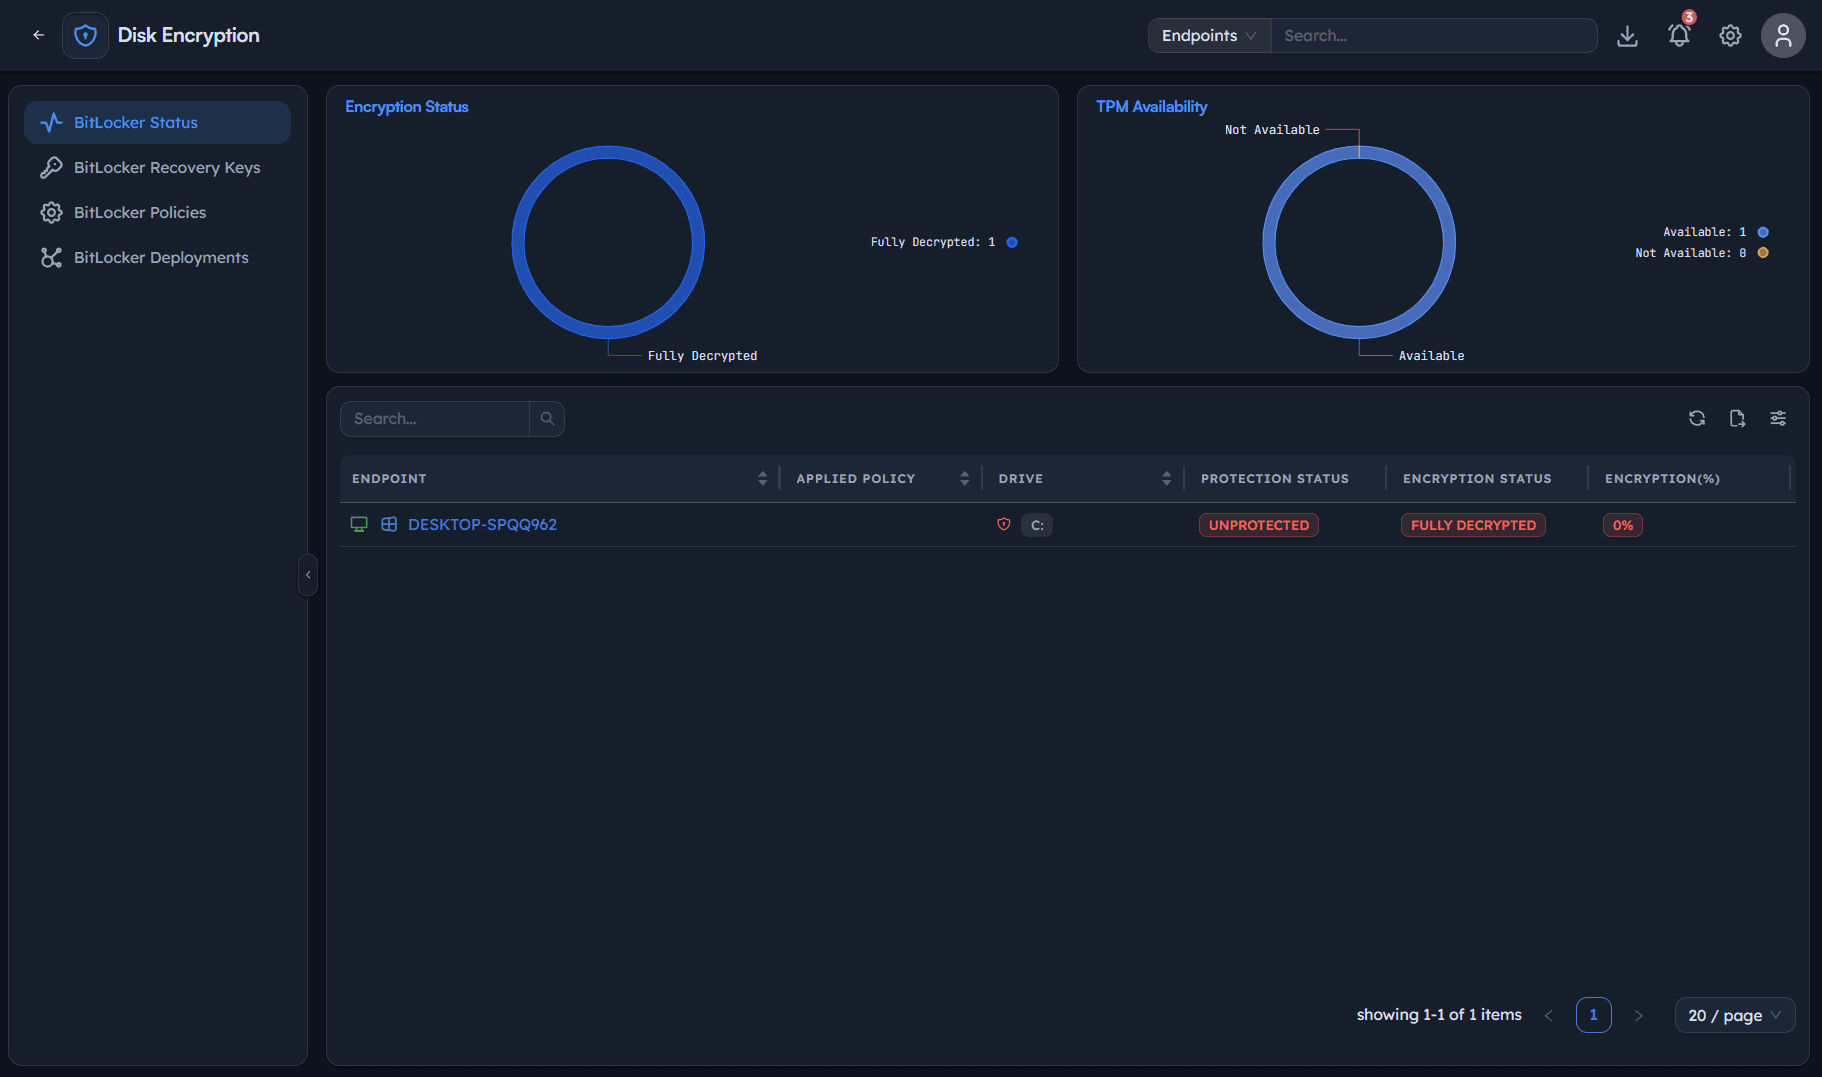
Track live progress per endpoint until encryption completes, using the status dashboard rather than the task log alone.
Instructions
- Go to BitLocker Status.
- Read the Encryption Status and TPM Availability summary widgets.
- Find the target endpoint's row and watch Protection Status move from
Unprotected, Encryption Status showEncryption In Progress, and Encryption(%) climb toward 100%. - Refresh periodically: the percentage updates live as the drive encrypts (e.g. 56% → 60% → 96%).
Path: Console / Disk Encryption / BitLocker Status
Result: Once the percentage reaches 100%, the deployment's Stage shows Completed in the BitLocker Deployments list, and Protection Status updates accordingly.
Pro tip: A device stuck below 100% for longer than expected is usually still on, plugged in, and running: encryption pauses if the device sleeps or loses power, and resumes automatically on next boot.
Step 8: Retrieve and manage recovery keys
Confirm the recovery key was escrowed correctly and know where to find it later for support or audit purposes.
Instructions
- When encryption begins, you may be prompted to confirm your password as an admin action gate before the key is displayed.
- The Recovery Key for Volume C: dialog shows the 48-digit key, with a copy button: record it in your secure key vault if you need it outside the console.
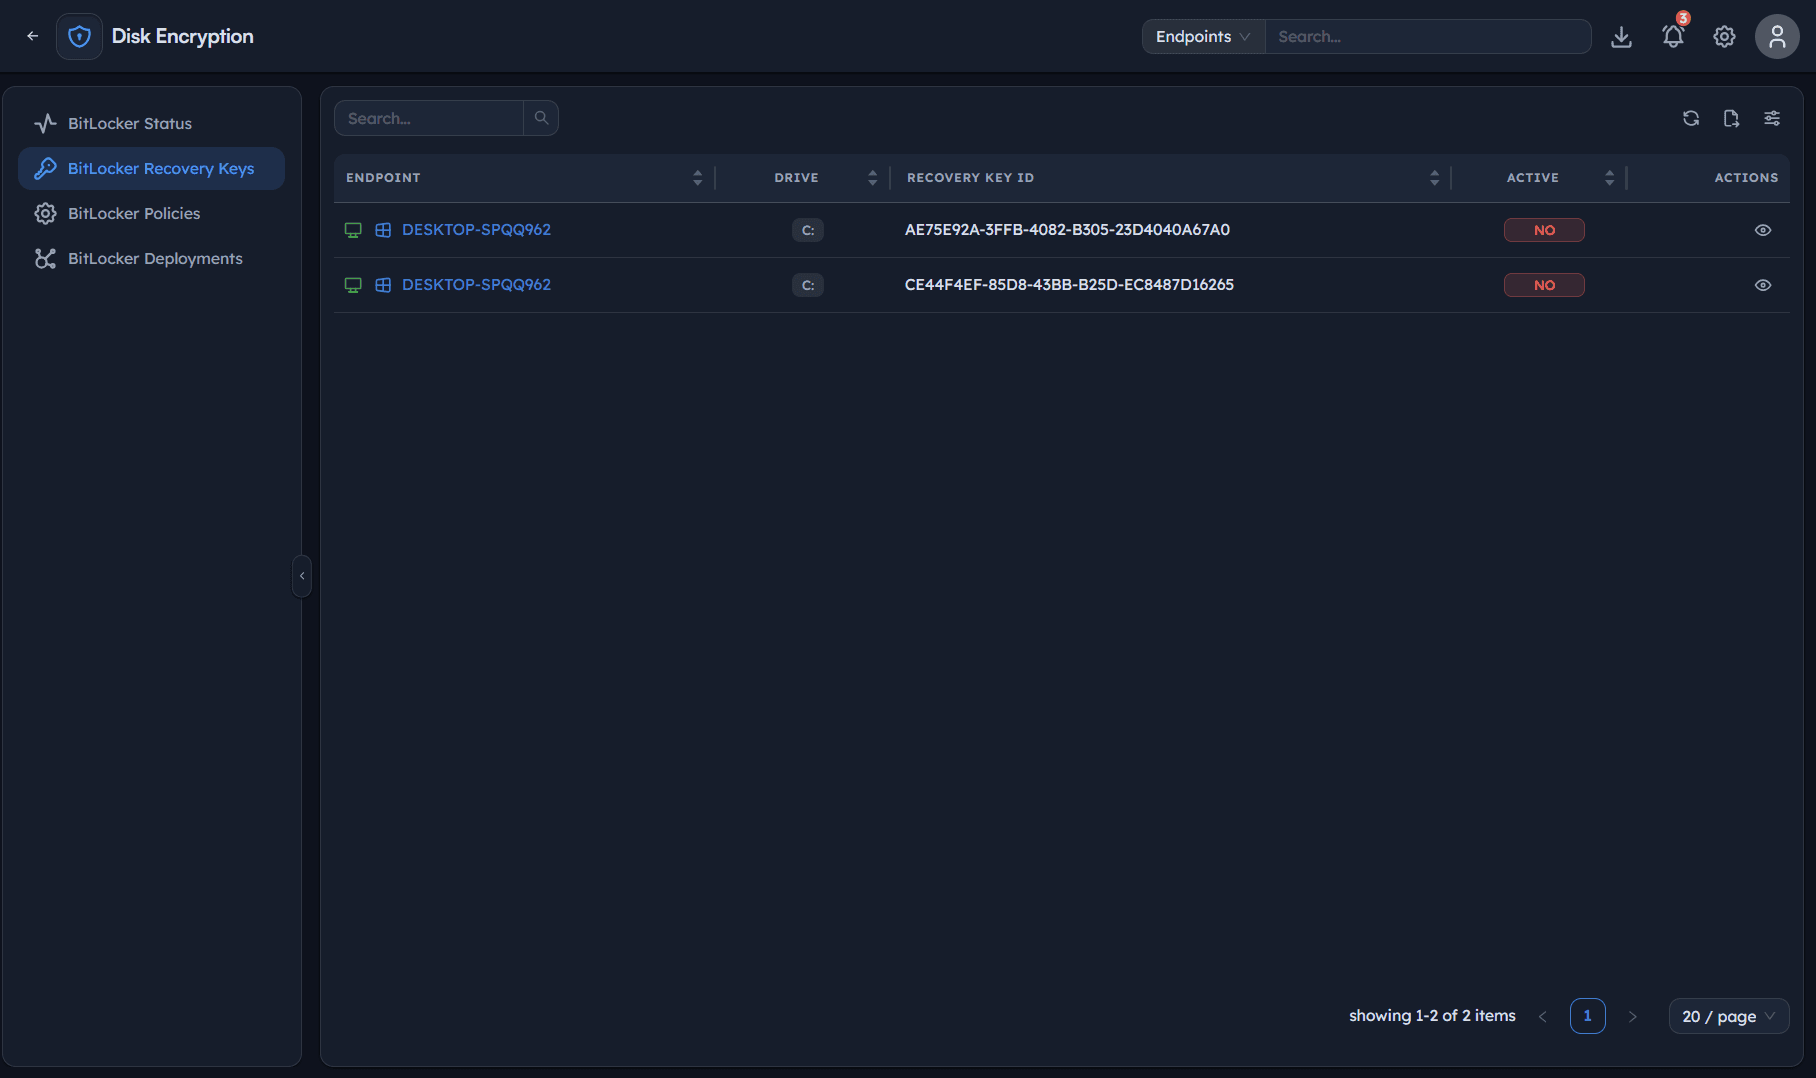
- Go to BitLocker Recovery Keys to see every escrowed key across endpoints: Endpoint, Drive, Recovery Key ID, and Active status.
- When a key rotates, the previous key remains listed with Active = No for historical/audit purposes; only the current key shows Active = Yes.
Path: Console / Disk Encryption / BitLocker Recovery Keys
Console: recovery key records
| Endpoint | Drive | Recovery Key ID | Active |
|---|---|---|---|
| <ENDPOINT-HOSTNAME> | C: | <RECOVERY-KEY-ID-REDACTED> | Yes |
| <ENDPOINT-HOSTNAME> | C: | <RECOVERY-KEY-ID-REDACTED> | No |
Result: Every encrypted drive has a retrievable recovery key on record, with rotation history preserved rather than overwritten.
Important: Treat the recovery key list itself as sensitive: anyone who can read it can unlock any managed drive. Restrict this view to the same admin roles permitted to manage policies.
Step 9: Verify protection status fleet-wide
Confirm the rollout achieved full coverage before considering the cycle closed.
Instructions
- Return to BitLocker Status and review the TPM Availability widget for any endpoints reporting
Not Available: these need a fallback password policy, not a TPM-only one. - Confirm every targeted endpoint shows Protection Status: Protected (once fully encrypted, status moves off
Unprotected). - Cross-check the BitLocker Recovery Keys list: every protected endpoint should have exactly one Active key.
- Investigate any endpoint still showing
Unprotectedafter its deployment task reports complete.
Path: Console / Disk Encryption / BitLocker Status
Result: A fleet-wide view confirming which endpoints are actually protected, which are pending, and which need attention: the evidence you'd present in an audit.
Best practice: Re-check status a full day after deployment, not immediately: devices that were asleep or offline during the initial push need a chance to come back online and complete.
Step 10: Decrypt a drive when needed
Reverse encryption cleanly through policy rather than a manual manage-bde -off on the endpoint, so the action stays tracked and auditable.
Instructions
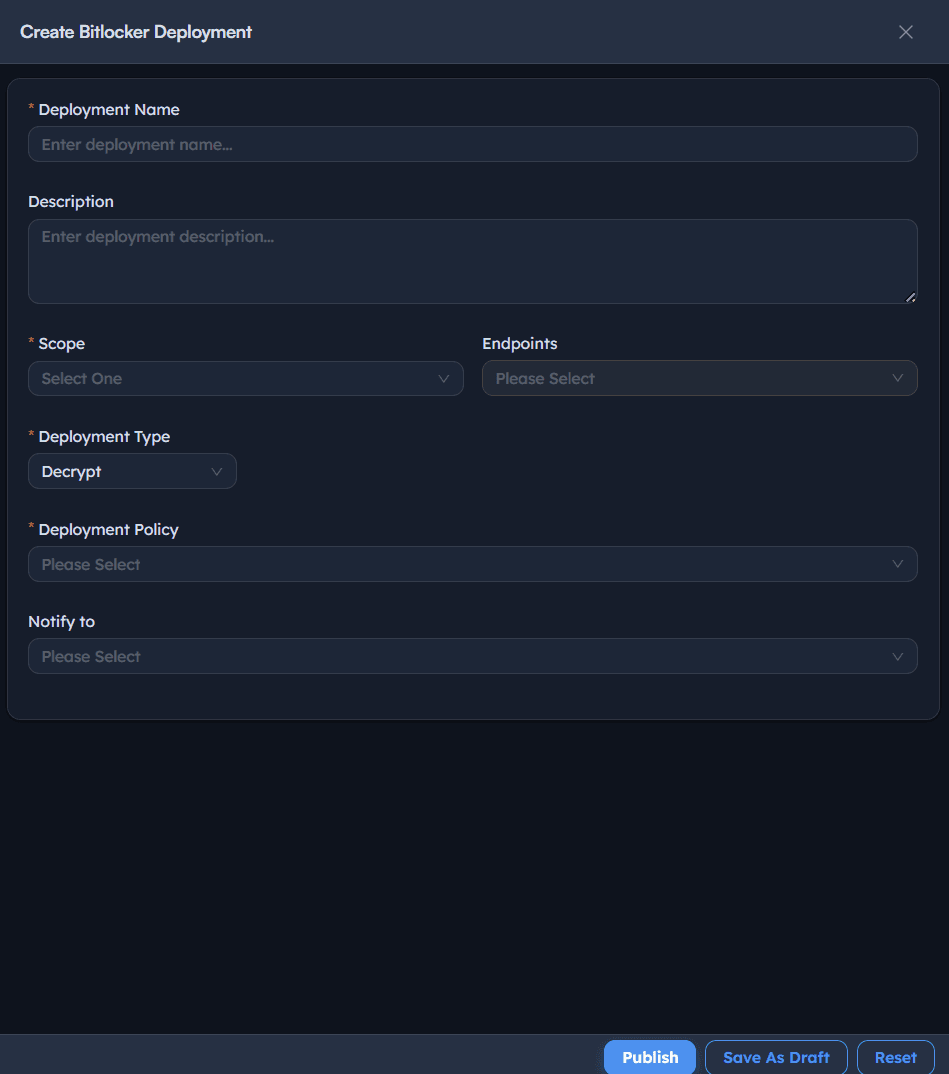
- Go to BitLocker Deployments → Create BitLocker Deployment.
- Name it for the action: e.g. Decrypt Drive.
- Set Scope to the same or a different target endpoint set.
- Set Deployment Type to
Decrypt. - Select the applicable Deployment Policy and select Publish.
- Monitor BitLocker Status: the endpoint shows
Decryption In Progresswith a percentage counting down, thenFully Decryptedat0%.
Path: Console / Disk Encryption / BitLocker Deployments / Create BitLocker Deployment
Result: The drive returns to an unprotected state through a tracked action, with the same task/status visibility as encryption had.
Warning: A decrypted drive still targeted by an active Encrypt policy will simply re-encrypt at the next evaluation. Remove the endpoint from the policy scope first if the decryption needs to persist.
Best practices for BitLocker management
| Practice | Why it matters | Recommended setting |
|---|---|---|
| XTS-AES for modern Windows | Tamper-evident mode; the correct default wherever the OS supports it | Windows 10/11 and server tier |
| TPM Only with password fallback | Covers hardware without a TPM without leaving it unprotected | Allow Without TPM: on, min. length 10 |
| Used Space Only for new devices | Faster encryption with no coverage loss on drives never used unencrypted | Full Volume only for reassigned/decommissioned drives |
| Recovery key rotation | Limits how long an exposed key stays valid | 30 days, shorter for sensitive groups |
| Central recovery key escrow | Removes dependence on a user remembering or storing their own key | Verify one Active key per protected drive |
| Scoped deployments | Avoids fleet-wide encryption starting from a single mistake | Specific Endpoints/Departments before All Endpoints |
| Encrypt removable drives by policy | Closes the most common single audit gap in an otherwise encrypted fleet | Encrypt Removable Drives: on |
Troubleshooting: common issues and resolutions
| Issue | Cause | Resolution |
|---|---|---|
| Encryption percentage stuck | Device is asleep, powered off, or lost power mid-encryption | Confirm device is on and plugged in; encryption resumes automatically on next boot |
| TPM Availability shows Not Available | Device lacks a TPM or it's disabled in firmware | Enable TPM in BIOS/UEFI if present, or apply a password-fallback policy to that group |
| Recovery key dialog doesn't appear | Admin password confirmation step was dismissed or timed out | Re-trigger from BitLocker Recovery Keys view, or re-run the deployment |
| Endpoint still Unprotected after deployment completes | Deployment task failed silently or endpoint was offline during the window | Check task output log for errors; re-publish the deployment to that endpoint |
| Drive re-encrypts after manual decryption | Endpoint is still in scope of an active Encrypt policy | Remove the endpoint from policy scope before or immediately after decrypting |
| Multiple Active recovery keys for one drive | Key rotation created a new key before the old one was marked inactive | Confirm only the latest key is in use; treat older keys as historical, not valid |
Frequently asked questions
For a drive that has never held unencrypted data (a fresh image, for example), yes. For a drive that has been in use, previously-deleted sectors may still contain unencrypted remnants, so use Full Volume when reassigning or decommissioning a device.
With TPM Only mode and Allow Without TPM disabled, the device is excluded from encryption. Enable Allow Without TPM and set a minimum password length so it falls back to password-based protection instead of being left unprotected.
It's escrowed automatically to the BitLocker Recovery Keys list the moment encryption begins, keyed by endpoint and drive, with rotation history preserved.
You can set Scope to All Endpoints, but there's no pilot/soak equivalent for encryption the way there is for patch rollout: start with a specific endpoint set to confirm behaviour before widening scope.
Create a Decrypt-type deployment scoped only to that endpoint, and remove it from the Encrypt policy's target scope so it isn't re-encrypted at the next evaluation.
No: rotation happens in the background on the schedule you set, and the new key is escrowed automatically without any user-facing prompt.