


How to Configure URL Filtering
You'll learn how to configure a URL Filtering policy to manage web access across endpoints. Discover how to allow or block specific websites, enforce browsing policies, reduce exposure to malicious content, improve employee productivity, and strengthen your organization's security posture through centralized URL filtering.
How to Configure URL Filtering
Overview:
Why blocking a site by domain alone doesn't scale
A single blocked domain is easy to manage. A real policy, block social media during work hours on some machines, cap streaming data usage on others, allow a specific list of learning sites while blocking distracting ones, is not one rule but a small system of rules that has to stay coherent as it grows. Managing that by editing a flat blocklist by hand gets unmanageable fast, and it gives you no way to express "blocked, except during lunch" or "allowed, but capped at 2GB a day."
URL Filtering separates this into two layers: a URL Category groups the actual domains (what to block, what to allow, and where to redirect a blocked request), and a URL Filter Profile defines the policy logic on top of that category, time-based (block this category during these hours, on these days) or usage-based (allow this category up to a data cap). The profile is then deployed to specific endpoints independently of the category or the rule logic underneath it.
This guide walks the full workflow end to end: building a URL category with block/allow lists and a redirect URL, creating a time-based filter profile with a schedule, creating a usage-based filter profile with a data cap, deploying a profile to endpoints, monitoring the deployment and its per-endpoint task status, and removing a filter cleanly when it's no longer needed.
- Separate the domain list from the policy logic: a category can be reused across multiple profiles with different schedules or caps.
- Enforce by time, not just by presence: a Time Based profile blocks a category only during the days and hours you specify.
- Enforce by data, not just by category: a Usage Based profile allows a category up to a defined data limit before it's restricted.
- Redirect instead of dead-ending: a blocked request can land on a defined redirect URL rather than a generic browser error.
- Deploy and remove independently: applying and removing a filter profile are both tracked deployments, not silent edits to a shared list.
Prerequisites
Confirm all four before creating a category. A profile built on a category with no block list, or deployed to the wrong scope, produces a filter that looks configured but doesn't actually restrict anything.
- Administrator access: your account holds a role permitted to manage URL Filtering. Read-only operators can view deployment status but cannot create categories, profiles, or deployments.
- Agent installed and reporting: the endpoint agent is installed, registered, and reporting healthy on every target device.
- Domain lists prepared: know the exact domains for the block list, allow list, and (if needed) a redirect destination before starting. Lists can be typed directly or pasted from a prepared text file.
- Policy intent decided: know whether this filter should be time-based (a schedule) or usage-based (a data cap) before creating the profile, since that choice determines which fields you'll configure.
Architecture: how a category and a profile combine into an enforced filter
A category defines the domains. A profile defines the enforcement logic against that category, either a time schedule or a data limit. A deployment binds the profile to endpoints and triggers enforcement.
| Stage | Component | Role |
|---|---|---|
| Definition | URL Category | Category name, Block List, Allow List, Redirect URL |
| Logic | URL Filter Profile | Profile Type (Time Based / Usage Based), rule(s) referencing one or more categories |
| Binding | Profile Deployment | Scope endpoints, deployment type (Apply/Remove), deployment policy |
| Execution | Endpoint agent | Enforces the rule, redirects or blocks matching requests, reports task status |
| Proof | Deployments list | Per-deployment Stage (Initiated/Completed) and per-endpoint task status |
Pro tip: Build categories around a theme (Social Media, Learning, Streaming) rather than around a single profile's needs. A well-scoped category is reusable across several profiles later.
Step 1: Open URL Filtering
Get oriented before creating anything, so you know where categories, profiles, and deployments each live.
Instructions
- From the main console, go to Endpoints → URL Filtering.
- Note the sections available: URL Categories, URL Filter Profiles, and Deployments.
Path: Console / Endpoints / URL Filtering
Result: You're in the URL Filtering module with visibility into any existing categories and profiles before creating new ones.
Step 2: Create a URL category
Define the actual domain lists this filter will act on: what to block, what to allow, and where a blocked request should land.
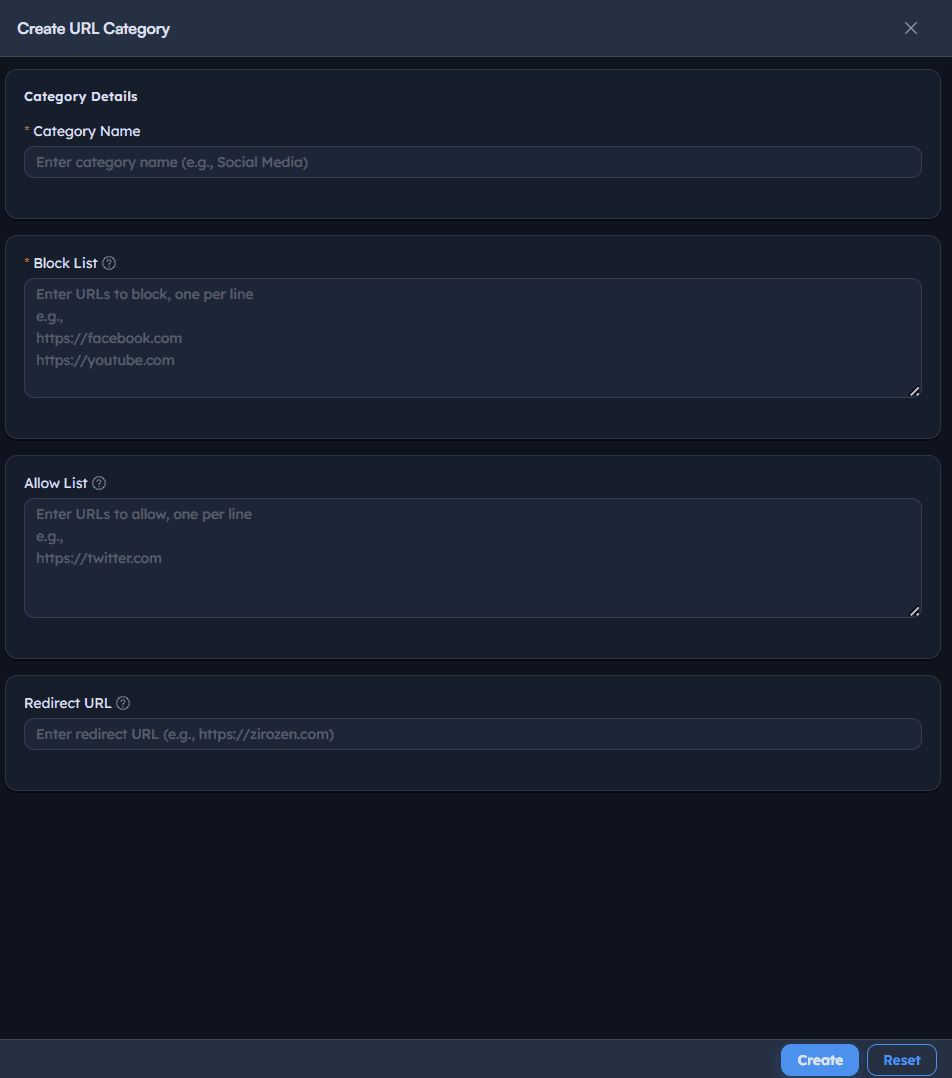
Instructions
- Go to URL Categories → Create URL Category.
- Enter a Category Name describing its theme, e.g. Study Timing.
- Under Block List, enter the domains to block, one per line, e.g.
www.facebook.com,www.instagram.com,www.snapchat.com. Domains can be typed directly or pasted from a prepared list. - Under Allow List, enter the domains to explicitly permit, e.g.
www.coursera.org,www.udemy.com,www.khanacademy.org,www.shiksha.com. - Optionally set a Redirect URL so a blocked request lands on a defined page instead of a generic error, e.g.
https://example.com. - Save the category.
Path: Console / URL Filtering / URL Categories / Create URL Category
Console: category definition
| Field | Value |
|---|---|
| Category Name | Study Timing |
| Block List | www.facebook.com, www.instagram.com, www.snapchat.com |
| Allow List | www.coursera.org, www.udemy.com, www.khanacademy.org, www.shiksha.com |
| Redirect URL | https://example.com |
Result: A reusable category exists with its domain lists defined. It has no enforcement schedule or scope yet, that's set in the profile and deployment steps.
Important: A domain present in both the Block List and the Allow List creates ambiguous intent. Review both lists together before saving, since the platform's tie-breaking behavior shouldn't be something you have to discover after deployment.
Step 3: Create a Time Based URL filter profile
Define a schedule-driven policy: block a category only during specific days and hours.
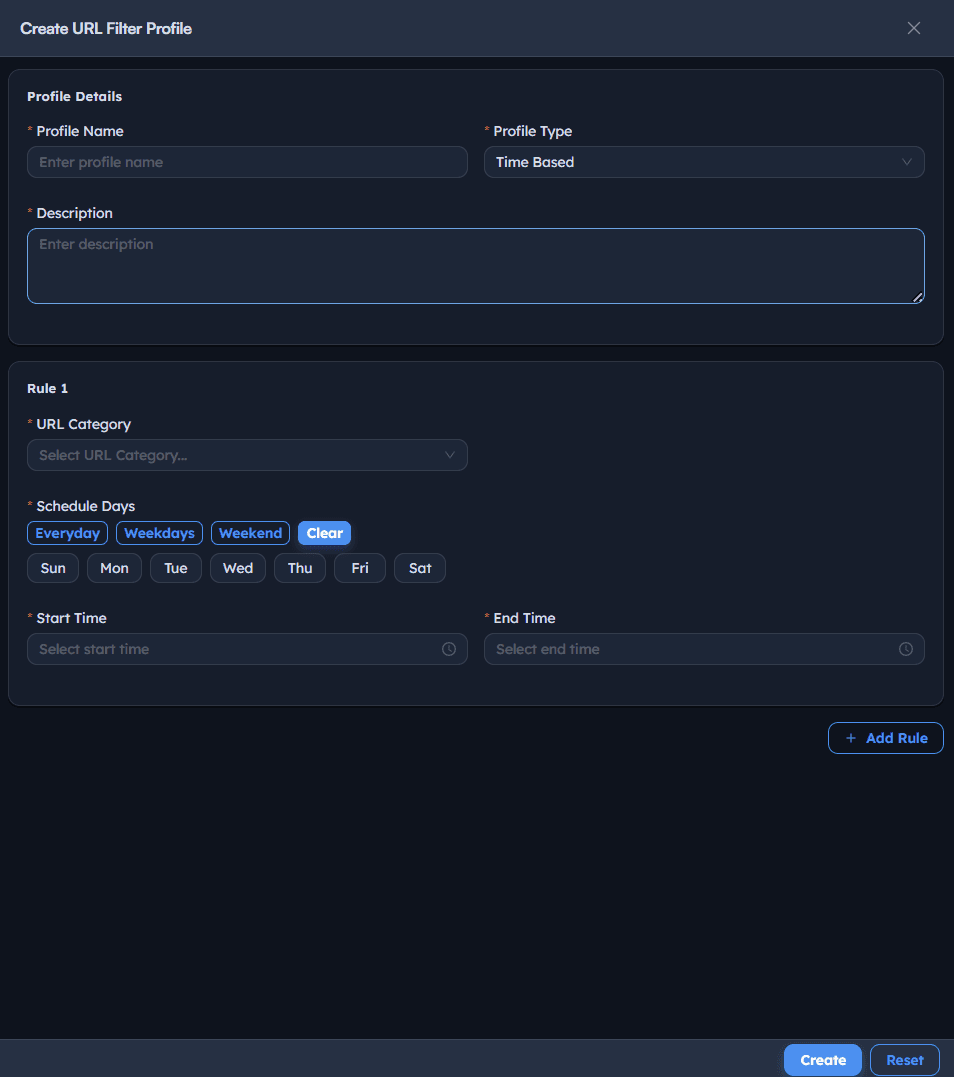
Instructions
- Go to URL Filter Profiles → Create URL Filter Profile.
- Enter a Profile Name, e.g. Block Social Media.
- Set Profile Type to
Time Based. - Add a Description, e.g. Block Social Media.
- Under Rule 1, set URL Category to the category created in Step 2, e.g.
Study Timing. - Set Schedule Days using the day toggles, or the
Weekdays,Weekend, orEverydayshortcuts. - Set Start Time and End Time for the block window.
- Select Add Rule if this profile needs more than one category/schedule combination.
- Save the profile.
Path: Console / URL Filtering / URL Filter Profiles / Create URL Filter Profile
Console: Time Based profile
| Field | Value |
|---|---|
| Profile Name | Block Social Media |
| Profile Type | Time Based |
| URL Category | Study Timing |
| Schedule Days | Everyday |
| Start Time | 01:00 |
| End Time | 08:00 |
Result: A profile exists that enforces the category's Block List only within the configured schedule, outside of which the category is not actively restricted by this profile.
Pro tip: Use the Weekdays/Weekend/Everyday shortcuts instead of toggling individual days by hand, they're faster and less error-prone for the common cases.
Step 4: Create a Usage Based URL filter profile
Define a data-driven policy instead of a schedule: allow a category up to a defined data limit.
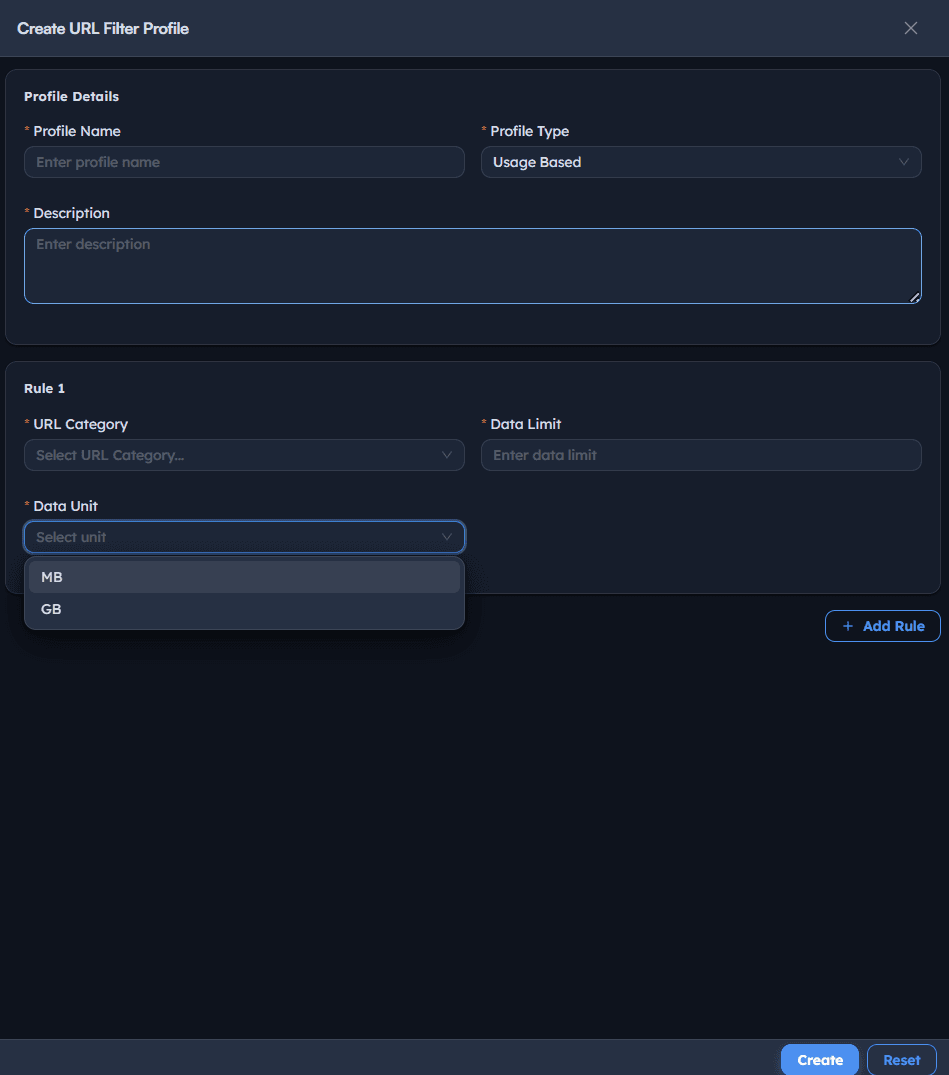
Instructions
- Go to URL Filter Profiles → Create URL Filter Profile.
- Enter a Profile Name and an optional Description.
- Set Profile Type to
Usage Based. - Under Rule 1, set URL Category to the target category.
- Set Data Limit to the numeric cap and Data Unit (e.g.
GB). - Save the profile.
Path: Console / URL Filtering / URL Filter Profiles / Create URL Filter Profile
Console: Usage Based profile fields
| Field | Value |
|---|---|
| Profile Type | Usage Based |
| URL Category | (selected category) |
| Data Limit | numeric value |
| Data Unit | GB |
Result: A profile exists that restricts the category's traffic once the configured data limit is reached, independent of any time schedule.
Best practice: Use Time Based profiles for behavioral or productivity policies (block social media during work hours) and Usage Based profiles for bandwidth-sensitive categories (streaming, large downloads), rather than trying to force one profile type to do both jobs.
Step 5: Deploy the filter profile to endpoints
Bind the profile to specific endpoints with a deployment of type Apply.
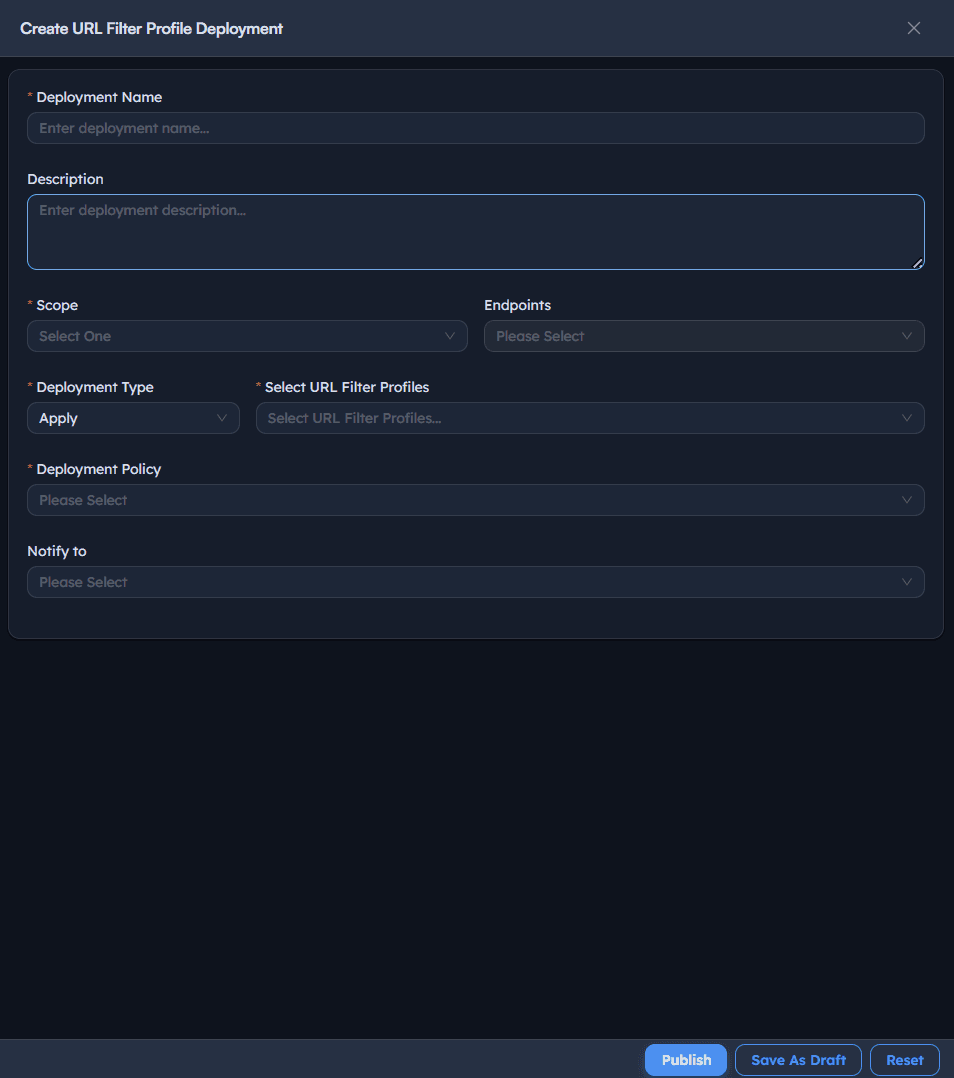
Instructions
- Go to Deployments → Create URL Filter Profile Deployment.
- Enter a Deployment Name, e.g. Block URL.
- Add an optional Description.
- Set Scope Endpoints to
Specific Endpointsand select the target device(s). - Set Deployment Type to
Apply. - Set Select URL Filter Profiles to the profile from Step 3 or 4, e.g.
Block Social Media. - Set Deployment Policy, e.g.
OOB Instant deployment policy(typeInstant). - Optionally set Notify to for completion alerts.
- Select Publish.
Path: Console / URL Filtering / Deployments / Create URL Filter Profile Deployment
Console: deployment definition
| Field | Value |
|---|---|
| Deployment Name | Block URL |
| Scope Endpoints | Specific Endpoints: <ENDPOINT-HOSTNAME> |
| Deployment Type | Apply |
| Select URL Filter Profiles | Block Social Media |
| Deployment Policy | OOB Instant deployment policy (Instant) |
Result: A task is created (e.g. ADR-064: Block URL) and appears in the task list with an initial status such as Ready to Deploy before moving to Initiated.
Warning: Confirm Scope Endpoints before publishing. A time-based social media block deployed to the wrong group can restrict access for people it was never meant to affect.
Step 6: Monitor the filter deployment
Track the deployment from initiation through completion, endpoint by endpoint.
Instructions
- Go to Deployments to see all deployments with their Type (
Apply,Remove), Stage (Initiated,Completed), Progress, and Policy. - Open the specific deployment task, e.g. ADR-064: Block URL, to see its per-endpoint Status and Last Updated time.
- Watch the status progress, e.g. from
Ready to DeploytoInitiatedto a completed state, confirming the profile actually reached and applied on the target endpoint.
Path: Console / URL Filtering / Deployments
Console: task status (example)
| Endpoint Name | Status | Last Updated |
|---|---|---|
| <ENDPOINT-HOSTNAME> | Initiated | 2026/07/06 11:38:04 AM |
Result: Confirmation that the deployment is progressing and, once complete, that the profile is enforced on the target endpoint.
Step 7: Remove a URL filter deployment
Reverse a filter cleanly through a Remove-type deployment rather than editing the underlying category or profile.
Instructions
- Go to Deployments → Create URL Filter Profile Deployment.
- Enter a Deployment Name for the removal, e.g. Remove Blocked URL.
- Set Scope Endpoints to the same or a different target set.
- Set Deployment Type to
Remove. - Set Select URL Filter Profiles to the profile being removed.
- Select Publish.
Path: Console / URL Filtering / Deployments / Create URL Filter Profile Deployment
Result: A Remove-type task runs and, once Completed, the filter profile is no longer enforced on the target endpoint.
Warning: Removing a profile deployment doesn't delete the underlying URL Category or Profile itself, it only stops enforcing that profile on the targeted endpoints. The category and profile remain available to deploy again or reuse elsewhere.
Step 8: Confirm the deployment list reflects current state
Review the full deployments list to see every Apply and Remove action together, rather than tracking each one individually.
Instructions
- Go to Deployments and review the full list: Deployment, Type (
Apply/Remove), Stage, Progress, and Policy. - Confirm the most recent action for any given profile and endpoint pair reflects the enforcement state you expect, since Apply and Remove deployments for the same profile can both appear in the same list over time.
- Use this list as your source of truth for what's currently enforced, rather than relying on memory of which deployments were run in what order.
Path: Console / URL Filtering / Deployments
Result: A single, chronological view of every filter deployment, Apply and Remove alike, across every profile and endpoint.
Best practice: When troubleshooting whether a filter is active, check the most recent deployment for that specific profile and endpoint combination first, an older Apply deployment can be superseded by a more recent Remove.
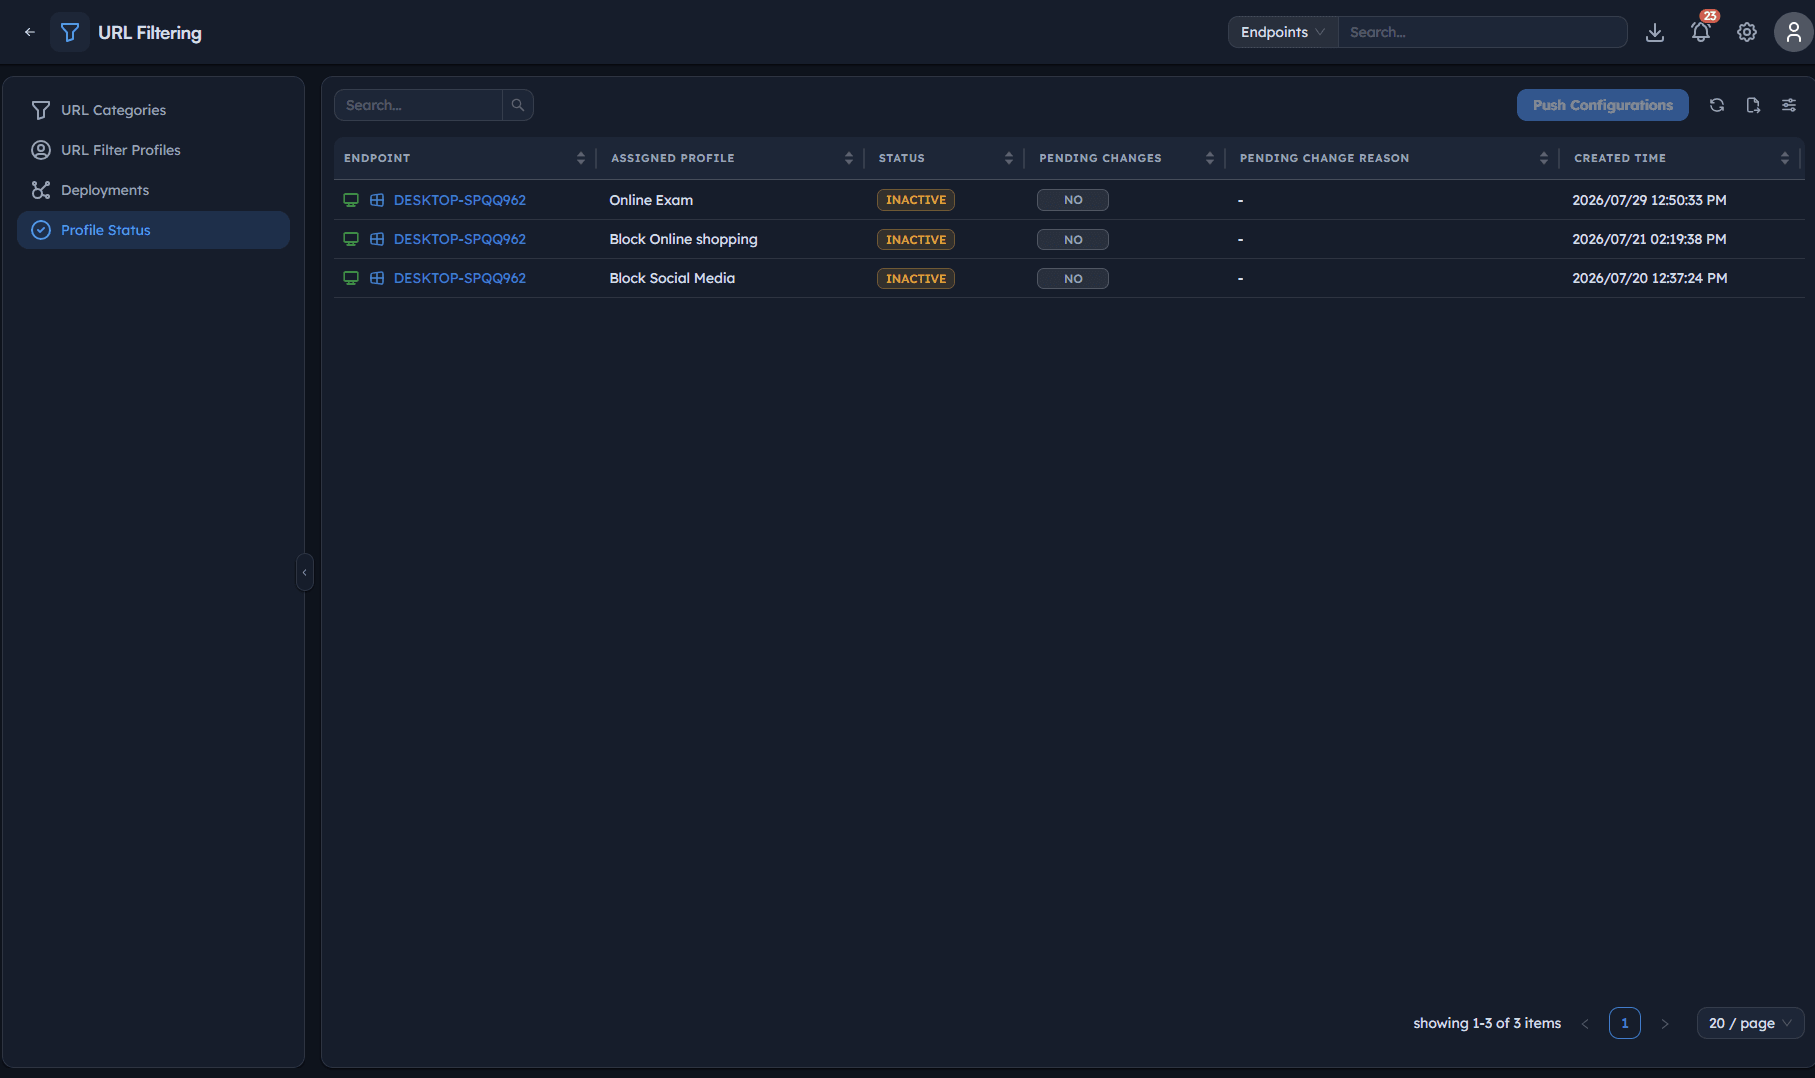
Step 9: Review categories and profiles before scaling up
Before deploying broadly, revisit the categories and profiles you've built to confirm they still reflect intent as the list grows.
Instructions
- Return to URL Categories and confirm each category's Block List, Allow List, and Redirect URL are still accurate.
- Return to URL Filter Profiles and confirm each profile's rules reference the correct category and the intended schedule or data limit.
- Check for categories created for a one-off test that are still referenced by an active profile, or profiles that reference a category no longer maintained.
Path: Console / URL Filtering / URL Categories and Console / URL Filtering / URL Filter Profiles
Result: A clean, current set of categories and profiles, rather than an accumulation of one-off configurations from earlier testing.
Step 10: Combine categories and profiles for layered policies
Use multiple rules within one profile, or multiple profiles against the same category, to express more complex intent than a single block list can.
Instructions
- Within a profile, select Add Rule to add a second URL Category with its own schedule or data limit, building a profile that covers more than one theme at once.
- Alternatively, create a second profile against the same category with a different Profile Type or schedule, e.g. one Time Based profile for work hours and a separate Usage Based profile for weekend data capping.
- Deploy each profile independently via its own deployment, so you can apply, adjust, or remove one layer without affecting the other.
Path: Console / URL Filtering / URL Filter Profiles / Create URL Filter Profile / Add Rule
Result: A layered filtering policy built from reusable, independently deployable pieces, rather than one large, hard-to-modify rule.
Best practices for URL filtering
| Practice | Why it matters | Recommended setting |
|---|---|---|
| Separate categories from profiles | Keeps domain lists reusable across multiple schedules or data caps | Theme-based categories (Social Media, Streaming, Learning) |
| Check Block/Allow list overlap | A domain in both lists creates ambiguous, hard-to-predict behavior | Review both lists together before saving a category |
| Match profile type to intent | Time Based and Usage Based solve different problems | Time Based for behavioral policy, Usage Based for bandwidth |
| Set a Redirect URL where appropriate | Avoids a generic browser error for blocked requests | A defined internal page explaining the block |
| Track Apply/Remove as deployments | Keeps enforcement changes auditable rather than silent edits | Review the Deployments list as the source of truth |
| Periodically review categories and profiles | Prevents drift from one-off test configurations | Scheduled review independent of any specific deployment |
Troubleshooting: common issues and resolutions
| Issue | Cause | Resolution |
|---|---|---|
| Category's block list doesn't restrict traffic | Profile referencing the category was never deployed, or was deployed with type Remove | Check the Deployments list for the most recent Apply/Remove for that profile and endpoint |
| Time Based profile blocks outside the intended hours | Schedule Days or Start/End Time were set incorrectly, or endpoint local time differs from expected | Re-check the exact schedule values against the endpoint's local time |
| A domain is both blocked and reachable | Domain appears in both Block List and Allow List, or in two categories with conflicting profiles | Review all categories and profiles referencing that domain and resolve the conflict at the category level |
| Deployment stuck at Ready to Deploy | Endpoint is offline or the agent isn't reporting | Confirm agent health on the target endpoint before expecting the task to progress |
| Usage Based profile doesn't seem to cap traffic | Data Limit or Data Unit was set incorrectly, or the profile wasn't deployed to the endpoint in question | Re-check the profile's Data Limit/Unit and confirm an Apply deployment reached that endpoint |
| Redirect URL doesn't appear for blocked requests | Redirect URL field was left blank on the category | Add a Redirect URL to the category and re-deploy the profile that references it |
Frequently asked questions
A category defines the actual domain lists: what to block, what to allow, and where to redirect. A profile defines the enforcement logic on top of one or more categories, either a time schedule or a data usage cap. The same category can be reused across multiple profiles.
Profile Type is set once per profile, Time Based or Usage Based. To combine both behaviors against the same category, create two separate profiles referencing that category and deploy both independently.
The request is blocked without a defined redirect destination, typically resulting in a generic browser-level error rather than a page you control. Set a Redirect URL on the category if you want blocked requests to land somewhere specific.
No. A Remove-type deployment stops enforcing that profile on the targeted endpoints. The underlying category and profile remain in the console and can be redeployed or reused later.
Yes, domains for the Block List and Allow List can be pasted in directly from a prepared list, one domain per line, rather than entering them individually.
Check the Deployments list for the most recent Apply or Remove deployment referencing that specific profile and endpoint. The most recent action reflects the current enforcement state.