


How to Configure Prohibited Software
Detect and automatically remove unauthorized or high-risk software from managed endpoints using configurable uninstall commands, end-user notifications, endpoint-level status tracking, and global exclusions.
How to Configure Prohibited Software
Overview
Why detecting an unwanted app isn't the same as removing it
Blocking an application by name stops it from launching, but it doesn't clean up what's already installed across the fleet. A vendor tool that was fine two years ago, a media player a user installed for a one-off task, a utility that's since been flagged as high-risk-these don't need a launch-time block, they need to be found wherever they're sitting and taken off the endpoint, ideally without a technician touching each machine by hand.
Prohibited Software is built for that inventory-driven cleanup: define a software title (and, optionally, exactly how to uninstall it), and the platform matches that definition against what's actually installed across endpoints, uninstalls it automatically when the auto-uninstall policy is enabled, and gives you a per-endpoint record of whether the removal succeeded. A global exclusion list keeps specific endpoints-a demo machine, a vendor's own laptop-out of enforcement without touching the underlying definition.
This guide walks the full workflow end to end: opening the Prohibited Software module, defining a prohibited software entry with its uninstall command, enabling the auto-uninstall policy, monitoring uninstall status per endpoint, excluding specific assets from enforcement, and confirming the removal actually reached a live endpoint.
- Define by software title, matched against real installs: pick the exact package (with its version) from what's already been inventoried, rather than typing a name and hoping it matches.
- Two uninstall command modes: use the default (Pre-fill) uninstall command the platform already knows for that package, or supply your own Custom command with the right silent switch.
- Auto-uninstall is a separate policy, not implicit: defining prohibited software doesn't remove it by itself-Auto-Uninstall Enabled is what turns detection into action.
- Notify before removing: an optional, editable notification message can be shown to the end user before their software is uninstalled.
- Exclude specific endpoints globally: a Global Exclusion list keeps named assets out of auto-uninstall enforcement across every prohibited software entry, not just one.
- See uninstall status per endpoint: Success/Failed status and the exact uninstall time are tracked per asset, not just at the definition level.
Prerequisites
Confirm these before creating a prohibited software entry. Selecting the wrong package/version, or leaving the auto-uninstall policy disabled, are the most common reasons a "blocked" application never actually gets removed.
- Administrator access: your account holds a role permitted to manage the Device Control → Prohibited Software module.
- Agent installed and reporting: the endpoint agent is installed, registered, and reporting healthy on every target device, and the software inventory for that device is up to date.
- Exact software title and version confirmed: the Software field matches against inventoried packages (e.g.
VLC media player (3.0.23)); confirm you're selecting the correct package rather than a similarly named plugin or sub-component. - Uninstall command decided: know whether the default (Pre-fill) uninstall command is sufficient, or whether you need a Custom command with a specific silent switch (e.g.
/S).
Architecture: how a prohibited software definition becomes a removal
A prohibited software entry defines what's unwanted and how to remove it. The auto-uninstall policy decides whether that removal happens automatically and what the end user sees. Settings scope which endpoints are exempt from enforcement fleet-wide.
| Stage | Component | Role |
|---|---|---|
| Definition | Prohibited Software entry | Software title, version, uninstall command type and command |
| Enforcement toggle | Auto-Uninstall Policy | Enables automatic removal, optional end-user notification and message |
| Exemption | Settings → Global Exclusion | Endpoint-scoped exception applied across all prohibited software entries |
| Execution | Endpoint agent | Detects the installed package, runs the uninstall command, reports status |
| Proof | Auto-Uninstall Status | Per-endpoint Success/Failed status with uninstall timestamp |
Pro tip: Search the Software field by the package name you expect (e.g. vlc) rather than guessing the exact display string-the dropdown surfaces every matching inventoried package, including sub-components and plugins, so you can confirm you're targeting the right one before the version auto-fills.
Step 1: Open Prohibited Software
Get oriented in Device Control before creating anything, so you know where the prohibited software list, the auto-uninstall policy, status, and settings each live.
Instructions
- From the main console, go to Endpoints → Device Control.
- Under Access and Applications, select the Prohibited Software card-"Reduces security risks by preventing the use of unapproved or high-risk applications."
- Note the sections in the left sidebar: Prohibited Software (definitions), Auto-Uninstall Policy, Auto-Uninstall Status, and Settings.
Path: Console / Endpoints / Device Control / Prohibited Software
Result: You're in the Prohibited Software module with visibility into any existing entries before authoring a new one.
Step 2: Create a prohibited software entry
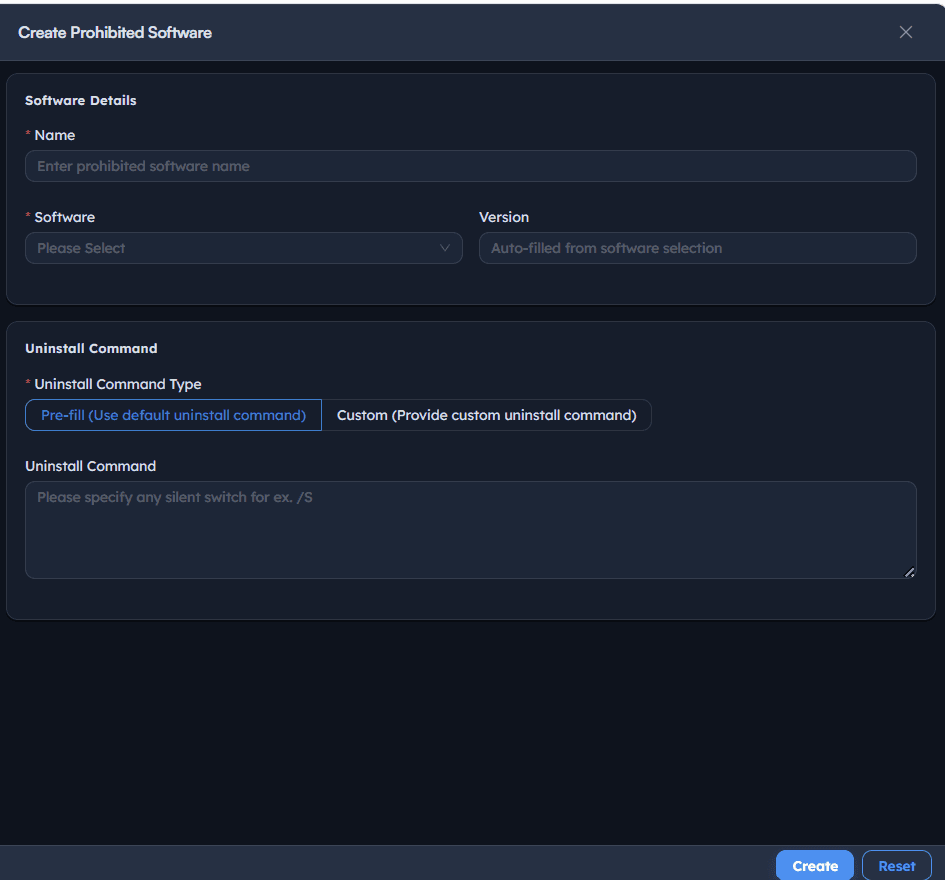
Define what's unwanted: a name for the entry, the exact software package and version, and how it should be uninstalled.
Instructions
- Go to Prohibited Software → Create.
- Enter a Name describing the entry's intent, e.g. Uninstall VLC.
- In the Software field, search and select the exact inventoried package, e.g.
VLC media player (3.0.23). Version auto-fills from the selection. - Under Uninstall Command, set Uninstall Command Type to
Pre-fill (Use default uninstall command)orCustom (Provide custom uninstall command). - If using Custom, enter the Uninstall Command exactly, including any silent switch, e.g.
"C:\Program Files\VideoLAN\VLC\uninstall.exe" /S. - Select Create.
Path: Console / Device Control / Prohibited Software / Create
Console: entry definition
| Field | Value |
|---|---|
| Name | Uninstall VLC |
| Software | VLC media player (3.0.23) |
| Version | 3.0.23 (auto-filled) |
| Uninstall Command Type | Pre-fill |
| Uninstall Command | "C:\Program Files\VideoLAN\VLC\uninstall.exe" /S |
Result: A prohibited software entry exists in the list alongside any others (e.g. an existing Uninstall VLC from linux entry targeting vlc (3.0.23-1)). It has no enforcement yet-that's controlled by the auto-uninstall policy in Step 3.
Important: The Software field lists every matching inventoried package, including plugins and sub-components (libvlccore9, vlc-plugin-visualization, vlc-bin, and similar). Selecting the wrong one creates an entry that never matches what's actually causing the problem on the endpoint.
Step 3: Configure the Auto-Uninstall Policy
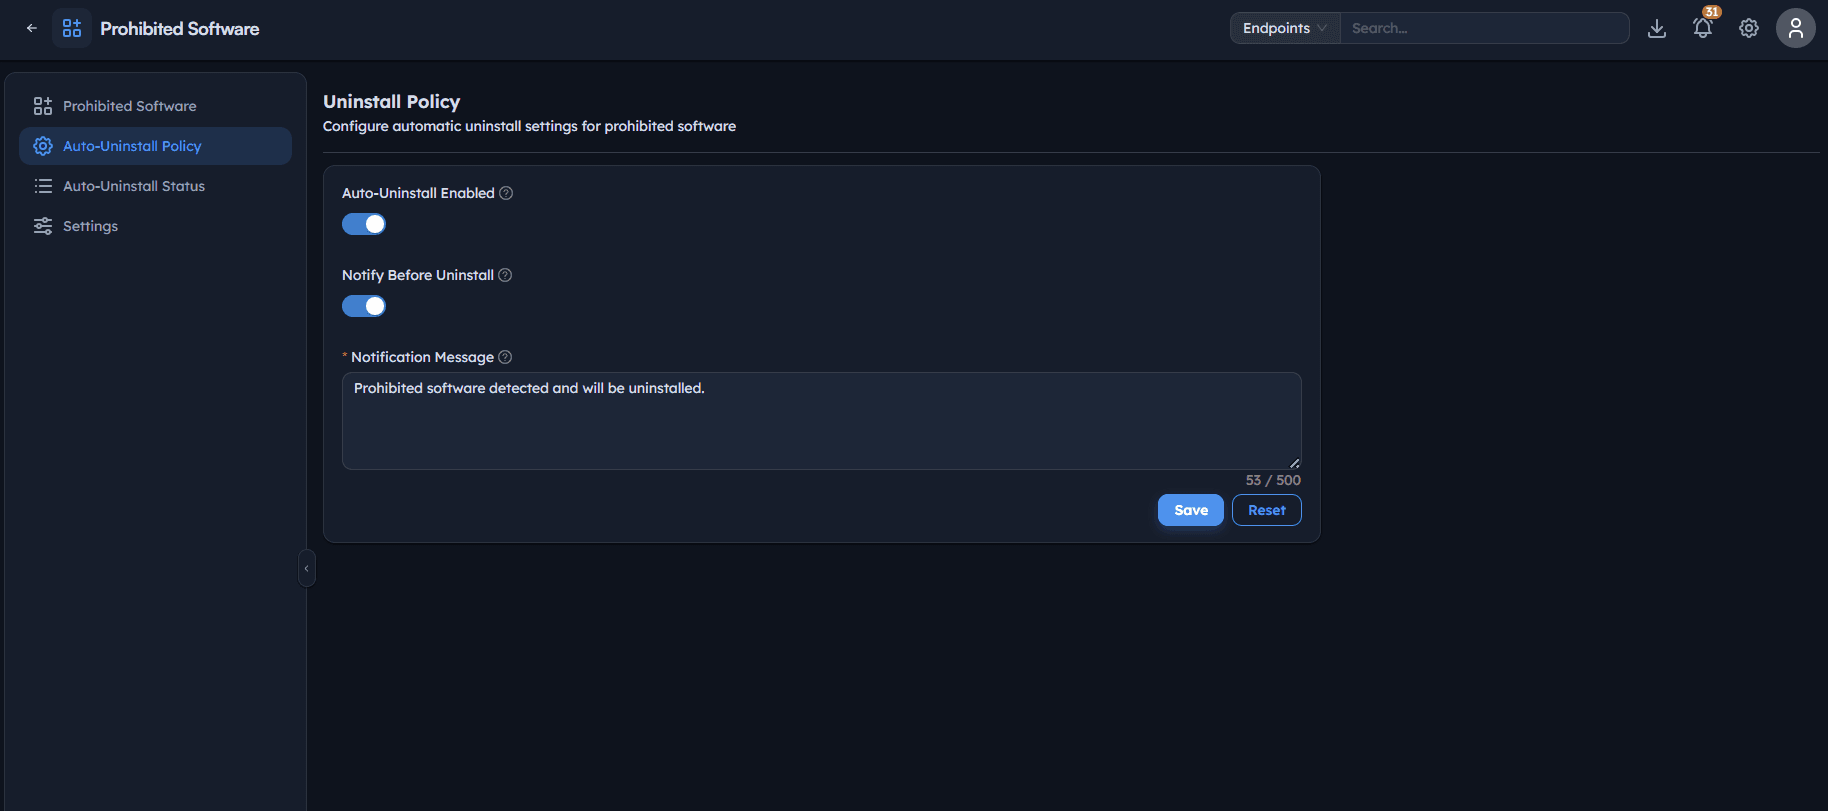
Turn detection into automatic action, and decide whether the end user is notified before their software is removed.
Instructions
- Go to Auto-Uninstall Policy.
- Toggle Auto-Uninstall Enabled on.
- Optionally toggle Notify Before Uninstall on to warn the end user first.
- Edit the Notification Message shown to the end user, e.g. "Prohibited software detected and will be uninstalled." (500-character limit).
- Select Save.
Path: Console / Device Control / Prohibited Software / Auto-Uninstall Policy
Console: policy definition
| Field | Value |
|---|---|
| Auto-Uninstall Enabled | On |
| Notify Before Uninstall | On |
| Notification Message | Prohibited software detected and will be uninstalled. |
Result: Every prohibited software entry is now eligible for automatic removal, and end users will see the notification message before it happens.
Warning: Auto-Uninstall Enabled applies platform-wide to every prohibited software entry, not just the one you most recently created. Confirm every existing entry is intentional before turning this on.
Step 4: Monitor Auto-Uninstall Status
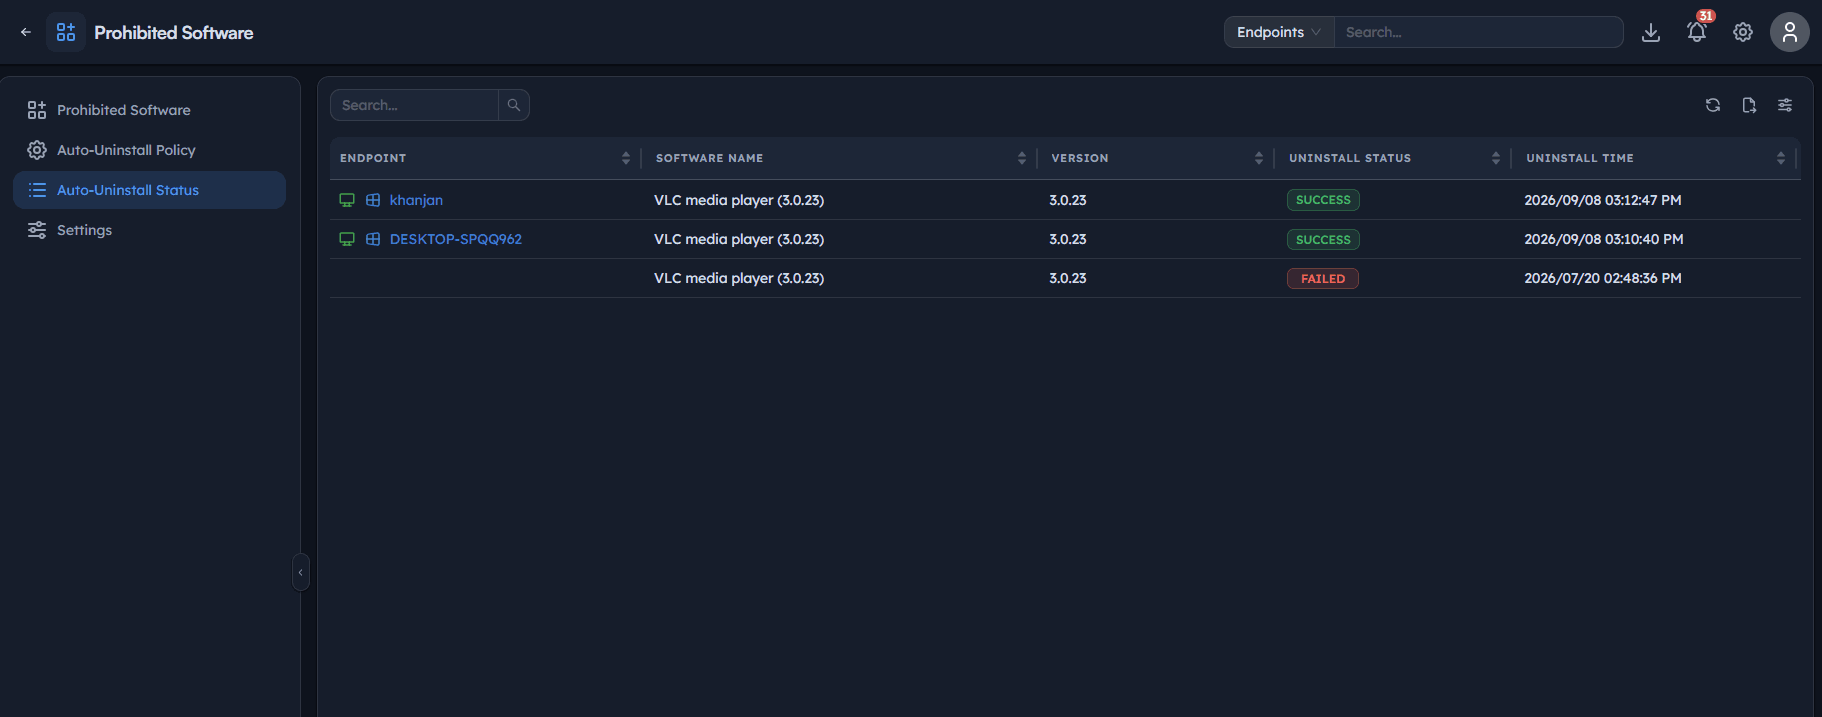
Confirm removal actually reached an endpoint, rather than assuming the policy took effect.
Instructions
- Go to Auto-Uninstall Status to see every uninstall attempt with Endpoint, Software Name, Version, Uninstall Status, and Uninstall Time.
- Read the Uninstall Status column:
SUCCESSconfirms removal completed;FAILEDmeans it did not. - Use the refresh control to pull the latest results after a policy change.
Path: Console / Device Control / Prohibited Software / Auto-Uninstall Status
Console: uninstall status
| Endpoint | Software Name | Version | Uninstall Status | Uninstall Time |
|---|---|---|---|---|
| <ENDPOINT-HOSTNAME> | VLC media player (3.0.23) | 3.0.23 | SUCCESS | 2026/09/08 03:10:40 PM |
| <ENDPOINT-HOSTNAME> | VLC media player (3.0.23) | 3.0.23 | FAILED | 2026/07/20 02:48:36 PM |
Result: A per-endpoint, timestamped audit trail of every uninstall attempt, successful or not.
Important: A FAILED status is worth investigating on its own-it doesn't roll back or retry automatically. Check the endpoint's agent connectivity and the uninstall command before assuming the software is gone.
Step 5: Exclude specific endpoints with Global Exclusion
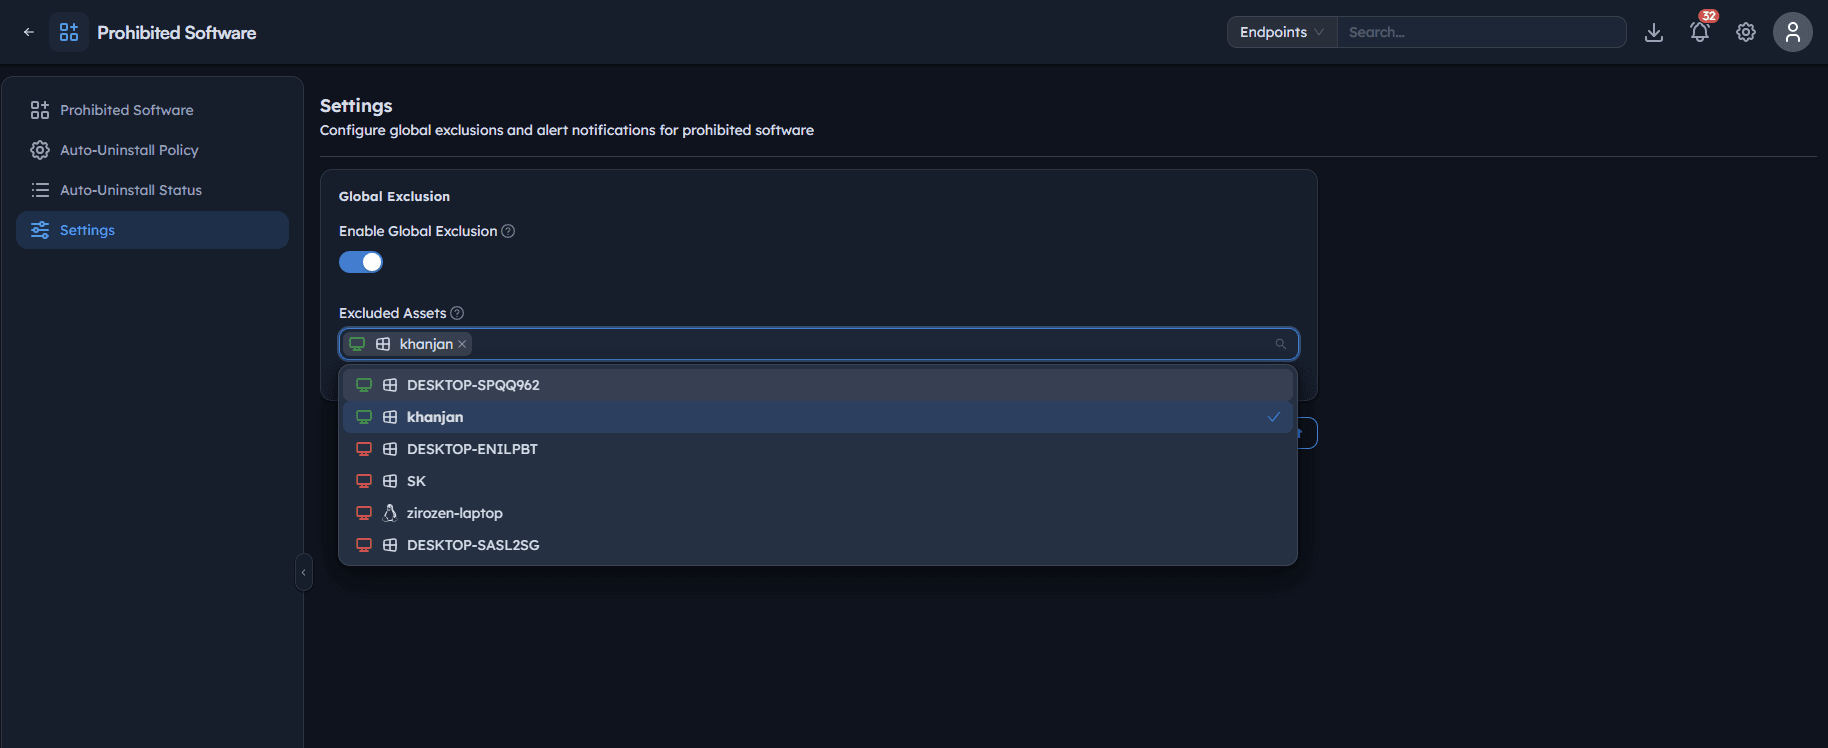
Keep a named endpoint out of auto-uninstall enforcement entirely, without editing any individual prohibited software entry.
Instructions
- Go to Settings.
- Toggle Enable Global Exclusion on. This reveals the Excluded Assets field.
- Search and select one or more endpoints to exclude, e.g.
<ENDPOINT-HOSTNAME>. - Select Save.
Path: Console / Device Control / Prohibited Software / Settings
Console: global exclusion
| Field | Value |
|---|---|
| Enable Global Exclusion | On |
| Excluded Assets | <ENDPOINT-HOSTNAME> |
Result: The selected endpoint(s) are exempt from auto-uninstall across every prohibited software entry, while enforcement continues normally everywhere else.
Pro tip: Global Exclusion is fleet-wide by endpoint, not by software title-if you only need to exempt one endpoint from one specific piece of software, reconsider whether that entry or policy should exist for that endpoint at all rather than using a broad exclusion.
Step 6: Confirm end-to-end enforcement
Verify the whole chain-definition, policy, and endpoint agent-actually results in a removal.
Instructions
- With Auto-Uninstall Enabled and Notify Before Uninstall on, wait for the agent on a matching endpoint to detect the prohibited software.
- The end user sees a system notification (e.g. a Windows PowerShell toast: "EndpointOps – Software Uninstall-Prohibited software detected and will be uninstalled.").
- Return to Auto-Uninstall Status and refresh; confirm a new row appears for that endpoint with Uninstall Status
SUCCESSand the current timestamp.
Path: Console / Device Control / Prohibited Software / Auto-Uninstall Status
Result: Confirmed, evidence-backed removal-a real notification reached the endpoint and the status list reflects a successful uninstall, not just an assumption based on the policy being enabled.
Best practices for prohibited software
| Practice | Why it matters | Recommended setting |
|---|---|---|
| Select the exact inventoried package | Plugins and sub-components can share a similar name but never trigger the same match | Confirm the package and version before saving the entry |
| Keep Notify Before Uninstall on | End users aren't surprised by software disappearing mid-task | On, with a clear, specific Notification Message |
| Use Custom uninstall commands when the default fails | The Pre-fill command doesn't cover every installer's silent-switch requirements | Custom, with the exact path and switch (e.g. /S) |
| Use Global Exclusion sparingly | A broad, fleet-wide exemption is easy to forget is still active | Scope to specific named endpoints with a clear reason |
| Check Auto-Uninstall Status after every policy change | Enabling the policy and successfully removing software are different facts | Confirm SUCCESS, not just that the policy shows enabled |
| Review Auto-Uninstall Status on a recurring basis | A FAILED entry doesn't retry on its own and can go unnoticed | Periodic audit independent of any specific rollout |
Troubleshooting: common issues and resolutions
| Issue | Cause | Resolution |
|---|---|---|
| Prohibited software entry created but nothing is removed | Auto-Uninstall Enabled is off | Go to Auto-Uninstall Policy and confirm the toggle is on |
| Uninstall Status shows FAILED | Uninstall command doesn't match the real installer path, or agent lost connectivity mid-run | Confirm the uninstall command and endpoint agent health, then re-check status |
| Software still present despite a SUCCESS status on a different machine | The Software field matched a different package/version than what's actually installed on the affected endpoint | Re-confirm the exact package and version selected in the entry |
| An endpoint never appears in Auto-Uninstall Status | The endpoint is listed under Global Exclusion, or the agent hasn't reported the inventory match yet | Check Settings → Excluded Assets, and confirm agent health |
| End user reports no notification before removal | Notify Before Uninstall is off, or the Notification Message field was left blank | Enable the toggle and confirm a Notification Message is saved |
| Custom uninstall command doesn't run silently | The silent switch is missing or incorrect for that installer | Confirm the correct switch (e.g. /S, /quiet) for the specific uninstaller |
Frequently asked questions
No. The entry only defines what to look for and how to remove it. Automatic removal only happens once Auto-Uninstall Enabled is turned on in the Auto-Uninstall Policy.
Pre-fill uses the default uninstall command the platform already associates with the selected package. Custom lets you specify the exact uninstall path and any silent switch yourself, useful when the default command doesn't match how that installer was deployed.
Yes. Enable Global Exclusion under Settings and add the endpoint to Excluded Assets. This applies across every prohibited software entry, not just one.
Only if Notify Before Uninstall is enabled. When it is, the endpoint shows a system notification with the configured Notification Message before the uninstall runs.
Check Auto-Uninstall Status. Each attempt is listed per endpoint with a Success or Failed status and the exact uninstall time.
Inventoried packages include plugins and sub-components alongside the main application (e.g. libvlccore9, vlc-bin alongside VLC media player itself). Select the specific package you actually intend to target.