


How to Configure Progressive Patch Deployment
Progressive Patch Deployment enables IT administrators to roll out software patches in controlled phases, reducing deployment risks and minimizing business disruption. By deploying updates to selected device groups first, validating patch success, and then expanding deployment, organizations can ensure reliable, secure, and efficient patch management across all endpoints.
How to Configure Progressive Patch Deployment
Overview:
Why a single deployment wave is a single point of failure
Pushing an application update to every endpoint at once is fast, and that speed is exactly the problem. If the update is defective, incompatible with a subset of hardware, or breaks a dependent workflow, the entire fleet finds out at the same time. There's no early warning, no small population absorbing the damage first, and rollback becomes an emergency response instead of a routine step.
Progressive deployment solves this by splitting a single rollout into ordered rings, each with its own success threshold, soak time, and promotion gate. A small validation population goes first. Only once it clears its bar does the rollout move to the next ring. A bad update is contained to a handful of machines instead of the whole estate, and the person running the rollout gets real signal from ring 1 before ring 2 is even in play. They have total four. (1.Validation ring, 2.Pilot ring, 3.Controlled ring and 4.Production ring.)
This guide walks the full workflow end to end: creating a progressive deployment, targeting it by category and severity, selecting the applications to deploy, scheduling the rollout, configuring a validation ring and a pilot ring with independent promotion rules, publishing the deployment, and monitoring it ring by ring through to completion.
- Contain failure: a defective update reaches a validation ring, not the estate, before it can do estate-wide damage.
- Promote on evidence: each ring only advances once its success rate clears the threshold you set, not on a fixed timer alone.
- Automate or hold deliberately: promotion mode can advance automatically when a ring meets its bar, or wait for manual sign-off.
- See real-time health: per-ring success rate, failure count, and soak countdown are visible while the rollout is in progress, not only after it finishes.
- Cover third-party and OS updates alike: the same ring model applies whether you're rolling out a browser update or a Windows patch.
Prerequisites
Confirm all four before creating a progressive deployment. A ring with no computer group assigned, or a threshold nobody agreed on, is the most common cause of a rollout stalling with no clear reason.
- Administrator access: your account holds a role permitted to manage Progressive Patch Deployment. Read-only operators can view deployment status but cannot create or publish deployments.
- Agent installed and reporting: the endpoint agent is installed, registered, and reporting healthy on every target device across every ring you plan to configure.
- Application catalog populated: the applications you intend to deploy (browsers, utilities, or other third-party software) are available in the application catalog to select from.
- Computer groups or endpoint scope defined: each ring needs its own target population, typically a small validation group, then a larger pilot group, then broader production. Decide this grouping before configuring rings, not while configuring them.
Architecture: how a deployment becomes a sequence of rings
A progressive deployment is one definition (what to deploy, to whom, and when) that fans out into an ordered list of rings, each with independent targeting and independent promotion rules. The platform evaluates each ring's health against its own threshold before advancing to the next.
| Stage | Component | Role |
|---|---|---|
| Definition | Progressive Deployment | Name, targeting category, severities, OS platform, applications, schedule |
| Sequence | Deployment Rings | Ordered list (e.g. Validation, Pilot), each with its own scope and thresholds |
| Gate | Promotion Mode | Auto (advances automatically on success) or Manual Hold (waits for sign-off) |
| Execution | Endpoint agent | Installs the application per ring, reports per-endpoint task status |
| Proof | Ring Progress dashboard | Live success rate, soak countdown, and deployment health per ring |
Pro tip: Keep Ring 1 small and diverse rather than large and homogeneous. Its job is to surface a problem fast, not to represent the whole fleet statistically.
Step 1: Open Progressive Patch Deployment
Get oriented before creating anything, so you know what's already been configured.
Instructions
- From the main console, go to Endpoints → Progressive Patch Deployment.
- Review the existing deployment list: each row shows Name, Platform, Enabled status, Rings count, Schedule, Severities, Category, and Created On.
Path: Console / Endpoints / Progressive Patch Deployment
Result: You have visibility into existing progressive deployments before creating a new one, including how many rings each already uses.
Step 2: Create a progressive deployment and set targeting
Define what this deployment is for and what category of update it covers.
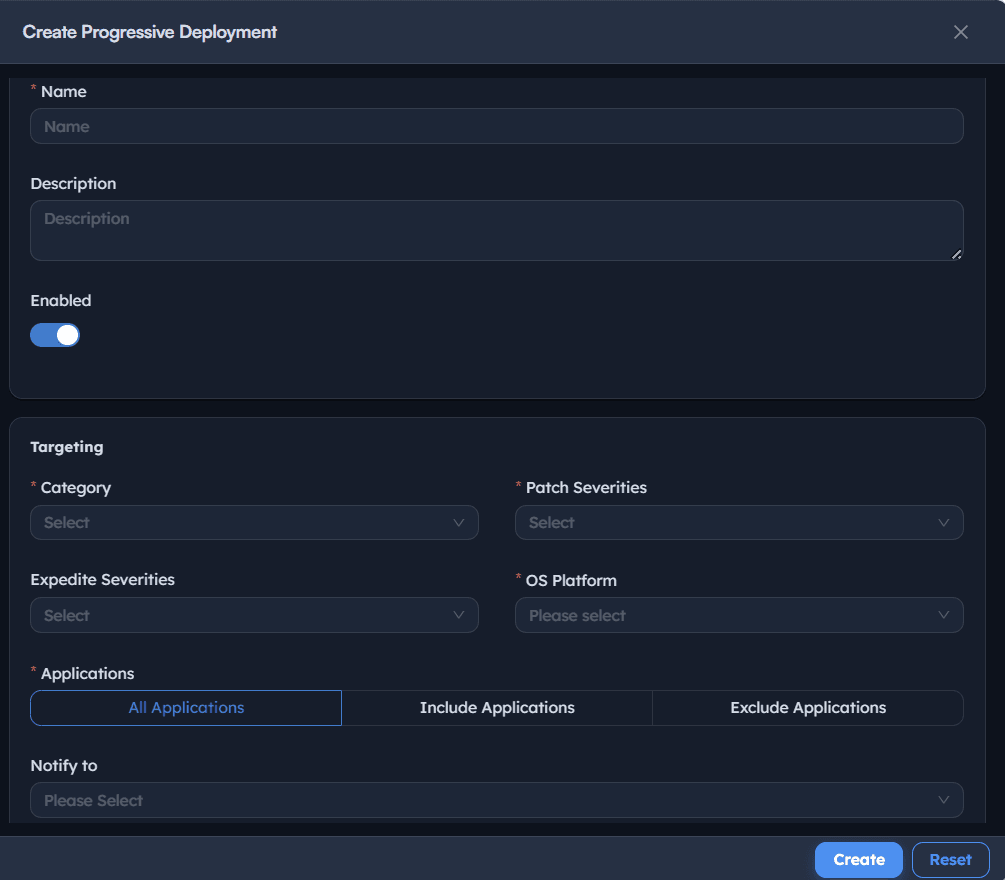
Instructions
- Select Create Progressive Deployment.
- Enter a Name describing the rollout, e.g. Install VLC & Chrome, and toggle Enabled.
- Optionally add a Description.
- Under Targeting, set Category (e.g.
Tools,Third Party) and Patch Severities (e.g.Unspecified,Critical,Moderate). - Set Expedite Severities if certain severities should skip standard soak time.
- Set OS Platform to the target operating system.
Path: Console / Progressive Patch Deployment / Create Progressive Deployment
Console: targeting fields
| Field | Value |
|---|---|
| Name | Install VLC & Chrome |
| Category | Tools, Third Party |
| Patch Severities | Unspecified, Critical, Moderate |
| OS Platform | Windows |
Result: The deployment has a name and a targeting scope, but no applications or rings yet.
Important: Category and Severity filters decide what counts as in-scope for this deployment going forward, not just for the applications you pick today. A category set too broadly will pull in updates you didn't intend to progressively roll out.
Step 3: Select the applications to deploy
Choose the specific applications this deployment will install or update, rather than leaving it to the category filter alone.
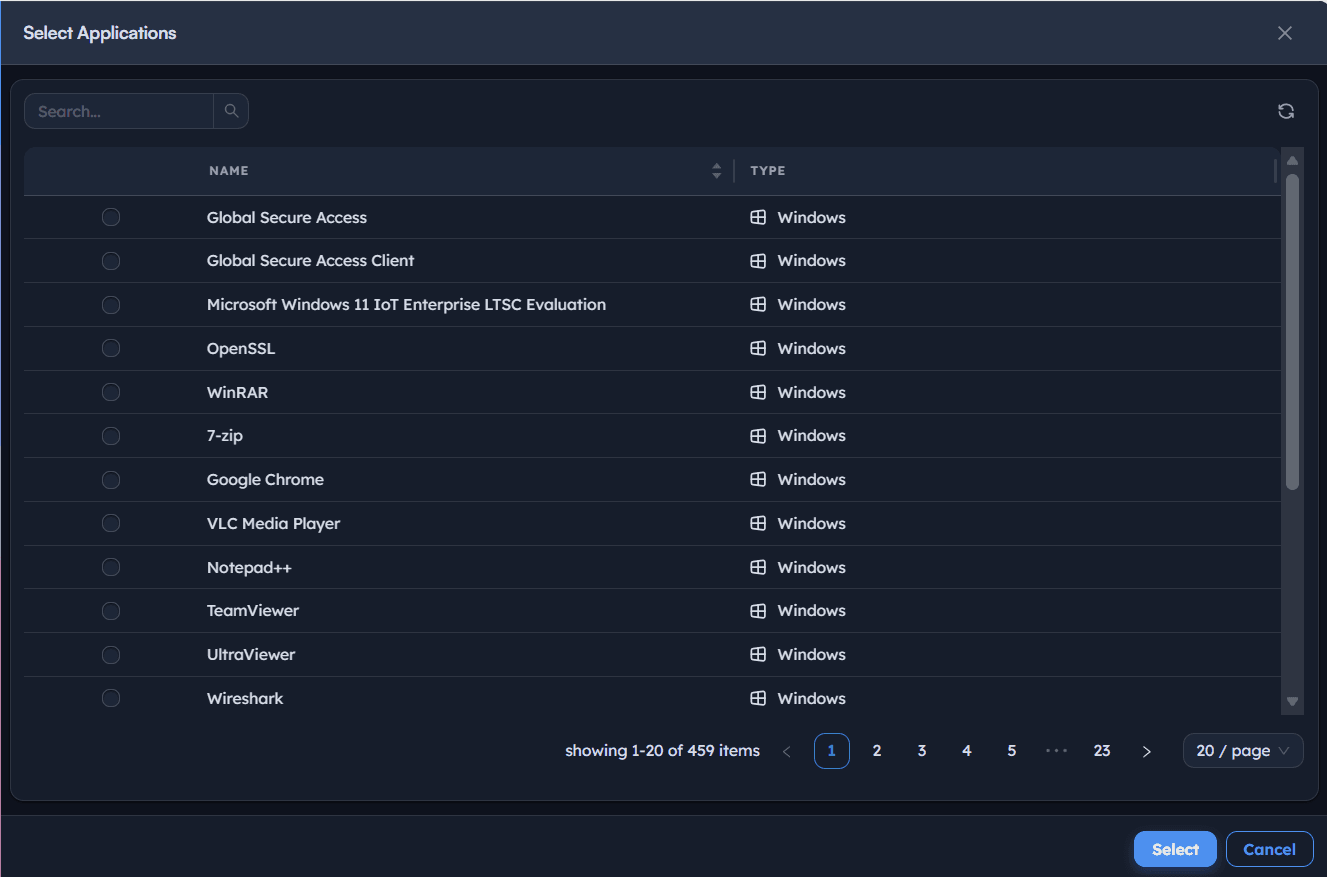
Instructions
- Under Applications, choose
All Applications,Include Applications, orExclude Applicationsdepending on how precisely you want to scope this deployment. - Select Add Applications to open the application picker.
- Search the catalog (hundreds of entries are typically available) and select the specific applications, e.g.
Google ChromeandVLC Media Player. - Confirm the Selected Applications list shows exactly the applications intended, with no extras carried over from a broad search.
Path: Console / Progressive Patch Deployment / Create Progressive Deployment / Applications / Add Applications
Console: selected applications
| Name | Type |
|---|---|
| Google Chrome | Windows |
| VLC Media Player | Windows |
Result: The deployment now has a concrete application list, separate from the broader category/severity targeting set in Step 2.
Best practice: Prefer Include Applications with an explicit list over All Applications for anything beyond a routine, well-understood update category. An explicit list is easier to reason about when a ring reports a failure.
Step 4: Configure the schedule
Decide when the rollout begins and whether it repeats.
Instructions
- Under Schedule, set the Schedule type:
Once,Daily,Interval,Weekly, orMonthly. - For a one-time rollout, select
Onceand set the Start At date and time using the calendar picker. - For a recurring rollout, select
Monthlyand set the Days of Month and start time instead. - Optionally set Notify to so a team is alerted as the deployment progresses.
Path: Console / Progressive Patch Deployment / Create Progressive Deployment / Schedule
Result: The deployment has a defined start time. Rings, configured next, inherit this schedule as their starting point.
Step 5: Configure the first ring (Validation)
Define the smallest, earliest ring: its target population, promotion rule, and the thresholds that decide whether the rollout is allowed to continue.
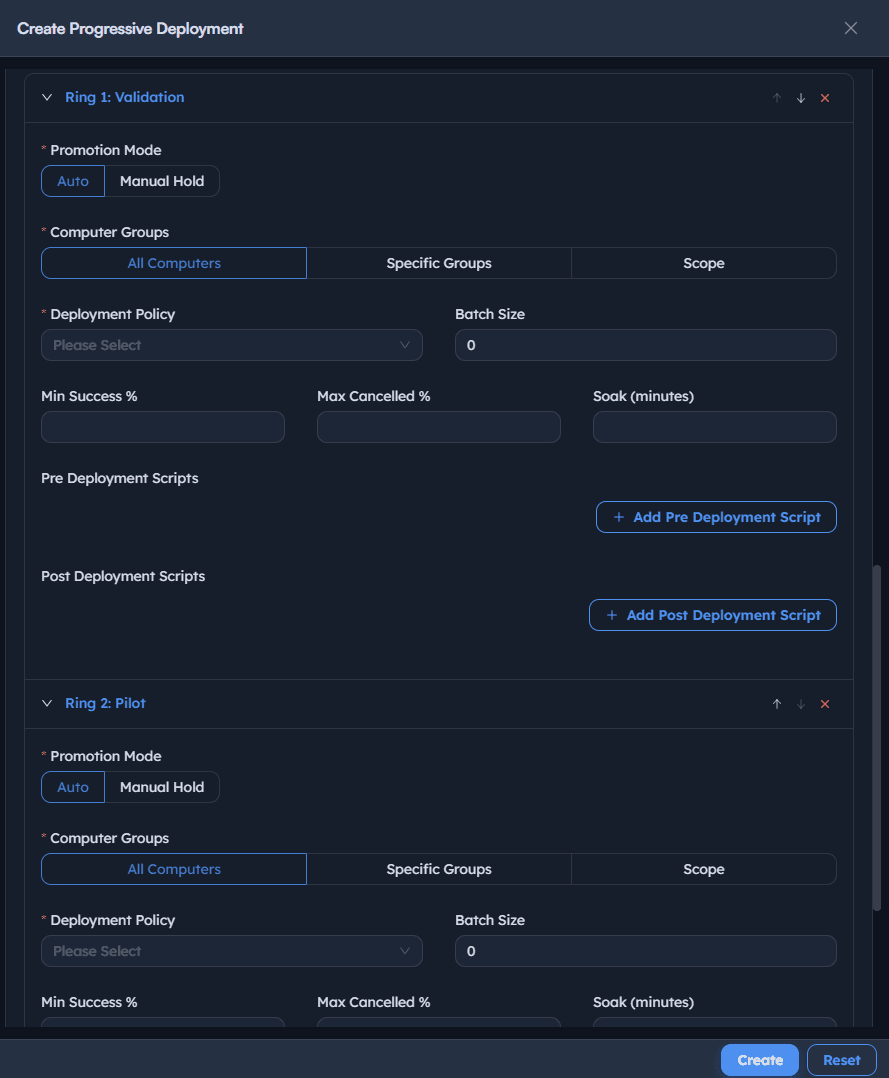
Instructions
- Under Deployment Rings, the first ring is created by default, e.g. Ring 1: Validation.
- Set Promotion Mode to
Auto(advances automatically once thresholds are met) orManual Hold(waits for an admin to promote it). - Set Computer Groups to
All ComputersorSpecific Groups, or set Scope Endpoints toSpecific Endpointsand select the exact target device(s) for this ring. - Set Deployment Policy (e.g.
OOB Instant deployment policy, typeInstant) and Batch Size for how many endpoints install concurrently within the ring. - Set Min Success %, the minimum success rate required before promotion, Max Cancelled %, the cancellation threshold that halts the ring, and Soak (minutes), how long to wait and observe after installation before evaluating promotion.
- Optionally add Pre Deployment Scripts and Post Deployment Scripts to run before or after installation on this ring.
Path: Console / Progressive Patch Deployment / Create Progressive Deployment / Deployment Rings / Ring 1: Validation
Console: Ring 1 configuration
| Field | Value |
|---|---|
| Ring Name | Ring 1: Validation |
| Promotion Mode | Manual Hold |
| Scope Endpoints | Specific Endpoints: <ENDPOINT-HOSTNAME> |
| Deployment Policy | OOB Instant deployment policy (Instant) |
| Min Success % | 80% |
| Max Cancelled % | 20% |
| Soak (minutes) | 0 |
Result: Ring 1 is fully defined with its own target, its own promotion threshold, and its own soak window, independent of any ring that follows it.
Warning: A Min Success % set too low defeats the purpose of a validation ring. If a ring can "succeed" while a meaningful fraction of it fails, a real problem can still propagate to the next ring.
Step 6: Add a second ring (Pilot)
Extend the rollout to a larger population once Ring 1 is defined, with its own independent thresholds.
Instructions
- Select Add Ring to append a new ring, e.g. Ring 2: Pilot.
- Configure it the same way as Ring 1: Promotion Mode, Computer Groups or Scope Endpoints, Deployment Policy, Batch Size, Min Success %, Max Cancelled %, Soak (minutes), and optional pre/post deployment scripts.
- Set a tighter or looser threshold than Ring 1 deliberately. A pilot ring often carries a higher Min Success % (e.g.
95%) since it's a larger, more consequential population than validation. - Repeat Add Ring for as many stages as the rollout needs (validation, pilot, broad, critical infrastructure) before publishing.
Path: Console / Progressive Patch Deployment / Create Progressive Deployment / Deployment Rings / Add Ring
Console: Ring 2 configuration
| Field | Value |
|---|---|
| Ring Name | Ring 2: Pilot |
| Scope Endpoints | Specific Endpoints: <ENDPOINT-HOSTNAME-2> |
| Deployment Policy | OOB Instant deployment policy (Instant) |
| Min Success % | 95% |
| Max Cancelled % | 0% |
Result: A two-ring sequence exists, Validation then Pilot, each independently scoped and independently gated.
Pro tip: Give each ring a name that describes its role, not just a number. "Ring 2: Pilot" is unambiguous months later; "Ring 2" on its own is not.
Step 7: Publish the deployment
Save and activate the progressive deployment so it begins on its scheduled start time.
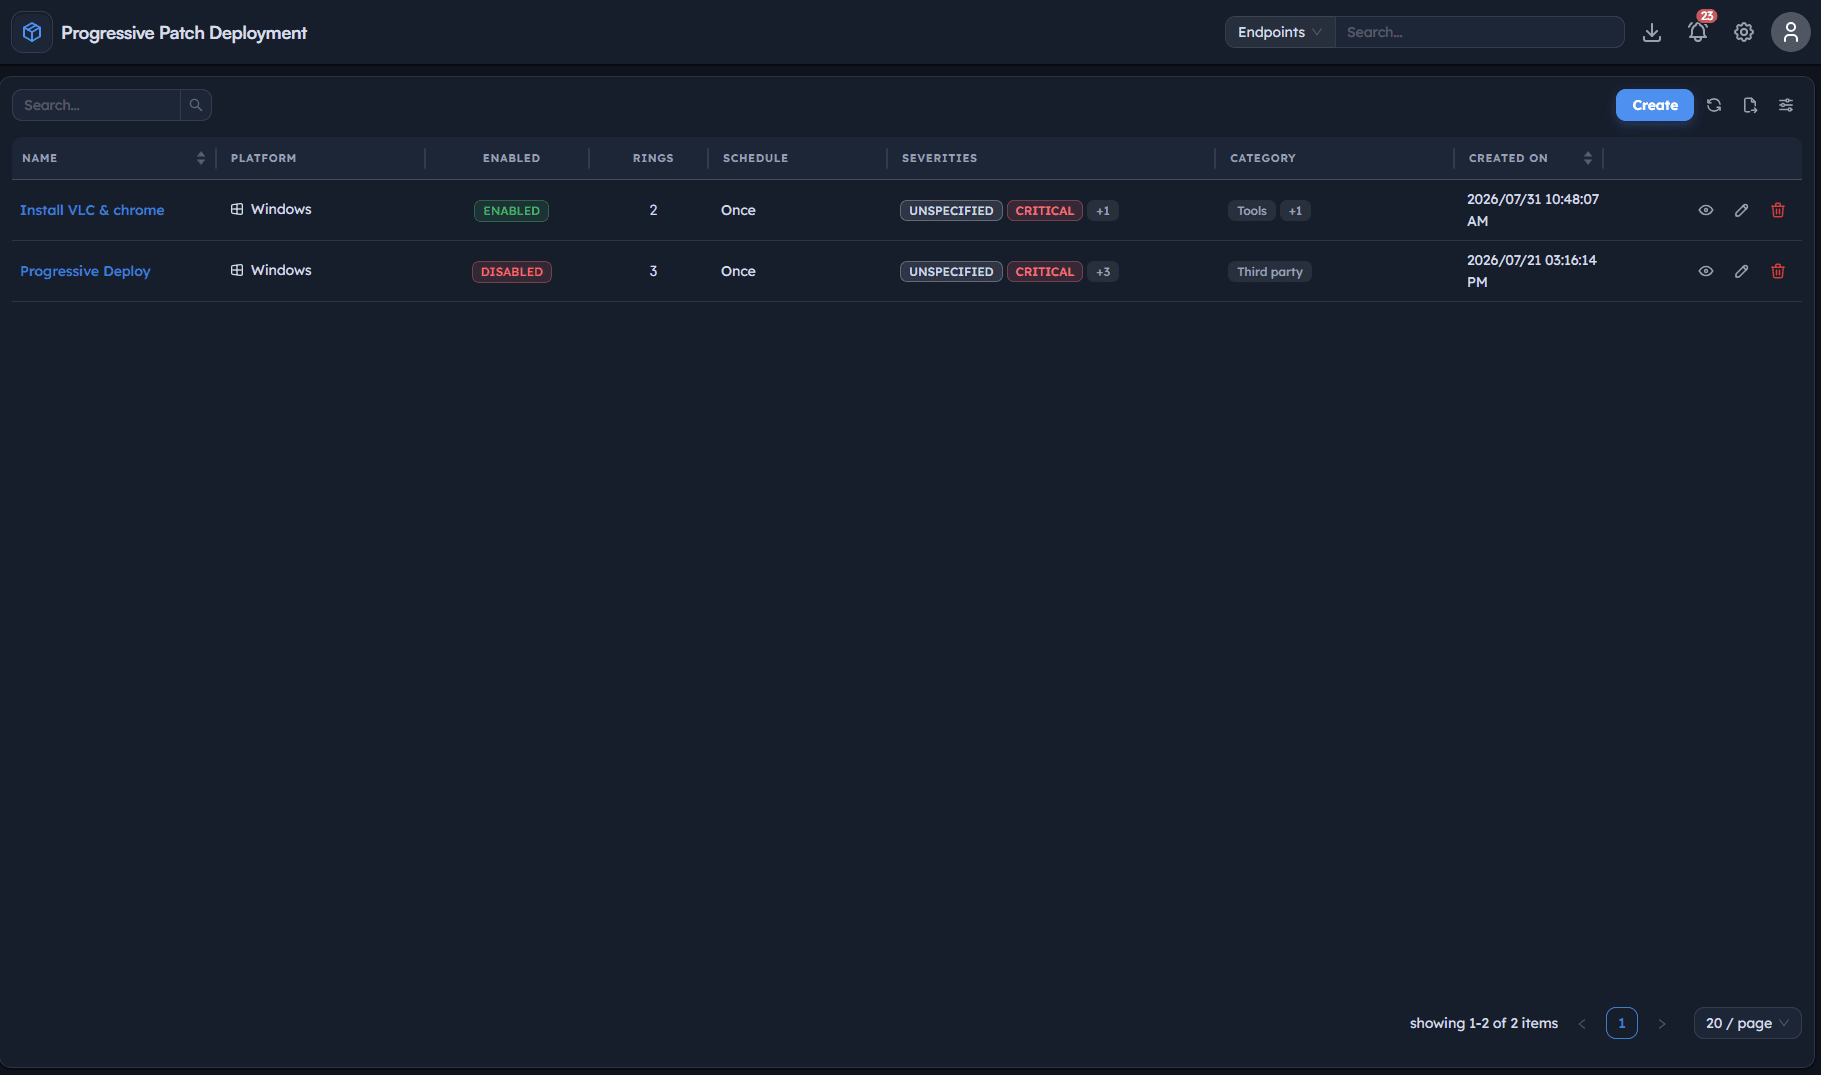
Instructions
- Review the full deployment: targeting, applications, schedule, and every ring's configuration.
- Confirm the Enabled toggle is on.
- Select Save (or the equivalent publish action) to activate the deployment.
Path: Console / Progressive Patch Deployment / Create Progressive Deployment / Save
Result: The deployment appears in the Progressive Patch Deployment list as Enabled, and will begin running at its scheduled start time.
Step 8: Monitor ring progress in real time
Track the rollout as it moves through each ring, watching success rate and soak status rather than waiting for a final report.
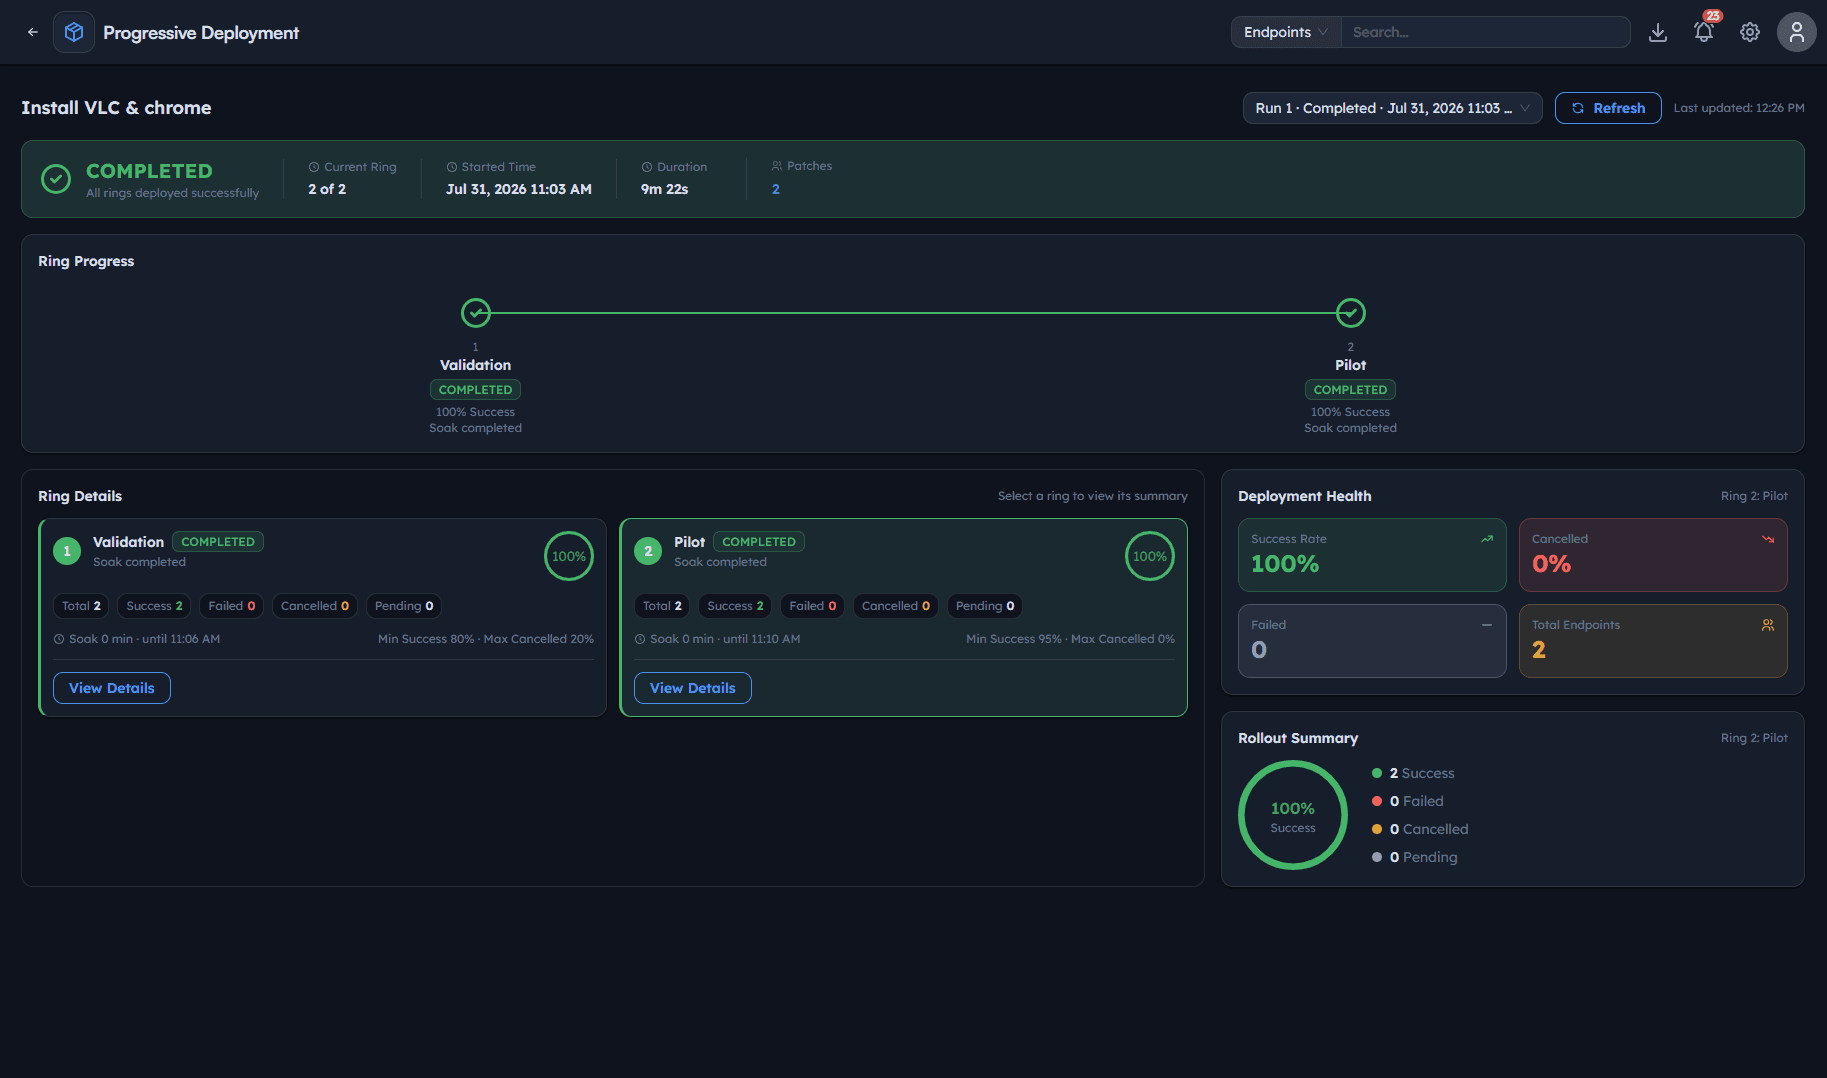
Instructions
- Open the running deployment, e.g. Install VLC & Chrome, to see its live Run view.
- Read the top summary: overall status (
IN PROGRESS,COMPLETED), Current Ring (e.g.1 of 2), Started Time, Duration, and Patches count. - Review Ring Progress: each ring shows its state (
IN PROGRESS,PENDING,COMPLETED) and success percentage. - Select a ring under Ring Details to see its Deployment Health: Success Rate, Cancelled rate, and counts for Total, Success, Failed, Cancelled, and Pending endpoints.
- Watch the Soak countdown (e.g. Soak 0 min: until 11:06 AM) alongside the configured Min Success % and Max Cancelled % thresholds for that ring.
Path: Console / Progressive Patch Deployment / <Deployment Name> / Run view
Console: ring progress (mid-rollout)
| Ring | State | Success | Notes |
|---|---|---|---|
| 1: Validation | In Progress | 100% | Soak 0 min until 11:06 AM, Min Success 80% |
| 2: Pilot | Pending | 0% | Not started, Min Success 95% |
Result: A live, per-ring view of exactly where the rollout stands, with enough detail to decide whether to promote, hold, or intervene.
Best practice: Don't just watch the top-line success percentage. Check the Failed and Cancelled counts specifically, since a ring can show a passing rate while still containing a small number of genuine failures worth investigating before promotion.
Step 9: Review per-endpoint ring deployment tasks
Drill into the actual install tasks behind a ring's success rate, endpoint by endpoint and application by application.
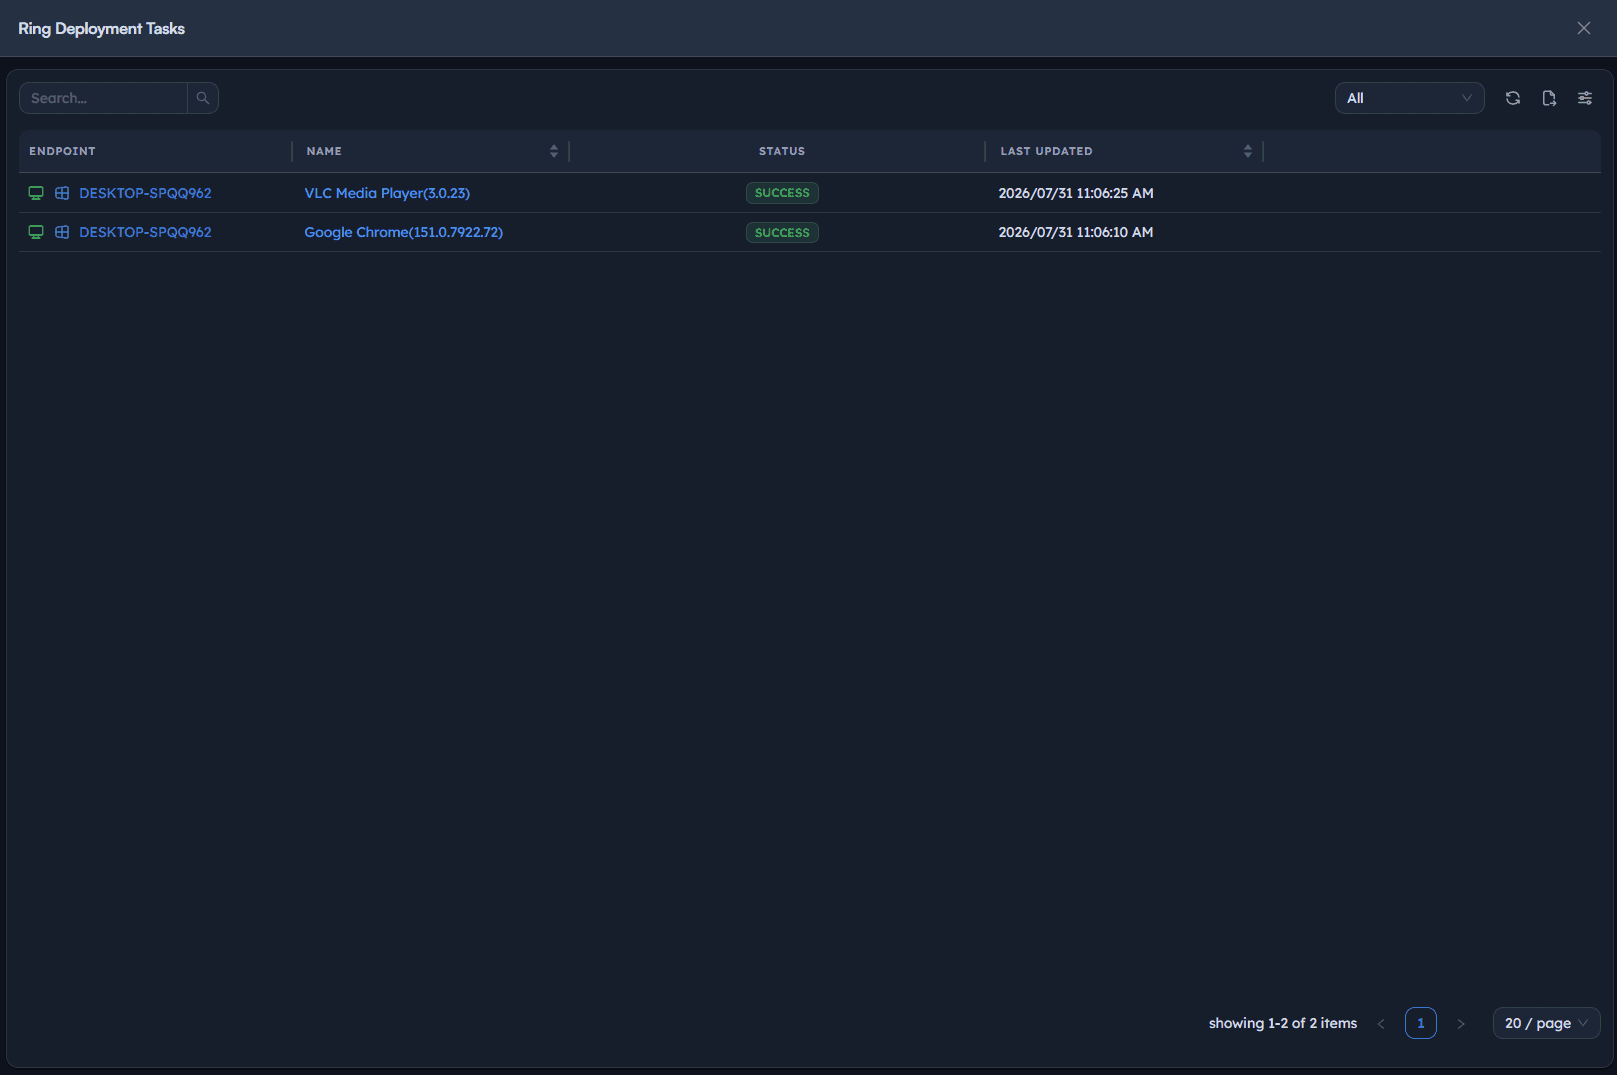
Instructions
- From the ring's detail view, open Ring Deployment Tasks.
- Review each row: Endpoint, Name (the specific application and version, e.g. Google Chrome(151.0.7922.72)), Status (
SUCCESS,IN PROGRESS,FAILED), and Last Updated. - Use this view to confirm that a ring's aggregate success percentage is backed by real, individual task completions, not just a rollup number.
Path: Console / Progressive Patch Deployment / <Deployment Name> / Ring Details / Ring Deployment Tasks
Console: ring deployment tasks (example)
| Endpoint | Application | Status | Last Updated |
|---|---|---|---|
| <ENDPOINT-HOSTNAME> | VLC Media Player (3.0.23) | SUCCESS | 2026/07/31 11:06:25 AM |
| <ENDPOINT-HOSTNAME> | Google Chrome (151.0.7922.72) | SUCCESS | 2026/07/31 11:06:10 AM |
Result: Individual task-level evidence for every endpoint in the ring, the detail behind the ring's headline success rate.
Step 10: Confirm ring promotion and full completion
Follow the rollout from the first ring's soak completion through to every ring finishing, and confirm the deployment closes out cleanly.
Instructions
- Once Ring 1 meets its Min Success % and completes its soak window, its state changes to
COMPLETED(shown as Soak completed). - If Promotion Mode is
Manual Hold, promote the next ring deliberately once you're satisfied with Ring 1's result; ifAuto, confirm Ring 2 begins on its own. - Watch Ring 2 move from
PENDINGtoIN PROGRESS, with its own success rate climbing as its endpoints complete. - Once every ring reports
COMPLETED, the overall deployment status changes toCOMPLETED, e.g. All rings deployed successfully, with a final Duration and Rollout Summary (Success / Failed / Cancelled / Pending counts) shown per ring. - Return to the Progressive Patch Deployment list to confirm the deployment's overall record reflects the completed run.
Path: Console / Progressive Patch Deployment / <Deployment Name> / Run view
Console: final state
| Ring | State | Success |
|---|---|---|
| 1: Validation | Completed | 100% |
| 2: Pilot | Completed | 100% |
Result: A fully promoted, fully completed rollout with a per-ring audit trail from validation through to the last ring, rather than a single all-at-once push with no staged evidence behind it.
Warning: A deployment that shows COMPLETED with a non-zero Failed count in any ring succeeded procedurally, not necessarily functionally. Check the ring's Deployment Health and Ring Deployment Tasks before treating a completed rollout as a fully clean one.
Best practices for progressive patch deployment
| Practice | Why it matters | Recommended setting |
|---|---|---|
| Small, diverse Ring 1 | Surfaces a real problem fast instead of averaging it away in a large population | A handful of endpoints across different hardware/app profiles |
| Explicit application selection | Keeps scope predictable and failures easy to trace to a specific update | Include Applications with a named list over All Applications |
| Independent thresholds per ring | Later, larger rings should tolerate less failure than an early validation ring | Lower Min Success % on Ring 1, higher on later rings |
| Manual Hold for early rings | Keeps a human in the loop before a rollout reaches a consequential population | Manual Hold on Validation/Pilot, Auto only once trusted |
| Meaningful soak time | Gives a ring time to reveal delayed failures before promotion | Non-zero soak minutes for anything beyond a trivial update |
| Named, role-based ring labels | Keeps a multi-ring deployment legible months later | "Ring 1: Validation", "Ring 2: Pilot", not just numbers |
| Check task-level detail before promoting | A passing aggregate rate can still mask a real failure worth investigating | Review Ring Deployment Tasks, not just the success percentage |
Troubleshooting: common issues and resolutions
| Issue | Cause | Resolution |
|---|---|---|
| Ring stuck at Pending indefinitely | Promotion Mode is Manual Hold and the previous ring hasn't been promoted, or the previous ring hasn't met its threshold | Check the prior ring's Deployment Health and promote manually if it has genuinely met its Min Success % |
| Ring shows 0% success with no tasks | Scope Endpoints or Computer Groups for that ring is empty or misconfigured | Confirm the ring's Scope Endpoints/Computer Groups selection before the deployment starts |
| Deployment doesn't start at scheduled time | Schedule was saved as a different type (e.g. Monthly) than intended, or Enabled was left off | Confirm both the Schedule type/Start At value and the Enabled toggle before the intended start time |
| A ring completes with Failed entries but still shows COMPLETED | The ring's success rate still cleared Min Success % despite some failures | This is expected behavior, not a bug; review Ring Deployment Tasks to address the specific failed endpoints separately |
| Wrong application version deployed | Selected Applications list included an unintended entry from a broad catalog search | Review Selected Applications carefully before saving; remove and re-add if the wrong version or product was picked |
| Second ring uses the same thresholds as the first by accident | Ring 2 was added by duplicating Ring 1's settings without adjustment | Explicitly review and adjust Min Success %, Max Cancelled %, and Scope for every added ring |
Frequently asked questions
Auto advances the deployment to the next ring automatically once the current ring meets its Min Success % and completes its soak window. Manual Hold pauses at that point until an admin explicitly promotes the ring, giving a human the final say before a larger population is affected.
The category and severity targeting is flexible, but it's clearer to keep OS patching and third-party application rollouts in separate deployments, since their risk profiles, thresholds, and rollback paths are usually different.
The ring halts rather than promoting, since it has exceeded the tolerance you configured. Review the ring's Deployment Health and Ring Deployment Tasks to understand the failures before deciding whether to retry, adjust, or cancel the rollout.
Two rings, a small validation population and a larger pilot, covers most application rollouts. Larger or higher-risk changes benefit from adding a broad production ring and a critical infrastructure ring after those, the same staged logic as patch management ring deployment.
Yes, intentionally. Soak time is there to catch problems that don't appear immediately at install, such as a service failing to restart cleanly. A soak time of 0 minutes skips that observation window entirely.
Yes. Pre Deployment Scripts and Post Deployment Scripts are configured per ring, so an early validation ring can carry extra diagnostic scripts that later, larger rings don't need to run.