


How to Configure File Access Control
File Access Control enables organizations to centrally manage and enforce file and folder permissions across all endpoints. It allows administrators to define granular access policies for users and groups, deploy them consistently, prevent unauthorized access, and maintain security, compliance, and audit readiness through centralized policy management.
How to Configure File Access Control
Overview:
Why file permissions need policy, not one-off ACL edits
Setting an NTFS permission by hand on one machine is a five-minute task. Doing it consistently across a fleet, keeping it consistent after a reimage, and proving later which accounts had write access to a sensitive folder on a given date, is a different problem entirely. Manual ACL edits drift the moment someone rebuilds a machine or copies a folder structure without copying its permissions, and there's no record of what was intended versus what happened to be configured.
File Access Control treats a file or folder permission as a deployable, auditable policy rather than a one-time setting. A policy defines a target path, the user or group it applies to, and the specific permissions to allow or deny, and that policy is then deployed to endpoints the same way any other managed configuration is, with a tracked task and a per-endpoint result.
This guide walks the full workflow end to end: creating a File Access Control policy with a defined target and principal, configuring granular Allow/Deny permissions, adding multiple access control actions to a single policy, deploying that policy to endpoints, and confirming the deployment succeeded on each target.
- Consistent enforcement: the same permission structure applies wherever the policy is deployed, not whatever happened to be set locally.
- Granular Allow/Deny control: Read, Write, Execute, Modify, and Full Control are each set independently, not bundled into a single access level.
- Multiple rules per policy: one policy can carry several access control actions, each with its own target, principal, and permission set.
- Startup enforcement: a policy can be set to apply on startup, so the permission structure is reasserted even if something changed it in the meantime.
- Deployment-tracked: applying a policy is a tracked deployment with per-endpoint task status, not an untracked script run.
Prerequisites
Confirm all four before creating a policy. A policy targeting the wrong path, or a principal name typed incorrectly, is the most common cause of a deployment reporting success while changing nothing.
- Administrator access: your account holds a role permitted to manage File Access Control. Read-only operators can view deployment status but cannot create policies or deployments.
- Agent installed and reporting: the endpoint agent is installed, registered, and reporting healthy on every target device.
- Exact target path confirmed: know the precise file or folder path the policy will target, e.g.
C:\Folder\file.txt, verified against a real endpoint rather than assumed. - User/Group principal identified: know the exact domain and account or group name the policy applies to, e.g.
DOMAIN\Usersor a specific administrator account, in the format the policy expects.
Architecture: how a policy becomes an enforced file permission
A policy defines one or more access control actions, each pairing a target (file or folder) and a principal (user or group) with a specific set of Allow/Deny permissions. A deployment binds the policy to endpoints and installs it, and the agent enforces it, optionally reasserting it on every startup.
| Stage | Component | Role |
|---|---|---|
| Definition | File Access Control Policy | Name, Configuration Level, one or more Access Control Actions |
| Action | Access Control Action | Target Type/Path, User/Group Principal, Action, Permissions (Allow/Deny) |
| Binding | Policy Deployment | Scope endpoints, File Access Control Policy, deployment policy |
| Execution | Endpoint agent | Installs the permission set, optionally reapplies it on startup |
| Proof | Deployment Tasks | Per-endpoint Status (e.g. Success) and Last Updated timestamp |
Pro tip: Verify the target path and principal name on one representative endpoint before building the policy. A path or account name typed from memory is one of the easiest things to get subtly wrong.
Step 1: Open File Access Control
Get oriented before creating anything, so you know where policies and deployments live.
Instructions
- From the main console, go to Endpoints → Device Control.
- Under Data Protection, select File Access Control, described as controlling access to files and folders based on defined security policies.
- Note the module's two main areas: Policy (or Policies) and Deployments.
Path: Console / Endpoints / Device Control / File Access Control
Result: You're in the File Access Control module with visibility into existing policies before authoring a new one.
Step 2: Create a File Access Control policy and set its details
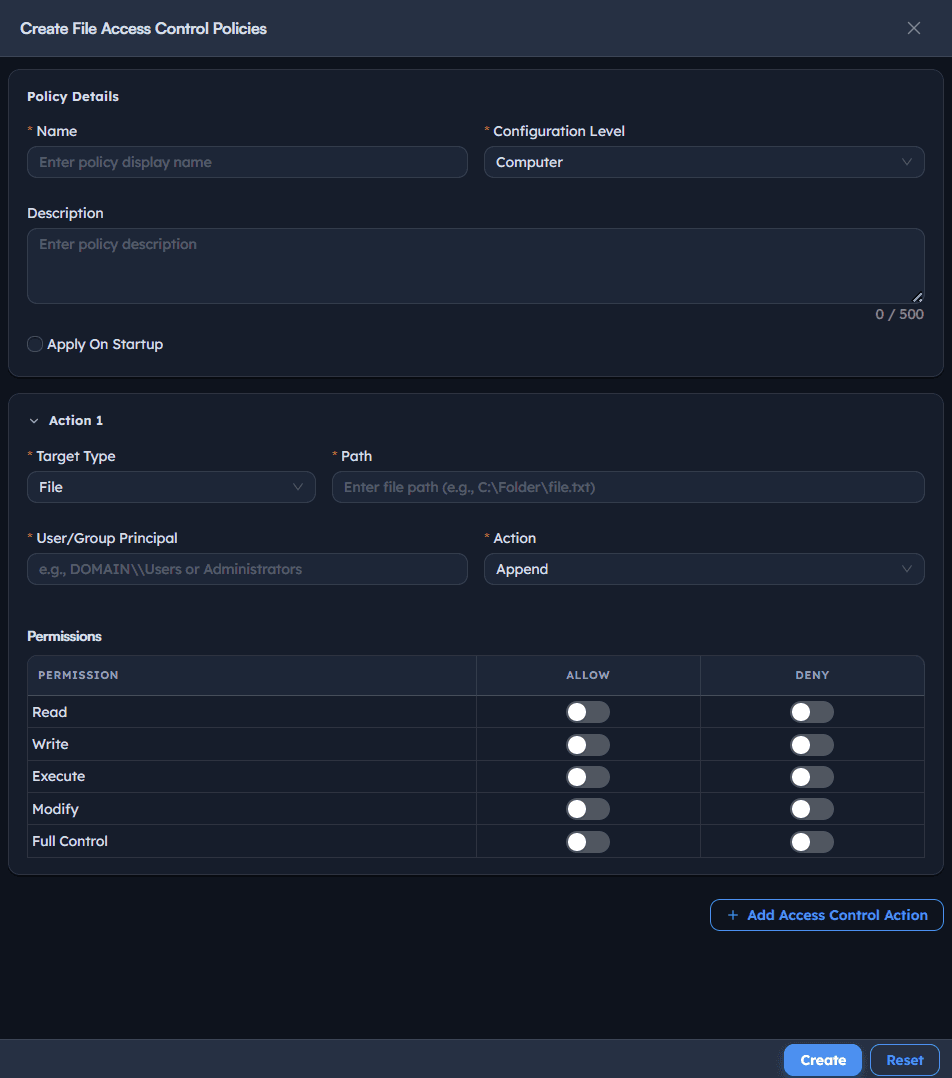
Start the policy with a name, configuration level, and whether it should reassert itself on startup.
Instructions
- Go to Create File Access Control Policies.
- Enter a Name for the policy, e.g. File Control.
- Set Configuration Level to
Computer(applies at the machine level). - Add an optional Description.
- Toggle Apply On Startup on if the permission structure should be reapplied every time the endpoint starts, useful for permissions that could otherwise drift.
Path: Console / File Access Control / Create File Access Control Policies
Console: policy details
| Field | Value |
|---|---|
| Name | File Control |
| Configuration Level | Computer |
| Apply On Startup | On |
Result: A named policy shell exists. It has no target, principal, or permissions yet, those are defined in the first access control action.
Step 3: Define the target for Action 1
Specify exactly what file or folder this action controls.
Instructions
- Under Action 1, set Target Type to
FileorFolderdepending on the scope needed. - Set Path to the exact location, e.g.
C:\Folder\file.txtfor a single file, or a folder path for everything beneath it.
Path: Console / File Access Control / Create File Access Control Policies / Action 1
Console: target fields
| Field | Value |
|---|---|
| Target Type | File |
| Path | C:\Folder\file.txt |
Result: The action now has a concrete, unambiguous target rather than a placeholder.
Important: Folder-level targets apply to everything beneath that folder, including files added later. Confirm that's the intended scope before choosing Folder over a specific File path.
Step 4: Set the User/Group principal and action
Specify who this rule applies to, and how the rule should be applied relative to any existing permissions.
Instructions
- Set User/Group Principal to the exact account or group, e.g.
DOMAIN\Usersor a named administrator account. - Set Action to
Appendto add this rule alongside any existing permissions on the target, rather than replacing them outright.
Path: Console / File Access Control / Create File Access Control Policies / Action 1
Console: principal fields
| Field | Value |
|---|---|
| User/Group Principal | DOMAIN\Users or Administrator |
| Action | Append |
Result: The rule now specifies exactly who it governs and how it combines with any pre-existing permission entries on the target.
Warning: Confirm the exact principal name and domain prefix. A group name typed without its domain prefix, or a slightly misspelled account name, can silently target a principal that doesn't exist, resulting in a deployment that reports success but enforces nothing.
Step 5: Configure Allow/Deny permissions
Set each permission independently rather than choosing a single bundled access level.
Instructions
- Under Permissions, review each row: Read, Write, Execute, Modify, Full Control.
- For each permission, select Allow or Deny as needed. Leaving both unchecked for a permission typically means that permission is not explicitly governed by this rule.
- Set only the permissions this rule actually needs to control. Granting Full Control when only Read access was intended defeats the purpose of granular control.
Path: Console / File Access Control / Create File Access Control Policies / Action 1 / Permissions
Console: permission matrix (example)
| Permission | Allow | Deny |
|---|---|---|
| Read | Checked | - |
| Write | - | Checked |
| Execute | - | - |
| Modify | - | Checked |
| Full Control | - | Checked |
Result: A precise permission set for this principal and target, explicit about what's allowed and what's explicitly denied, rather than left to inherited defaults.
Best practice: An explicit Deny always overrides an Allow for the same principal, the standard behavior for layered permission systems. Use Deny deliberately, not as a default, since it can override an Allow granted elsewhere for the same account or a group it belongs to.
Step 6: Add additional access control actions
Extend the policy with more than one target/principal/permission combination when a single rule isn't enough.
Instructions
- Select + Add Access Control Action to append a new action, e.g. Action 2.
- Configure its Target Type, Path, User/Group Principal, Action, and Permissions independently of Action 1.
- Repeat for as many actions as the policy needs, each one a self-contained rule within the same named policy.
- Save the policy once all actions are configured.
Path: Console / File Access Control / Create File Access Control Policies / + Add Access Control Action
Result: A single policy now enforces multiple, independent file access rules, deployed and tracked together as one unit.
Pro tip: Group related rules into one policy (e.g. all rules protecting a specific application's data folder) rather than creating many single-action policies. It keeps deployment and later auditing simpler.
Step 7: Deploy the File Access Control policy
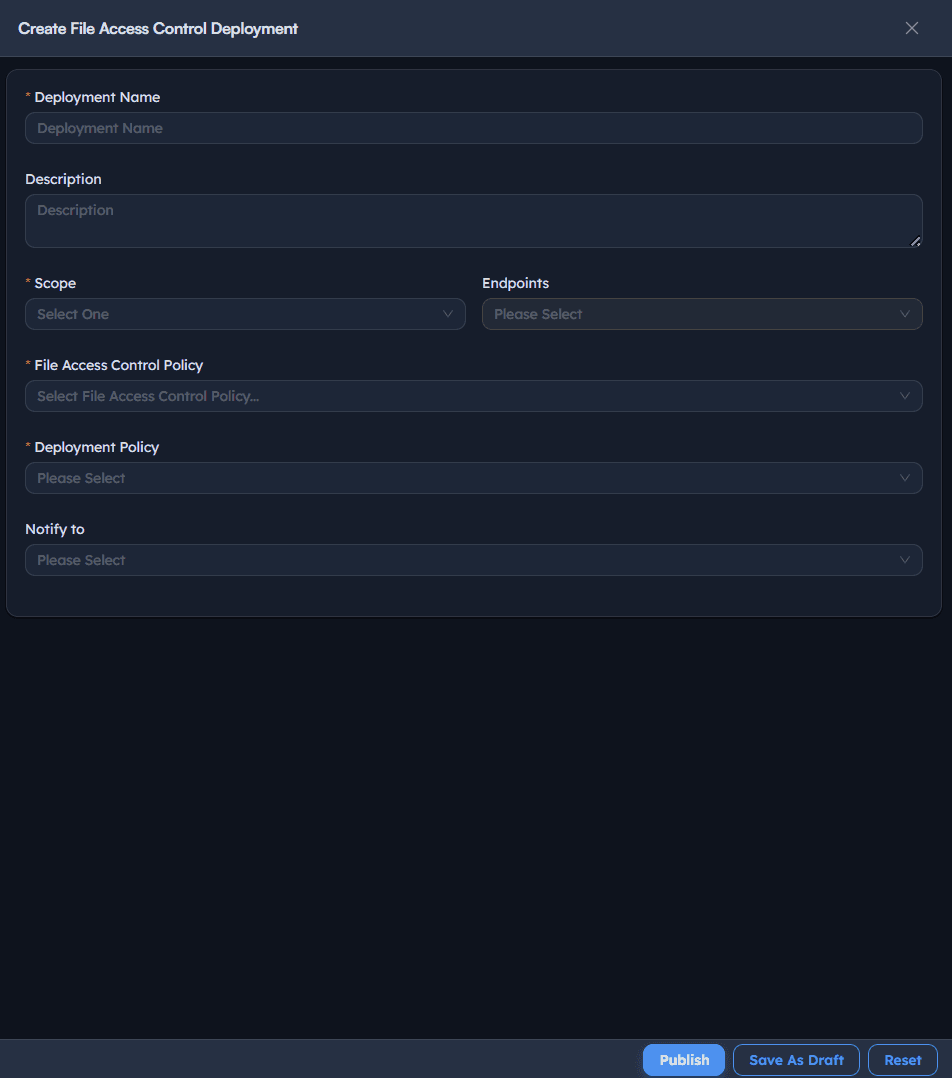
Bind the policy to specific endpoints so it's actually installed and enforced.
Instructions
- Go to Deployments → Create File Access Control Deployment.
- Enter a Deployment Name, e.g. File Access.
- Add an optional Description.
- Set Scope Endpoints to
All Endpoints,Specific Endpoints,Specific Departments,Specific Locations, orWindows, and select the target accordingly. - Set File Access Control Policy to the policy created in Steps 2 through 6, e.g.
File Control. - Set Deployment Policy, e.g.
OOB Instant deployment policy(typeInstant). - Optionally set Notify to for completion alerts.
- Select Publish.
Path: Console / File Access Control / Deployments / Create File Access Control Deployment
Console: deployment definition
| Field | Value |
|---|---|
| Deployment Name | File Access |
| Scope Endpoints | Specific Endpoints: <ENDPOINT-HOSTNAME> |
| File Access Control Policy | File Control |
| Deployment Policy | OOB Instant deployment policy (Instant) |
Result: A task is created (e.g. ADR-071: File Control) with type Install, visible under the deployments list with an initial stage of Initiated.
Warning: Confirm Scope Endpoints matches the population this permission structure is actually meant to govern. A Deny rule on a shared resource deployed too broadly can lock out accounts that legitimately needed access.
Step 8: Monitor the deployment
Track the deployment from initiation through completion across the deployments list.
Instructions
- Go to Deployments to see all File Access Control deployments with their Type (
Install), Stage (Initiated,Completed), Progress, and Policy. - Open the specific deployment task to see its per-endpoint Status and Last Updated time.
Path: Console / File Access Control / Deployments
Result: A live view of the rollout, endpoint by endpoint, before treating the permission structure as fully in effect.
Step 9: Confirm task success per endpoint
Verify the policy actually installed successfully, rather than assuming a completed deployment stage means every endpoint succeeded individually.
Instructions
- Open the deployment task, e.g. ADR-071: File Control.
- Review each row: Endpoint Name, Status, and Last Updated.
- Confirm Status reads
Successfor every targeted endpoint before considering the rollout complete.
Path: Console / File Access Control / Deployments / <Task>
Result: Endpoint-level confirmation that the permission structure was actually applied, the evidence behind the deployment's overall completed stage.
Best practice: A deployment stage of Completed describes the task lifecycle, not necessarily a uniform Success across every endpoint. Always check individual endpoint status before treating a rollout as fully verified.
Step 10: Review and maintain policies over time
Revisit existing policies periodically, since a permission structure that was correct at creation can become stale as accounts, groups, or folder structures change.
Instructions
- Return to the policy list and review each policy's actions: target paths still exist and are still correct, and principal names still refer to active accounts or groups.
- Confirm Apply On Startup is set deliberately for each policy, on for permissions that must persist through drift, off for one-time provisioning rules that shouldn't keep reasserting.
- Re-deploy a policy after any edit to its actions, since a policy change alone doesn't retroactively update endpoints that already received an earlier version.
Path: Console / File Access Control / Create File Access Control Policies (review/edit)
Result: A permission structure that stays accurate as the environment changes, instead of one that was correct only on the day it was first deployed.
Best practices for file access control
| Practice | Why it matters | Recommended setting |
|---|---|---|
| Verify path and principal on a real endpoint | Typos here produce a policy that deploys successfully but enforces nothing | Confirm before authoring, not after a failed audit |
| Set only the permissions you mean to govern | Bundled access levels obscure intent and make later audits harder | Explicit Allow/Deny per permission, not a blanket level |
| Use Deny deliberately | An explicit Deny overrides an Allow for the same principal | Reserve Deny for rules that must win over any inherited Allow |
| Group related actions into one policy | Keeps deployment and audit trail coherent for a related set of rules | One policy per protected resource or application, not per rule |
| Use Apply On Startup for persistent rules | Reasserts the permission structure against drift or local changes | On for anything meant to be durable, off for one-time provisioning |
| Check per-endpoint task status | A Completed deployment stage isn't the same as a Success on every endpoint | Review the task's endpoint list before considering it verified |
| Re-deploy after policy edits | Existing endpoints don't retroactively receive a policy change | Publish a new deployment any time an action is modified |
Troubleshooting: common issues and resolutions
| Issue | Cause | Resolution |
|---|---|---|
| Deployment reports Success but permissions unchanged | Target Path or User/Group Principal was typed incorrectly and didn't match a real object | Verify the exact path and principal on the target endpoint, correct the policy, and redeploy |
| An account still has access despite an explicit Deny | Deny was set on a group the account belongs to indirectly, but a more specific Allow elsewhere is being evaluated first | Confirm the Deny targets the correct principal, direct account or the right group, and covers the same permission |
| Policy stopped working after a folder was moved or recreated | Path in the policy no longer matches the actual current location | Update the Action's Path and redeploy the policy |
| Startup reassertion causes a permission to keep reappearing unexpectedly | Apply On Startup is enabled on a policy meant to be a one-time provisioning rule | Disable Apply On Startup for policies that shouldn't persistently reassert |
| Task shows Initiated indefinitely | Endpoint is offline or the agent isn't reporting | Confirm agent health on the target endpoint before expecting the task to progress |
| Multiple actions in one policy conflict with each other | Two actions target overlapping paths or principals with contradictory Allow/Deny settings | Review all actions in the policy together, not just the one most recently edited |
Frequently asked questions
Append adds this rule alongside any existing permissions already present on the target, rather than replacing the entire permission set. This is generally safer for shared resources where other legitimate entries may already exist.
Yes, for the same principal and permission, an explicit Deny takes precedence over an Allow, including an Allow the account might otherwise have through group membership. Use Deny deliberately since it can override access granted elsewhere.
A File target applies only to that specific file. A Folder target applies to everything beneath it, including files added after the policy was created, so confirm that broader scope is actually intended.
No. Enable it for permission structures that must persist and resist drift. Leave it off for one-time provisioning rules that shouldn't keep reapplying every time the endpoint starts.
Yes, via multiple Access Control Actions within the same policy. It's generally clearer to group related rules, protecting the same resource or application, into one policy rather than mixing unrelated targets together.
Yes. Editing a policy's actions doesn't retroactively update endpoints that already received an earlier version. Publish a new deployment referencing the updated policy to apply the change.