


How to Configure Appearance Management
Centrally configure wallpaper, screensaver, and desktop preferences, deploy them to selected endpoints, and verify successful application with detailed execution logs.
How to Configure Appearance Management
Overview:
Why a display policy needs more than just a name and a picture
Desktop appearance looks like a cosmetic concern until it isn't - a screensaver that never locks, a wallpaper that leaks internal information in a screenshot, or a "My Computer" label that doesn't match asset-naming standards all become small but recurring support tickets. Setting these by hand on each machine doesn't scale, and there's no single place to confirm they're actually consistent across the fleet.
Appearance Management turns those individual desktop settings into one policy: wallpaper behavior, screensaver file and timeout, logon-resume behavior, and a set of general settings (renaming My Computer/My Network Places, font DPI, Windows Welcome, IntelliMouse tips, the My Documents icon). Like other Device Control modules, the policy only takes effect once deployed to a scope of endpoints, and every deployment breaks down into a per-endpoint task with a full execution log.
This guide walks the full workflow end to end: opening Appearance Management, creating a display policy with a custom screensaver, deploying that policy to specific endpoints, and confirming from the task output that every individual setting was actually applied.
- One policy, several setting groups: Wallpaper Settings, Screensaver Settings, and General Settings are configured together in a single Display Policy.
- Retain Existing is the safe default: nearly every field defaults to Retain Existing, so a policy only changes what you deliberately configure.
- Custom screensaver upload: the Screensaver Settings support uploading a
.scrfile directly, rather than only picking from what's already on the endpoint. - Deployment requires confirmation: publishing a deployment prompts a yes/no confirmation before it goes live, reducing the chance of an accidental rollout.
- Full per-setting execution log: the task output reports each setting group (wallpaper, screensaver, general settings) individually, not just a single pass/fail result for the whole policy.
Prerequisites
Confirm these before creating a display policy. An unconfirmed screensaver file format or a Configuration Level mismatch are common reasons a policy deploys without producing the expected visual result.
- Administrator access: your account holds a role permitted to manage the Device Control -> Appearance Management module.
- Agent installed and reporting: the endpoint agent is installed, registered, and reporting healthy on every target device.
- Screensaver file ready, if used: have the
.scrfile available locally before starting - only one file can be uploaded per policy. - Endpoint scope identified: know which specific endpoints, department, location, or platform this policy should be deployed to before publishing the deployment.
Architecture: how a display policy reaches an endpoint
A display policy defines wallpaper, screensaver, and general desktop settings together. A policy deployment binds that policy to a scope of endpoints. The endpoint agent applies each setting group and reports back a per-task status and log.
| Stage | Component | Role |
|---|---|---|
| Definition | Display Policy | Name, Configuration Level, wallpaper/screensaver/general settings |
| Binding | Policy Deployment | Scope, endpoints, selected display policy, deployment policy, optional notification |
| Execution | Endpoint agent | Applies each setting group in sequence, reports per-endpoint task status |
| Proof | Task Status and Output | Per-endpoint Success status with a timestamped, per-setting execution log |
Pro tip: Confirm before you deploy is easy to skim past - Appearance Management's Publish flow asks you to explicitly confirm the deployment name before it runs, which is a good moment to double check the scope and screensaver file you actually selected.
Step 1: Open Appearance Management
Get oriented in Device Control before creating anything, so you know where display policies and deployments each live.
Instructions
- From the main console, go to Endpoints -> Device Control.
- Under Endpoint Configuration, select the Appearance Management card - "Enforces appearance policies such as themes, wallpapers, lock screens, and visual preferences across managed devices."
- Note the sections in the left sidebar: Display Policies and Policy Deployments.
Path: Console / Endpoints / Device Control / Appearance Management
Result: You're in the Appearance Management module with visibility into any existing display policies before authoring a new one.
Step 2: Create a display policy
Define the policy identity, then configure wallpaper, screensaver, and general desktop settings.
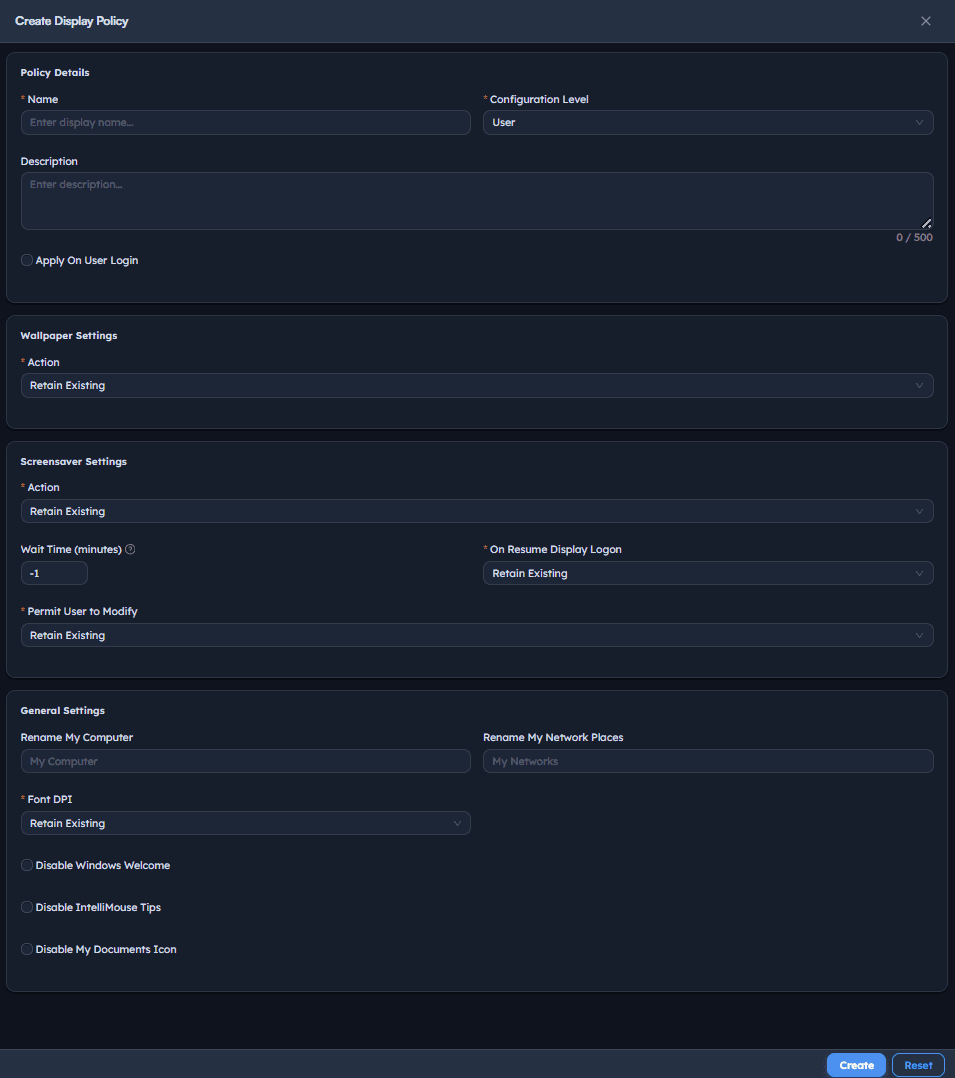
Instructions
- Go to Display Policies -> Create.
- Enter a Name describing the policy's intent, e.g. Set screensaver.
- Add an optional Description.
- Set Configuration Level (e.g.
User). - Optionally check Apply On User Login.
- Under Wallpaper Settings, set Action (e.g. leave as
Retain Existingto make no change). - Under Screensaver Settings, set Action to
Retain ExistingorNew. - If
New, upload a Screensaver File (.scrformat, one file maximum), set Wait Time (minutes), On Resume Display Logon, and Permit User to Modify. - Under General Settings, optionally set Rename My Computer, Rename My Network Places, Font DPI, and the Disable Windows Welcome, Disable IntelliMouse Tips, and Disable My Documents Icon checkboxes.
- Select Create.
Path: Console / Device Control / Appearance Management / Display Policies / Create
Console: policy definition
| Field | Value |
|---|---|
| Name | Set screensaver |
| Configuration Level | User |
| Wallpaper Settings - Action | Retain Existing |
| Screensaver Settings - Action | New |
| Screensaver File | Aerial.scr |
| Wait Time (minutes) | 5 |
| On Resume Display Logon | Show |
| Permit User to Modify | Yes |
| Font DPI | Retain Existing |
Result: A display policy exists in the list alongside any existing ones (e.g. a prior Display Setting policy at the User configuration level). It has no targets yet - those are set in the deployment step.
Important: Nearly every field defaults to Retain Existing, meaning the policy makes no change to that particular setting on the endpoint. Only fields you explicitly change (like Screensaver Settings' Action set to New) actually modify anything - this is what keeps a policy from silently overwriting settings you didn't intend to touch.
Step 3: Deploy the display policy to endpoints
Bind the policy to a scope of endpoints so it's actually applied, rather than just defined.
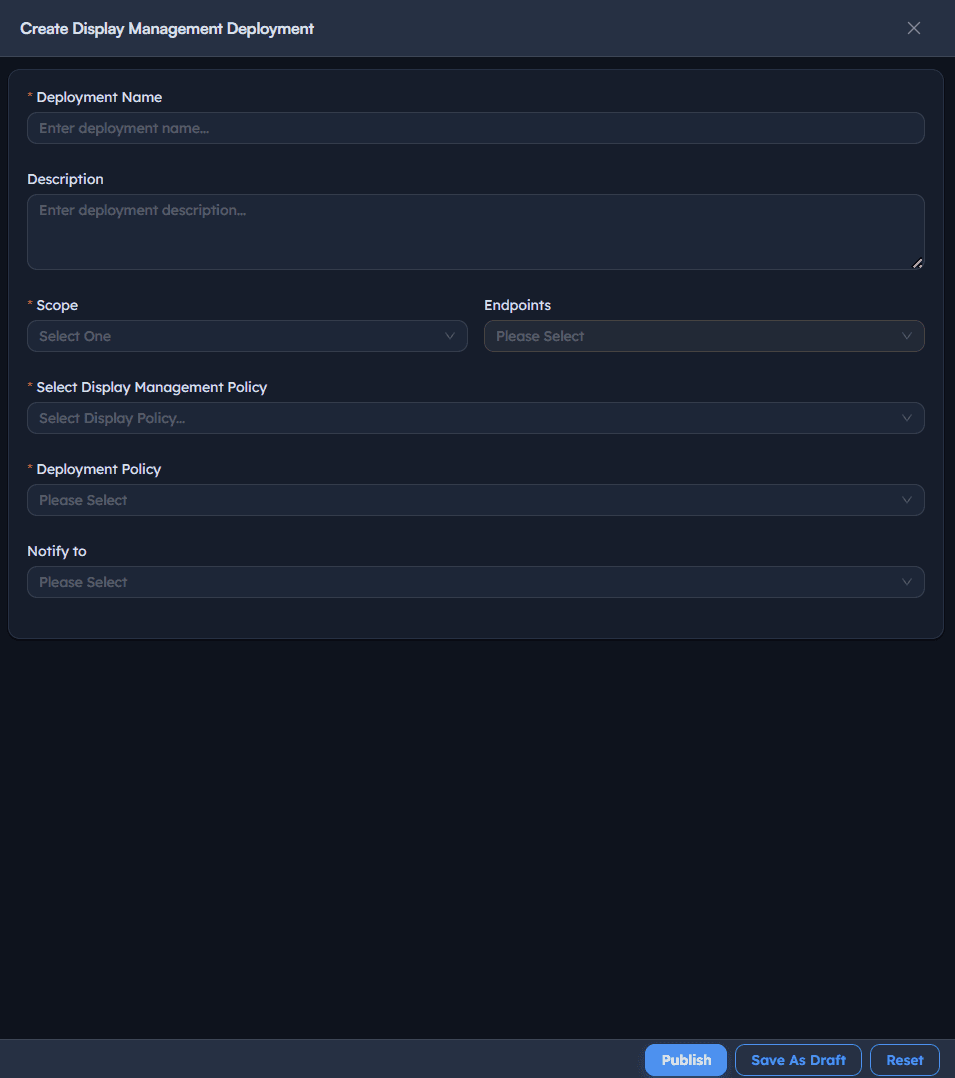
Instructions
- Go to Policy Deployments -> Create.
- Enter a Deployment Name, e.g. Set screensaver.
- Add an optional Description.
- Set Scope to
All Endpoints,Specific Endpoints,Specific Departments,Specific Locations, orWindows. - If Specific Endpoints, select the target Endpoints from the list.
- Set Select Display Management Policy to the policy created in Step 2.
- Set Deployment Policy (e.g.
OOB Instant deployment policy, typeInstant). - Optionally set Notify to for completion alerts.
- Select Publish, then confirm the deployment name in the prompt (or Save As Draft to finish later).
Path: Console / Device Control / Appearance Management / Policy Deployments / Create
Console: deployment definition
| Field | Value |
|---|---|
| Deployment Name | Set screensaver |
| Scope | Specific Endpoints: <ENDPOINT-HOSTNAME> |
| Select Display Management Policy | Set screensaver |
| Deployment Policy | OOB Instant deployment policy (Instant) |
Result: A deployment task is created (e.g. ADR-270: Set screensaver) with stage Completed and progress 1/1, visible in the Policy Deployments list alongside prior deployments.
Warning: Publish triggers a confirmation dialog asking "Are you sure you want to Publish Deployment: <name>?" - it's a genuine safeguard, not a formality, especially when Scope is set broadly (All Endpoints or Windows).
Step 4: Confirm the deployment with per-endpoint task status
Verify the deployment actually reached the endpoint and succeeded, rather than assuming from the deployment stage alone.
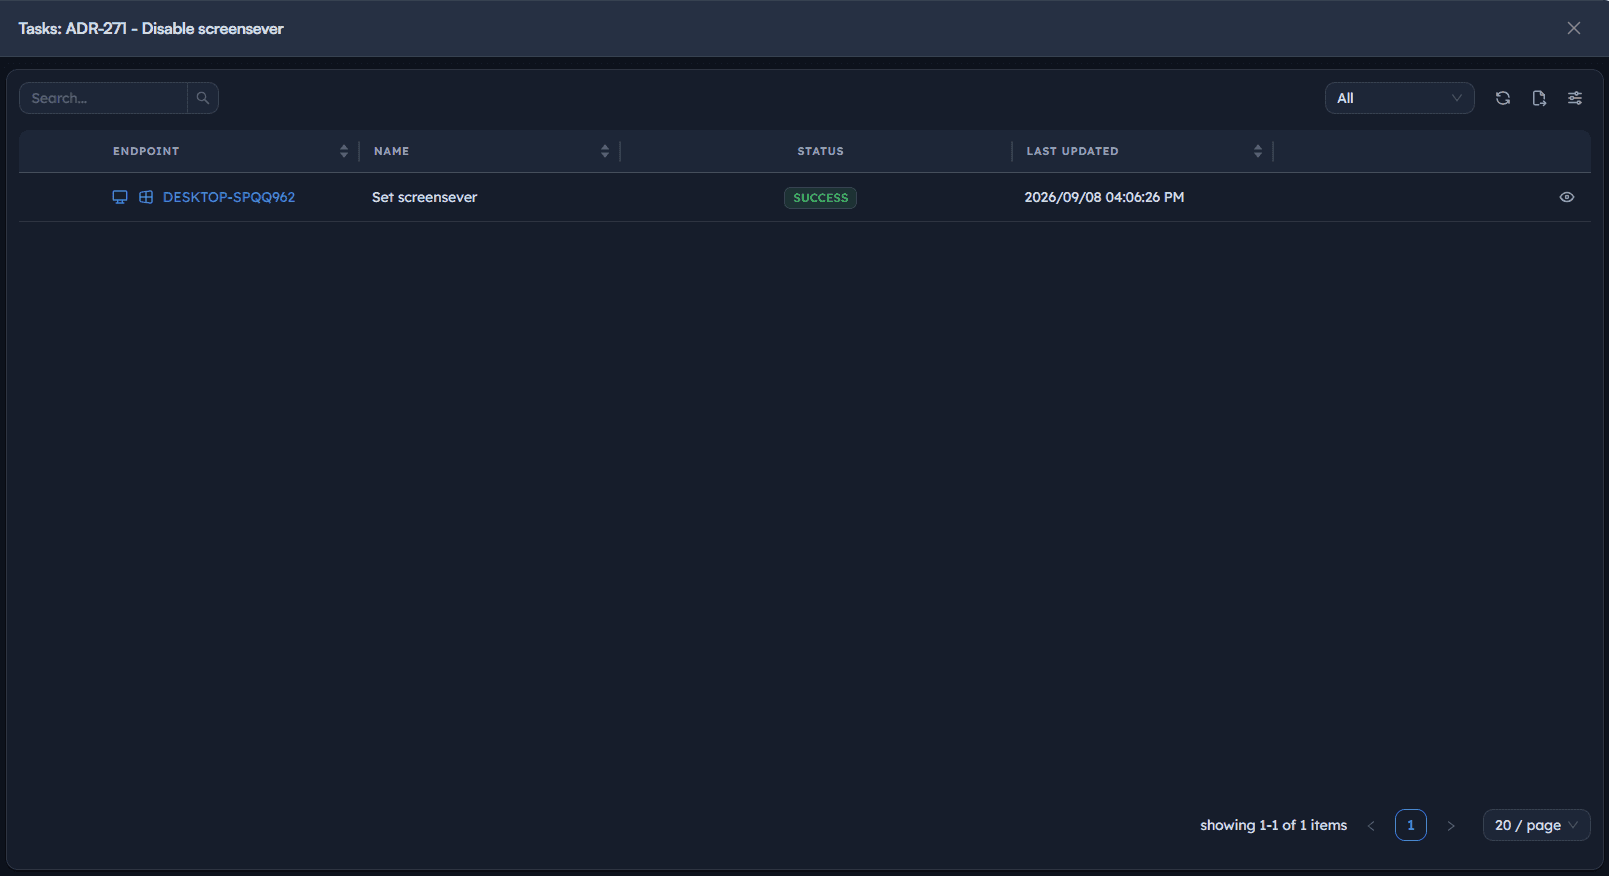
Instructions
- Go to Policy Deployments to see every deployment with its Type (
Install), Stage (Completed), Progress, and Policy. - Select the view icon on a deployment row to open its Tasks panel, showing Endpoint, Name, Status, and Last Updated.
- Confirm the Status shows
Successfor the target endpoint.
Path: Console / Device Control / Appearance Management / Policy Deployments
Console: task status
| Endpoint | Name | Status | Last Updated |
|---|---|---|---|
| <ENDPOINT-HOSTNAME> | Set screensaver | SUCCESS | 2026/09/08 04:05:36 PM |
Result: Confirmation that the deployment is not just Completed at the task level, but actually Success at the individual endpoint level.
Step 5: Review the per-setting execution output
Confirm exactly which settings were applied, retained, or skipped, rather than relying on the overall status alone.
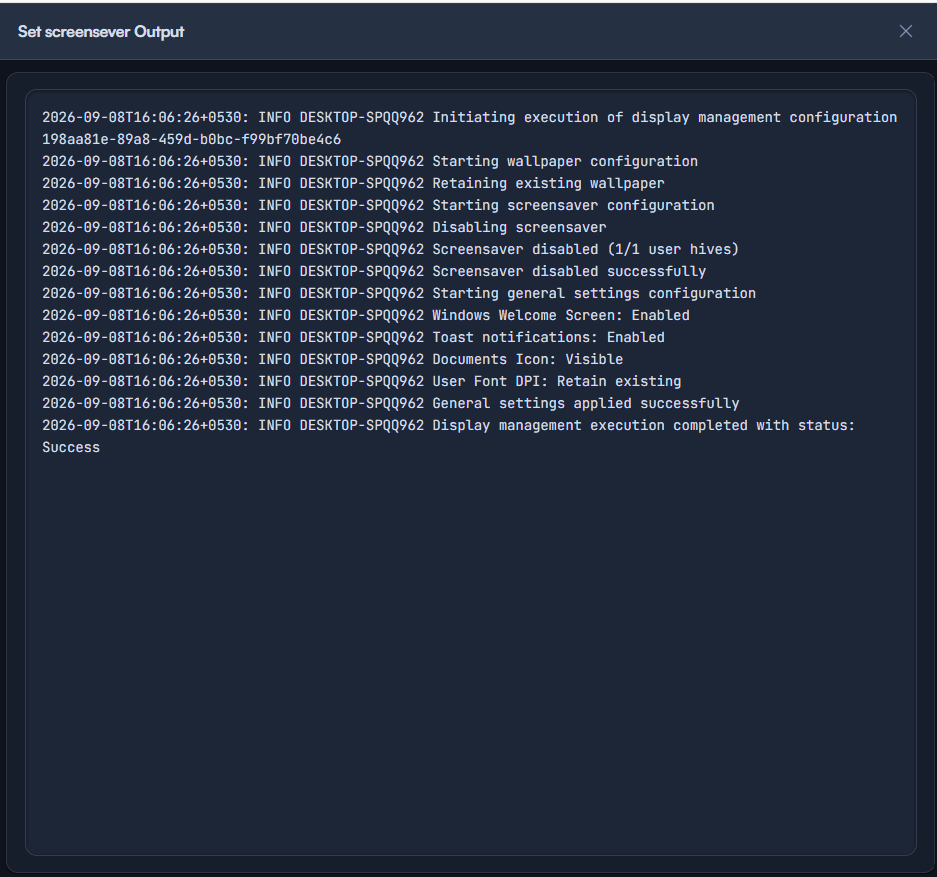
Instructions
- From the Tasks panel, select the task row to open its Output view.
- Review the timestamped log lines, grouped by setting area: wallpaper configuration, screensaver configuration (including file download and path placement), and general settings.
- Confirm the summary line reports the overall execution as
Success.
Path: Console / Device Control / Appearance Management / Policy Deployments / Tasks / Output
Result: Evidence-backed confirmation of exactly what changed on the endpoint (a new screensaver, a specific wait time) and what was deliberately left alone (the existing wallpaper, existing font DPI) - not just a single pass/fail flag for the whole policy.
Best practices for appearance management
| Practice | Why it matters | Recommended setting |
|---|---|---|
| Leave unrelated settings on Retain Existing | Prevents a policy meant for one setting (e.g. screensaver) from silently overwriting others | Only change the Action fields you actually intend to modify |
| Set a deliberate Wait Time for new screensavers | A default or forgotten wait time can leave a machine unlocked far longer than intended | Set an explicit, policy-appropriate number of minutes |
| Use Specific Endpoints while validating a new policy | A broad scope makes it harder to confirm the visual result before wider rollout | Test on a small set of endpoints first, then expand |
| Read the confirmation prompt on Publish | It's the last checkpoint before a live rollout, not just a formality | Confirm the deployment name and scope match your intent |
| Check the per-setting Output, not just Status | Success at the task level doesn't show which individual settings changed vs. were retained | Open Output whenever validating a new or unusual policy |
| Only allow user modification when appropriate | Permit User to Modify set to Yes lets end users override the screensaver you deployed | Set to No for compliance-driven screensavers, Yes for general preference policies |
Troubleshooting: common issues and resolutions
| Issue | Cause | Resolution |
|---|---|---|
| Deployment shows Success but the screensaver didn't change | Screensaver Settings Action was left at Retain Existing instead of New | Re-open the policy and confirm Action is set to New with a file uploaded |
| Screensaver file upload is rejected | File isn't in .scr format, or more than one file was selected | Confirm the file extension and that only a single file is uploaded |
| Task Status shows Failed | Agent lost connectivity mid-deployment, or the screensaver file failed to download | Confirm agent health and re-check the Output log for the specific failure point |
| Publish confirmation doesn't appear | The deployment was saved as a draft instead of published | Reopen the draft from Policy Deployments and select Publish |
| Users can still change the screensaver after deployment | Permit User to Modify was set to Yes | Set Permit User to Modify to No and redeploy |
| Policy shows in Display Policies but never appears in a deployment | The policy was created but never selected in a Policy Deployment | Create a deployment and select the policy under Select Display Management Policy |
Frequently asked questions
No. The policy only takes effect once deployed through a Policy Deployment to a chosen scope of endpoints.
It means the policy makes no change to that particular setting on the endpoint - the current configuration stays as-is, even though the field is part of the policy.
The Screensaver File field accepts .scr files, with a maximum of one file per policy.
Open the deployment's Tasks panel and check the Status column for that endpoint, then open the task's Output for a full, per-setting execution log.
It determines whether the end user is allowed to change the screensaver setting themselves after the policy is applied. Set it to No to enforce the deployed screensaver.
Publish creates an active deployment that runs immediately against the selected endpoints, after a confirmation prompt. Save As Draft stores the configuration without deploying it, useful when a deployment needs review before going live.